|
Test scope |
Test connection |
Test condition |
Nominal value |
Possible cause/Remedy |
| 1.0 |
Left front door (VL)
Pressure supply |
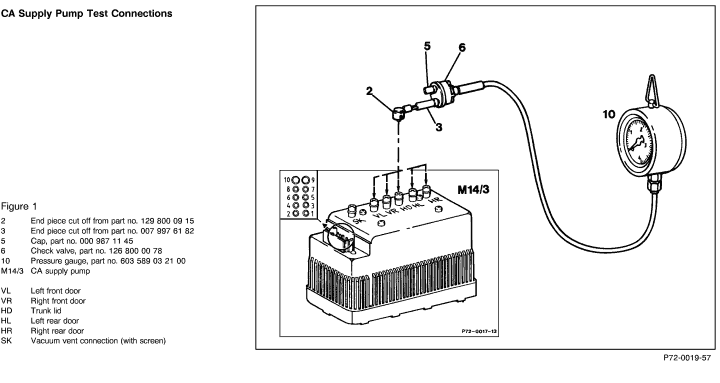
CA supply pump (M14/3) connection
VL (Figure 1) |
Using open end wrench, disconnect
connection
VL from M14/3.
Connect pressure gauge according to connection diagram (Figure 1).
Close left front door past the second detent.
|
>2 bar |
M14/3 (SMS, Repair Instructions,
Job No. 72-262),
Clogged vent line SK )if vent line was left on pump). |
| 2.0 |
Left front door (VL)
Pneumatic actuator
Pneumatic lines |
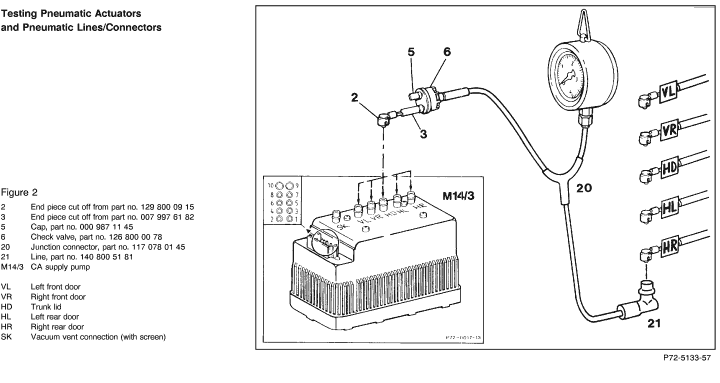
CA supply pump (M14/3) connection
VL (Figure 2) |
Connect pneumatic test line according
to connection diagram
(Figure 2).
Close left front door past the second detent.
|
Door must close by itself, wait 10
seconds >2 bar
Pressure drop  100 mbar in 1 minute. 100 mbar in 1 minute.
|
Pneumatic actuator or line leaking
or kinked (SMS, Repair Instructions, Job No. 72-266),
Clogged vent line SK (if vent line was left on pump). |
| 3.0 |
Left front door (VL)
Pneumatic actuator |
CA supply pump (M14/3) connection
VL (Figure 3) |
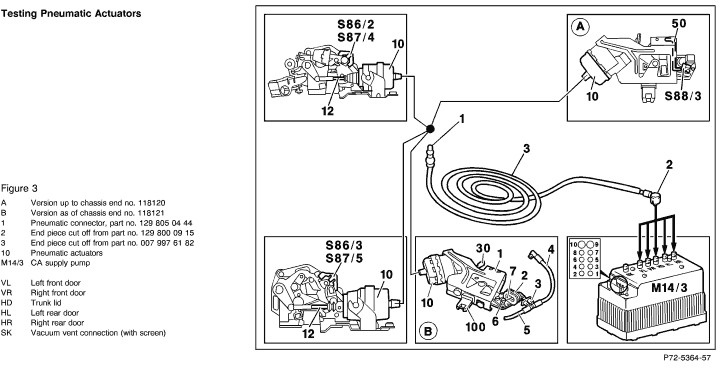
Pull pneumatic line off actuator.
Connect pneumatic test line according to connection diagram
(Figure 3).
Close left front door past the second detent.
|
Actuator must latch the door. |
Pneumatic actuator leaking. |
| 4.0 |
Right front door (VR)
Pressure supply |
CA supply pump (M14/3) connection
VR (Figure 1) |
Using open end wrench, disconnect
connection
VR from M14/3. Connect pressure gauge according to connection diagram (Figure
1).
Close right front door past the second detent.
|
>2 bar |
M14/3 (SMS, Repair Instructions,
Job No. 72-262),
Clogged vent line SK (if vent line was left on pump). |
| 5.0 |
Right front door (VR)
Pneumatic actuator
Pneumatic lines |
CA supply pump (M14/3) connection
VR (Figure 2) |
Connect pneumatic test line according
to connection diagram
(Figure 2).
Close right front door past the second detent.
|
Door must close by itself, wait 10
seconds >2 bar
Pressure drop 100 mbar in 1 minute.
|
Pneumatic actuator or line leaking
or kinked (SMS, Repair Instructions, Job No. 72-266),
Clogged vent line SK (if vent line was left on pump). |
| 6.0 |
Right front door (VR)
Pneumatic actuator |
CA supply pump (M14/3) connection
VR (Figure 3) |
Pull pneumatic line off actuator.
Connect pneumatic test line according to connection diagram
(Figure 3).
Close right front door past the second detent.
|
Actuator must latch the door. |
Pneumatic actuator leaking. |
| 7.0 |
Left rear door (HL)
Pressure supply |
CA supply pump (M14/3) connection
HL (Figure 1) |
Using open end wrench disconnect
connection
HL from M14/3.
Connect pressure gauge according to connection diagram (Figure 1).
Close left rear door past the second detent.
|
>2 bar |
M14/3 (SMS, Repair Instructions,
Job No. 72-262),
Clogged vent line SK (if vent line was left on pump). |
| 8.0 |
Left rear door (HL)
Pneumatic actuator
Pneumatic lines |
CA supply pump (M14/3) connection
HL (Figure 2) |
Connect pneumatic test line according
to connection diagram
(Figure 2).
Close left rear door past the second detent.
|
Door must close by itself, wait 10
seconds >2 bar
Pressure drop 100 mbar in 1 minute.
|
Pneumatic actuator or line leaking
or kinked (SMS, Repair Instructions, Job No. 72-266),
Clogged vent line SK (if vent line was left on pump). |
| 9.0 |
Left front door (HL)
Pneumatic actuator |
CA supply pump (M14/3) connection
HL (Figure 3) |
Connect pneumatic line according
to connection diagram (Figure 3).
Close left rear door past the second detent.
|
Actuator must latch the door. |
Pneumatic actuator leaking. |
| 10.0 |
Right rear door (HR)
Pressure supply |
CA supply pump (M14/3) connection
HR (Figure 1) |
Using open end wrench, disconnect
connection
HR from M14/3.
Connect pressure gauge according to connection diagram (Figure 1).
Close right rear door past the second detent.
|
>2 bar |
M14/3 (SMS, Repair Instructions,
Job No. 72-262),
Clogged vent line SK (if vent line was left on pump). |
| 11.0 |
Right rear door (HR)
Pneumatic actuator
Pneumatic lines |
CA supply pump (M14/3) connection
HR (Figure 2) |
Pull pneumatic line off actuator.
Connect pneumatic test line (HR) according to connection diagram
(Figure 2).
Close right rear door past the second detent.
|
Door must close by itself, wait 10
seconds >2 bar
Pressure drop 100 bar in 1 minute. |
Pneumatic actuator or line leaking
or kinked (SMS, Repair Instructions, Job No. 72-266),
Clogged vent line SK (if vent line was left on pump). |
| 12.0 |
Right rear door (HR)
Pneumatic actuator |
CA supply pump (M14/3) connection
HR (Figure 3) |
Pull pneumatic line off actuator.
Connect pneumatic test line according to connection diagram
(Figure 3).
Close right rear door past the second detent.
|
Actuator must latch the door. |
Pneumatic actuator leaking. |
| 13.0 |
Trunk lid (HD)
Pressure supply |
CA supply pump (M14/3) connection
HD (Figure 1) |
Using open end wrench, disconnect
connection
HD from M14/3.
Connect pressure gauge according to connection diagram (Figure 1).
Manually close latch (lower part). |
>2 bar |
M14/3 (SMS, Repair Instructions,
Job No. 72-262). |
| 14.0 |
Trunk lid (HD)
Pneumatic actuator
Pneumatic lines |
CA supply pump (M14/3) connection
HD (Figure 2) |
Pull pneumatic line off trunk lid
actuator (upper part).
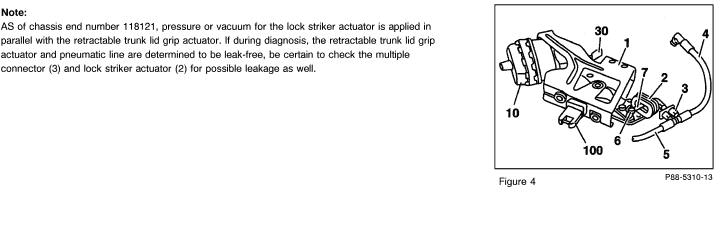
Striker tongue must be extended, if not, pull lever (50, Figure 3) to the
outside (striker tongue extends). Starting chassis end no. 118121 the activation
was modified, whereby the striker tongue is activated via the retractable
trunk lid grip.
Connect pneumatic test line according to connection diagram
(Figure 2).
Manually close latch (lower part).
|
Wait 10 seconds >2 bar
Pressure drop 100 bar in 1 minute. |
Pneumatic actuator or line leaking
or kinked (SMS, Repair Instructions, Job No. 72-266). |
| 15.0 |
Trunk lid (HD)
Pneumatic actuator |
CA supply pump (M14/3) connection
HD (Figure 3) |
Pull pneumatic line off actuator.
Connect pneumatic test line according to connection diagram
(Figure 3).
Manually close latch (lower part). |
Striker tongue retracts. |
Pneumatic actuator leaking.
|


 Printable
version
Printable
version