| Test step |
Scope of test |
Test connection |
Test condition |
Nominal value |
Possible cause/Remedy |
| 1.0 |
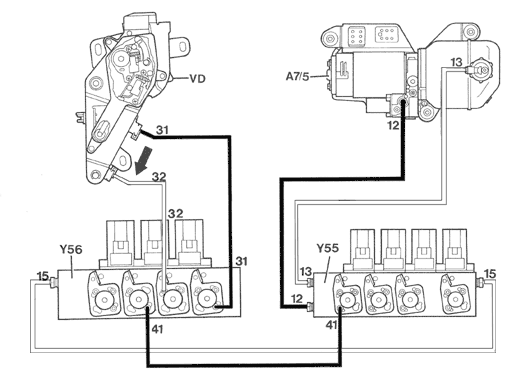
Check system pressure |
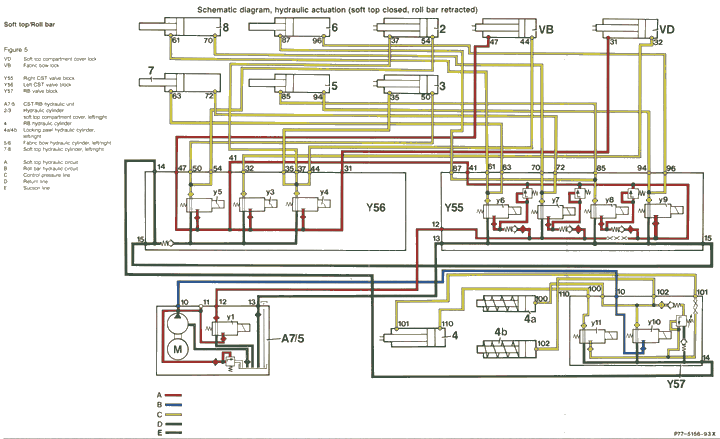
Connect pressure gauge according
to connection diagram (Figure 1). |
Soft top completely closed
Ignition: ON
Press and hold RB switch to retract roll bar. Have an assistant unplug
relay (A7/5k1, Figure 1) after 5 sec. Keep switch depressed an additional
5 sec.
Read test pressure:
Release test pressure:
Press soft top switch briefly several times.
|
120 - 195 bar |
<120 bar:
 2.0.
2.0. |
| 2.0 |
Test hydraulic unit |
Connect pressure gauge according
to connection diagram (Figure 1).
Disconnect hydraulic line no. 10, 12 (Figure 1) close off using plug
129 589 00 91 02/03. |
Soft top completely closed
Ignition: ON
Press and hold RB switch to retract roll bar. Have an assistant unplug
relay (A7/5k1, Figure 1) after 5 sec. Keep switch depressed an additional
5 sec.
Read test pressure:
|
175 - 195 bar |
<175 bar:
if the pressure displayed on the pressure gauge does not drop, replace
hydraulic unit.
If the pressure displayed on the pressure gauge does drop, the Main valve
(A7/5y1, Figure 1) is leaking. |
| |
|
|
Release test pressure:
Press soft top switch briefly several times.
|
|
|
| 3.0 |
Retract roll bar
(Figure 7) |
Connect pressure gauge according
to connection diagram (Figure 1). |
Roll bar extended.
Ignition: ON
Press and hold RB switch to retract roll bar. Have an assistant unplug
relay (A7/5k1, Figure 1) after 5 sec. Keep switch depressed an additional
5 sec.
Read test pressure:
Release test pressure:
Press soft top switch briefly several times.
|
120 - 195 bar |
<120 bar:
3.1. |
| 3.1 |
Retract roll bar
(Figure 7) |
Connect pressure gauge according
to connection diagram (Figure 1).
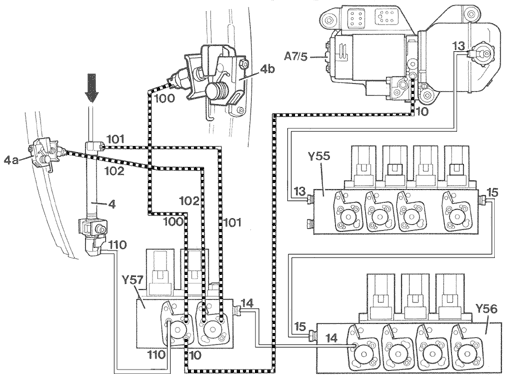
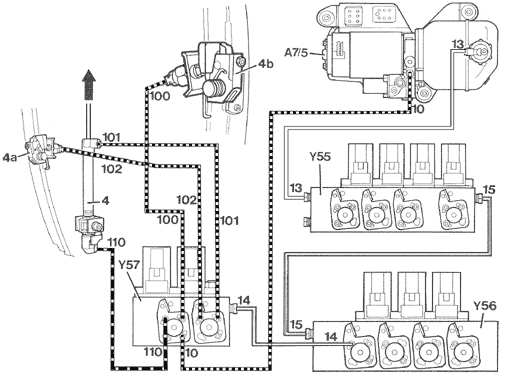
Disconnect hydraulic line No. 101, 110 from valve block (Y57, Figure 3).
Close connection with plug 129 589 00 91 01. |
Roll bar extended.
Ignition: ON
Press and hold RB switch to retract roll bar. Have an assistant unplug
relay (A7/5k1) (Figure 1) after 5 sec. Keep switch depressed an additional
5 sec.
Read test pressure:
Release test pressure:
Press soft top switch briefly several times.
|
120 - 195 bar
|
<120 bar:
Valve block (Y57, Figure 6)
Left or right locking pawl (Figure 6, Position 4a, 4b).
If nominal value is attained:
Roll bar hydraulic cylinder
(Figure 6, Position 4). |
| 4.0 |
Extend roll bar
(Figure 8) |
Connect pressure gauge according
to connection diagram (Figure 1).
Disconnect hydraulic line No. 101, 110 from valve block (Y57, Figure 3).
Close connection with plug 129 589 00 91 01. |
Roll bar retracted.
Ignition: ON
Press and hold RB switch to extend roll bar. Have an assistant unplug
relay (A7/5k1, Figure 1) after 5 sec. Keep switch depressed an additional
5 sec.
Read test pressure:
Release test pressure:
Press soft top switch briefly several times.
|
120 - 195 bar
|
<120 bar:
Valve block (Y57, Figure 6).
If nominal value is attained:
Roll bar hydraulic cylinder
(Figure 6, Position 4). |
| 5.0 |
Opening fabric bow lock (Figure
9) |
Connect pressure gauge according
to connection diagram (Figure 1).
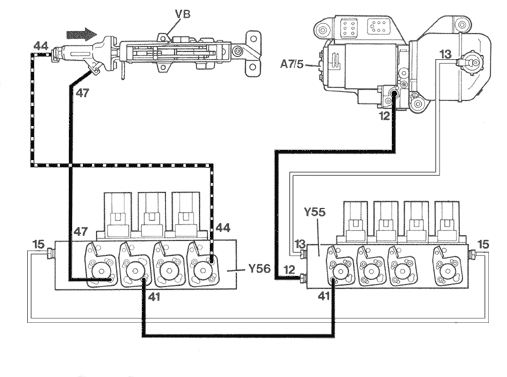
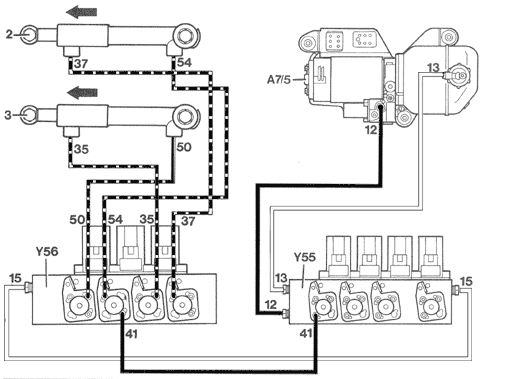
Disconnect hydraulic line no. 44, 47 from Valve block (Y56, Figure 4) close
connection using plug 129 589 00 91 01
Pull plug off valve block (Y55y7 and Y55y8, Figure 2). |
Starting position: Soft top completely
closed.
Front latches unlocked, soft top frame pushed up in front. Unscrew fabric
bow lock pins from inside vehicle, set fabric bow upright, open soft top
compartment cover. Remove trim panels in soft top compartment, soft top
compartment cover latched, fabric bow lowered.
Ignition: ON
Press and hold power soft top switch to open soft top. Have an assistant
unplug
relay (A7/5k1, Figure 1) after 5 sec. Keep switch depressed an additional
5 sec.
Read test pressure:
Release test pressure:
Press soft top switch briefly several times.
|
120 - 195 bar |
<120 bar:
5.1.
If nominal value is attained:
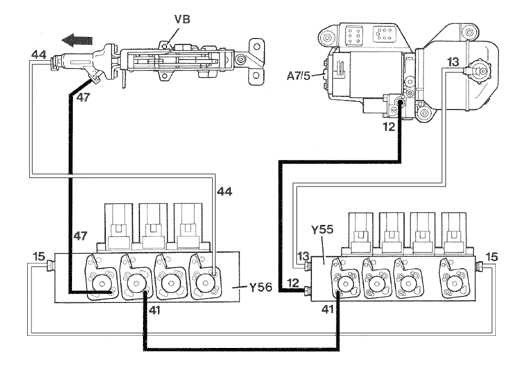
Fabric bow lock (Figure 6, Position VB). |
| 5.1 |
Opening fabric bow lock (Figure 9) |
Connect pressure gauge according
to connection diagram (Figure 1).
Disconnect hydraulic line no. 31 from valve block (Y56, Figure 4) close
connection using plug
129 589 00 91 01.
Connect hydraulic lines no. 44, 47 leave valves (Y55y7 and Y55y8) disconnected. |
Front latches unlocked, soft top
frame pushed up in front, soft top compartment cover latched, fabric bow
lowered.
Ignition: ON
Press and hold power soft top switch to open soft top. Have an assistant
unplug
relay (A7/5k1, Figure 1) after 5 sec. Keep switch depressed an additional
5 sec.
Read test pressure:
Release test pressure:
Press soft top switch briefly several times.
|
120 - 195 bar |
<120 bar:
5.2.
If nominal value is attained:
Soft top compartment cover lock hydraulic cylinder (Figure 6, Position VD). |
| 5.2 |
Opening fabric bow lock (Figure 9) |
Connect pressure gauge according
to connection diagram (Figure 1).
Disconnect hydraulic line no. 35, 37 from valve block (Y56, Figure 4), close
connection using plug 129 589 00 91 01.
Connect hydraulic line no. 31, leave valves (Y55y7 and Y55y8) disconnected. |
Front locks open, soft top closed,
front of soft top frame pushed up, soft top compartment cover locked, fabric
bow lowered.
Ignition: ON
Press and hold power soft top switch to open soft top. Have an assistant
unplug
relay (A7/5k1, Figure 1) after 5 sec. Keep switch depressed an additional
5 sec.
Read test pressure:
Release test pressure:
Press soft top switch briefly several times.
|
120 - 195 bar |
<120 bar:
5.4.
If nominal value is attained:
5.3. |
| 5.3 |
Opening fabric bow lock (Figure 9) |
Connect pressure gauge according
to connection diagram (Figure 1).
Connect hydraulic line no. 35, leave valves (Y55y7 and Y55y8) disconnected. |
Front locks open, soft top closed,
front of soft top frame pushed up, soft top compartment cover locked, fabric
bow lowered.
Ignition: ON
Press and hold power soft top switch to open soft top. Have an assistant
unplug
relay (A7/5k1, Figure 1) after 5 sec. Keep switch depressed an additional
5 sec.
Read test pressure:
Release test pressure:
Press soft top switch briefly several times.
|
120 - 195 bar |
<120 bar:
Left soft top compartment cover hydraulic cylinder (Figure 6, Position 2).
If nominal value is attained:
Right soft top compartment cover hydraulic cylinder (Figure 6, Position
3). |
| 5.4 |
Opening fabric bow lock (Figure 9) |
Connect pressure gauge according
to connection diagram (Figure 1).
Disconnect hydraulic line no. 41 from valve block (Y55, Figure 2), close
connection using plug
129 589 00 91 01.
Connect hydraulic line no. 35, 37, leave valves (Y55y7 and Y55y8) disconnected. |
Front locks open, soft top closed,
front of soft top frame pushed up, soft top compartment cover locked, fabric
bow lowered.
Ignition: ON
Press and hold power soft top switch to close soft top. Have an assistant
unplug
relay (A7/5k1, Figure 1) after 5 sec. Keep switch depressed an additional
5 sec.
Read test pressure:
Release test pressure:
Press soft top switch briefly several times.
|
120 - 195 bar |
<120 bar:
Valve block (Y55, Figure 6).
If nominal value is attained:
Valve block (Y56, Figure 6). |
| 6.0 |
Raising fabric bow
(Figure 10) |
Connect pressure gauge according
to connection diagram (Figure 1).
Disconnect hydraulic line no. 41 from valve block (Y55, Figure 2) close
connection using plug
129 589 00 91 01.
Disconnect plug from valve (Y55y7). |
Front locks open, soft top closed,
front of soft top frame pushed up, soft top compartment cover locked, fabric
bow raised.
Ignition: ON
Press and hold power soft top switch to open soft top. Have an assistant
unplug
relay (A7/5k1, Figure 1) after 5 sec. Keep switch depressed an additional
5 sec.
Read test pressure:
Release test pressure:
Press soft top switch briefly several times.
|
120 - 195 bar |
<120 bar:
6.1.
If nominal value is attained:
5.0. |
| 6.1 |
Raising fabric bow
(Figure 10) |
Connect pressure gauge according
to connection diagram (Figure 1).
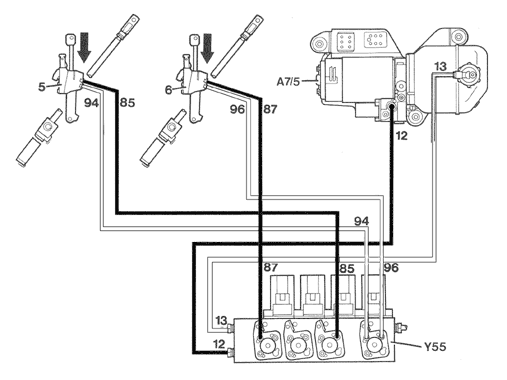
Disconnect hydraulic line no. 85, 87 from valve block (Y55, Figure 2), close
connection using plug 129 589 00 91 01.
Leave valve (Y55y7) and hydraulic line no. 41 disconnected. |
Front locks open, soft top closed,
front of soft top frame pushed up, soft top compartment cover locked, fabric
bow raised.
Ignition: ON
Press and hold power soft top switch to open soft top. Have an assistant
unplug
relay (A7/5k1, Figure 1) after 5 sec. Keep switch depressed an additional
5 sec.
Read test pressure:
Release test pressure:
Press soft top switch briefly several times.
|
120 - 195 bar |
<120 bar:
Valve block (Y55, Figure 6).
If nominal value is attained:
6.2. |
| 6.2 |
Raising fabric bow (Figure 10) |
Connect pressure gauge according
to connection diagram (Figure 1).
Connect hydraulic line no. 85, leave no. 41 and valve (Y55y7) disconnected. |
Front locks open, soft top closed,
front of soft top frame pushed up, soft top compartment cover locked, fabric
bow raised.
Ignition: ON
Press and hold power soft top switch to open soft top. Have an assistant
unplug
relay (A7/5k1, Figure 1) after 5 sec. Keep switch depressed an additional
5 sec.
Read test pressure:
Release test pressure:
Press soft top switch briefly several times.
|
120 - 195 bar |
<120 bar:
Left fabric bow hydraulic cylinder
(Figure 6, Position 5).
If nominal value is attained:
Right fabric bow hydraulic cylinder
(Figure 6, Position 6). |
| 7.0 |
Unlocking soft top compartment
cover lock (Figure 11) |
Connect pressure gauge according
to connection diagram (Figure 1).
Disconnect hydraulic line no. 31, 32 from valve block (Y56, Figure 4), close
connection using plug 129 589 00 91 01.
Disconnect connector from valve (Y55y7 and Y55y8, Figure 2). |
Front locks open, soft top closed,
front of soft top frame pushed up, fabric bow raised, soft top compartment
cover locked.
Ignition: ON
Press and hold power soft top switch to open soft top. Have an assistant
unplug
relay (A7/5k1, Figure 1) after 5 sec. Keep switch depressed an additional
5 sec.
Read test pressure:
Release test pressure:
Press soft top switch briefly several times.
|
120 - 195 bar
|
<120 bar:
Valve block (Y56, Figure 6).
If nominal value is attained:
Soft top compartment cover lock (Figure 6, Position VD). |
| 8.0 |
Raising soft top compartment cover
(Figure 12) |
|
|
|
Hydraulic fault not possible.
Check adjustment of soft top compartment cover, check for smooth operation
of cover hinges. |
| 9.0 |
Lowering fabric bow (Figure 13) |
19.0 |
19.0 |
120 - 195 bar
|
19.0. |
| 10.0 |
Opening soft top
(Figure 14) |
Connect pressure gauge according
to connection diagram (Figure 1).
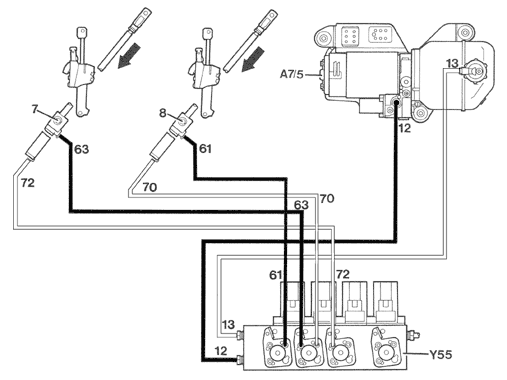
Disconnect hydraulic line no. 41, 61, 63 from valve block (Y55, Figure 2),
close connection using plug 129 589 00 91 01. |
Soft top compartment cover raised.
Lower soft top into compartment.
Ignition: ON
Press and hold power soft top switch to open soft top. Have an assistant
unplug
relay (A7/5k1, Figure 1) after 5 sec. Keep switch depressed an additional
5 sec.
Read test pressure:
Release test pressure:
Press soft top switch briefly several times.
|
120 - 195 bar
|
<120 bar:
Valve block (Y55, Figure 6).
If nominal value is attained:
10.1. |
| 10.1 |
Opening soft top (Figure 14) |
Connect pressure gauge according
to connection diagram (Figure 1).
Connect hydraulic line no. 63, leave no. 41, 61 disconnected. |
Soft top compartment cover raised,
lower soft top into compartment.
Ignition: ON
Press and hold power soft top switch to open soft top. Have an assistant
unplug
relay (A7/5k1, Figure 1) after 5 sec. Keep switch depressed an additional
5 sec.
Read test pressure:
Release test pressure:
Press soft top switch briefly several times.
|
120 - 195 bar |
< 120 bar:
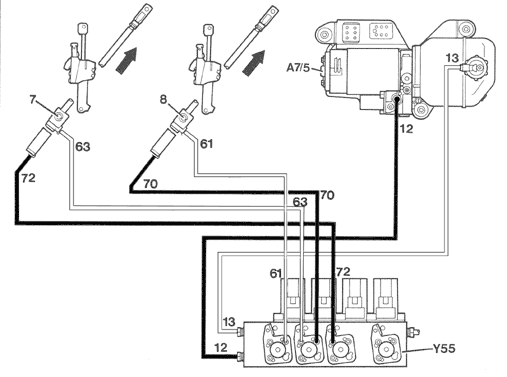
Left soft top drive hydraulic cylinder (Figure 6, Position 7).
If nominal value is attained:
Right soft top drive hydraulic cylinder (Figure 6, Position 8). |
| 11.0 |
Closing soft top compartment cover
(Figure 15) |
Connect pressure gauge according
to connection diagram (Figure 1)
|
Front locks open, soft top lowered
into soft top compartment, soft top compartment cover raised.
Ignition: ON
Press and hold power soft top switch to open soft top. Have an assistant
unplug relay (A7/5k1, Figure 1) after 5 sec. Keep switch depressed
an additional 5 sec.
Read test pressure:
Release test pressure:
Press soft top switch briefly several times.
|
120 - 195 bar |
5.2 |
| 12.0 |
Locking soft top compartment cover
lock (Figure 16) |
Connect pressure gauge according
to connection diagram (Figure 1).
Disconnect hydraulic line no. 31, 47 from valve block (Y56, Figure 4), close
connection using plug 129 589 00 91 01.
Disconnect connectors from valves (Y56y3 and Y56y4, Figure 4, Y55y6, Figure
2). |
Soft top lowered into soft top compartment,
soft top compartment cover raised.
Ignition: ON
Press and hold power soft top switch to open soft top. Have an assistant
unplug
relay (A7/5k1, Figure 1) after 5 sec. Keep switch depressed an additional
5 sec.
Read test pressure:
Release test pressure:
Press soft top switch briefly several times.
|
120 - 195 bar |
< 120 bar:
5.4
If nominal value is attained:
Soft top compartment cover lock hydraulic cylinder (Figure 5, Position VD). |
| 13.0 |
Unlocking soft top compartment
cover lock (Figure 11) |
Connect pressure gauge according
to connection diagram (Figure 1). |
Starting position:
Soft top opened completely.
1.0 and 2.0 carried
out. |
|
Soft top compartment cover lock pin
binding.
Adjust lock pin.
Soft top compartment cover lock defective.
|
| 14.0 |
Raising soft top compartment cover
(Figure 12) |
|
|
|
Hydraulic fault not possible.
Check adjustment of soft top compartment cover, check for smooth operation
of cover hinges.
|
| 15.0 |
Closing soft top (Figure 17) |
Connect pressure gauge according
to connection diagram (Figure 1).
Disconnect hydraulic line no. 70, 72 from valve block (Y55, Figure 2), close
connection using plug 129 589 00 91 01.
Disconnect connector from valve (Y55y8, Figure 2). |
Front locks open,
soft top compartment cover raised.
Close soft top manually, front of soft top frame pushed up, fabric bow lowered.
Ignition: ON
Press and hold power soft top switch to close soft top. Have an assistant
unplug
relay (A7/5k1, Figure 1) after 5 sec. Keep switch depressed an additional
5 sec.
Read test pressure:
Release test pressure:
Press soft top switch briefly several times.
|
120 - 195 bar |
<120 bar:
15.2.
If nominal value is attained:
15.1. |
| 15.1 |
Closing soft top (Figure 17) |
Connect pressure gauge according
to connection diagram (Figure 1).
Connect hydraulic line no. 72, leave no. 70 and valve (Y55y8) disconnected.
Disconnect connector from valve (Y55y8, Figure 2). |
Front locks open, soft top compartment
cover raised, soft top closed, soft top frame pushed up in front, fabric
bow lowered.
Ignition: ON
Press and hold power soft top switch to close soft top. Have an assistant
unplug
relay (A7/5k1, Figure 1) after 5 sec. Keep switch depressed an additional
5 sec.
Read test pressure:
Release test pressure:
Press soft top switch briefly several times.
|
120 - 195 bar |
<120 bar:
Left soft top hydraulic actuating cylinder (Figure 6, Position 7).
If nominal value is attained:
Right soft top hydraulic actuating cylinder (Figure 6, Position 8). |
| 15.2 |
Closing soft top (Figure 17) |
Connect pressure gauge according
to connection diagram (Figure 1).
Disconnect hydraulic line no. 41 from valve block (Y55, Figure 2) close
connection using plug 129 589 00 91 01. connect valve (Y55y8). |
Front locks open, soft top closed,
soft top frame pushed up in front, soft top compartment cover raised, fabric
bow raised.
Ignition: ON
Press and hold power soft top switch to close soft top. Have an assistant
unplug
relay (A7/5k1, Figure 1) after 5 sec. Keep switch depressed an additional
5 sec.
Read test pressure:
Release test pressure:
Press soft top switch briefly several times.
|
120 - 195 bar |
<120 bar:
Valve block (Y55, Figure 6).
If nominal value is attained:
Valve block (Y56, Figure 6). |
| 16.0 |
Raising fabric bow
(Figure 10) |
Connect pressure gauge according
to connection diagram (Figure 1)
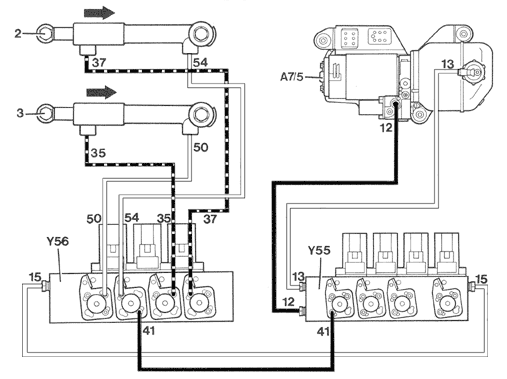
Disconnect hydraulic line no. 41, 85, 87 from valve block (Y55, Figure 2),
close connection using plug 129 589 00 91 01. |
Front locks open, soft top closed,
soft top frame pushed up in front, soft top compartment cover raised, fabric
bow raised.
Ignition: ON
Press and hold power soft top switch to close soft top. Have an assistant
unplug
relay (A7/5k1, Figure 1) after 5 sec. Keep switch depressed an additional
5 sec.
Read test pressure:
Release test pressure:
Press soft top switch briefly several times.
|
120 - 195 bar |
<120 bar:
15.2.
If nominal value is attained:
16.1. |
| 16.1 |
Raising fabric bow
(Figure 10). |
Connect pressure gauge according
to connection diagram (Figure 1).
Connect hydraulic line no. 85, leave no. 87 disconnected. |
Soft top open at front, soft top
closed, soft top frame pushed up in front, soft top compartment cover raised,
fabric bow raised.
Ignition: ON
Press and hold power soft top switch to close soft top. Have an assistant
unplug
relay (A7/5k1, Figure 1) after 5 sec. Keep switch depressed an additional
5 sec.
Read test pressure:
Release test pressure:
Press soft top switch briefly several times.
|
120 - 195 bar |
<120 bar:
Left fabric bow hydraulic cylinder (Figure 6, Position 5).
If nominal value is attained:
Right fabric bow hydraulic cylinder (Figure 6, Position 6). |
| 17.0 |
Lowering soft top compartment
cover
(Figure 15) |
Connect pressure gauge according
to connection diagram (Figure 1).
Disconnect hydraulic line no. 35, 37 from valve block (Y56, Figure 4), close
connection using plug 129 589 00 91 01.
Disconnect connector from valve (Y55y7 and Y55y8, Figure 2) . |
Front locks open, soft top closed,
soft top frame pushed up in front, fabric bow raised, soft top compartment
cover raised.
Ignition: ON
Press and hold power soft top switch to close soft top. Have an assistant
unplug
relay (A7/5k1, Figure 1) after 5 sec. Keep switch depressed an additional
5 sec.
Read test pressure:
Release test pressure:
Press soft top switch briefly several times.
|
120 - 195 bar |
<120 bar:
15.2.
If nominal value is attained:
17.1. |
|
17.1 |
Lowering soft top compartment cover
(Figure 15) |
Connect pressure gauge according
to connection diagram (Figure 1).
Connect hydraulic line no. 35, hold no. 37 in a container and leave valve
(Y55y7 and Y55y8) disconnected. |
Front locks open, soft top closed,
soft top frame pushed up in front, fabric bow raised, soft top compartment
cover lowered.
Ignition: ON
Press and hold power soft top switch to close soft top. Have an assistant
unplug
relay (A7/5k1, Figure 1) after 5 sec. Keep switch depressed an additional
5 sec.
Read test pressure:
Release test pressure:
Press soft top switch briefly several times.
|
120 - 195 bar |
<120 bar:
Left soft top compartment cover hydraulic cylinder (Figure 6, Position 3).
If nominal value is attained:
Right soft top compartment cover hydraulic cylinder (Figure 6, Position
2). |
| 18.0 |
Locking soft top compartment cover
lock (Figure 16) |
Connect pressure gauge according
to connection diagram (Figure 1).
Disconnect hydraulic line no. 31, 35, 37 from valve block (Y56, Figure 4),
close connection using plug 129 589 00 91 01.
Disconnect connector from valve (Y56y3, Figure 4). |
Front locks open, soft top closed,
soft top frame pushed up in front, fabric bow raised, soft top compartment
cover raised.
Ignition: ON
Press and hold power soft top switch to close soft top. Have an assistant
unplug
relay (A7/5k1, Figure 1) after 5 sec. Keep switch depressed an additional
5 sec.
Read test pressure:
Release test pressure:
Press soft top switch briefly several times.
|
120 - 195 bar |
<120 bar:
15.2.
If nominal value is attained:
18.1. |
| 18.1 |
Locking soft top compartment cover
lock (Figure 16) |
Connect pressure gauge according
to connection diagram (Figure 1).
Connect hydraulic line no. 31,
Leave no. 35, 37 and valve (Y56y3) disconnected. Disconnect connector from
valve (Y55y9, Figure 2).
|
Front locks open, soft top closed,
soft top frame pushed up in front, fabric bow raised, soft top compartment
cover raised. |
|
<120 bar:
Soft top compartment cover lock hydraulic cylinder (Figure 6, Position VD).
If nominal value is attained:
18.2 |
| 18.2 |
Locking soft top compartment cover
lock (Figure 16) |
Connect pressure gauge according
to connection diagram (Figure 1).
Connect hydraulic line no. 35, hold no. 37 in a container and leave valve
(Y56y3) disconnected. |
Front locks open, soft top closed,
soft top frame pushed up in front, fabric bow raised.
Ignition: ON
Press and hold power soft top switch to close soft top.

Soft top compartment cover will close.
Have an assistant unplug relay (A7/5k1, Figure 1) after 5 sec. Keep
switch depressed an additional 5 sec.
Read test pressure:
Release test pressure:
Press soft top switch briefly several times.
|
120 - 195 bar |
<120 bar:
Left soft top compartment cover hydraulic cylinder (Figure 6, Position 2).
If nominal value is attained:
Right soft top compartment cover hydraulic cylinder (Figure 6, Position
3). |
| 19.0 |
Lowering fabric bow (Figure 13) |
Connect pressure gauge according
to connection diagram (Figure 1).
Disconnect hydraulic line no. 41, 94, 96 from valve block (Y55, Figure 2),
close connection using plug 129 589 00 91 01. |
Front locks open, soft top closed,
soft top frame pushed up in front, soft top compartment cover raised, soft
top compartment cover locked, fabric bow raised.
Ignition: ON
Press and hold power soft top switch to close soft top. Have an assistant
unplug
relay (A7/5k1, Figure 1) after 5 sec. Keep switch depressed an additional
5 sec.
Read test pressure:
Release test pressure:
Press soft top switch briefly several times.
|
120 - 195 bar |
<120 bar:
15.2
If nominal value is attained:
19.1 |
| 19.1 |
Lowering fabric bow
(Figure 13) |
Connect pressure gauge according
to connection diagram (Figure 1).
Connect hydraulic line no. 94, leave no. 41 disconnected, hold no. 96 in
a container. |
Front locks open, soft top closed,
soft top frame pushed up in front, soft top compartment cover locked, fabric
bow lowered. Place wooden blocks (2 pieces, 80mm x 60mm x 20mm) between
the soft top compartment cover and the fabric bow next to the latches on
the left and right.
Ignition: ON
Press and hold power soft top switch to close soft top. Have an assistant
unplug relay (A7/5k1, Figure 1) after 5 sec. Keep switch depressed
an additional 5 sec.
Read test pressure:
Release test pressure:
Press soft top switch briefly several times.
|
120 - 195 bar |
<120 bar:
Left fabric bow hydraulic cylinder (Figure 6, Position 5).
If nominal value is attained:
Right fabric bow hydraulic cylinder (Figure 6, Position 6). |
| 20.0 |
Locking fabric bow lock (Figure
18) |
Connect pressure gauge according
to connection diagram (Figure 1).
Disconnect connector from valve (Y55y9, Figure 2). |
Front locks open, soft top closed,
soft top frame pushed up in front, fabric bow raised, soft top compartment
cover locked, fabric bow lock opened.
Ignition: ON
Press and hold power soft top switch to close soft top. Have an assistant
unplug relay (A7/5k1, Figure 1) after 5 sec. Keep switch depressed
an additional 5 sec.
Read test pressure:
Release test pressure:
Press soft top switch briefly several times.
|
120 - 195 bar |
<120 bar:
Hydraulic cylinder fabric bow lock (Figure 6, Position VB).
If nominal value is attained:
Lock mechanism,
Lock pin improperly adjusted. |


 Printable
version
Printable
version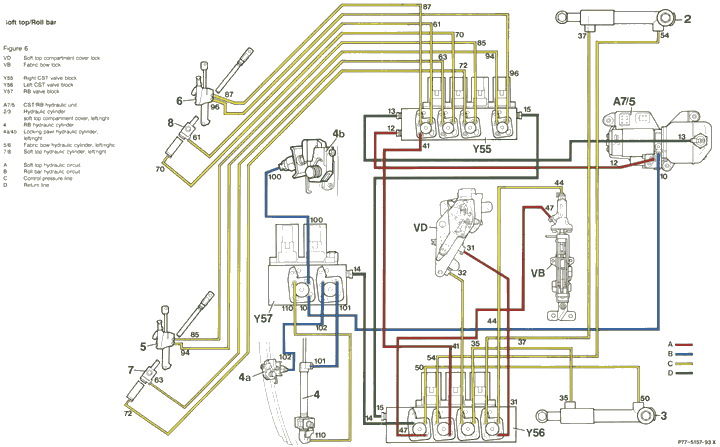
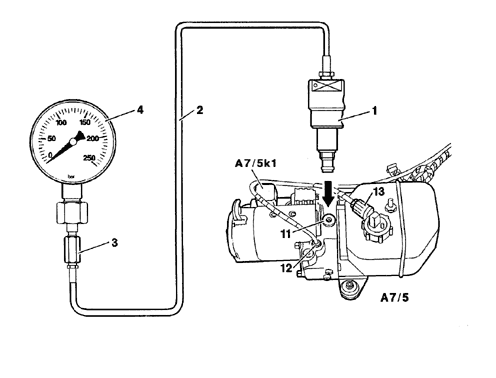
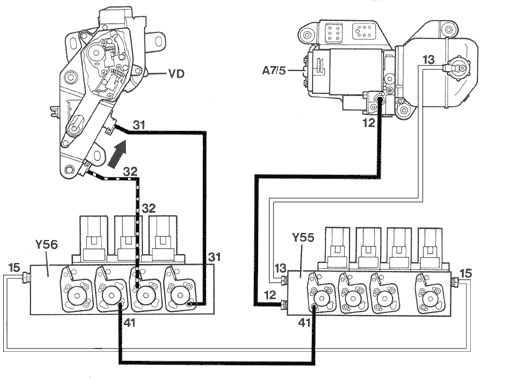
 Connection of test equipment
to hydraulic unit (Figure 1).
Connection of test equipment
to hydraulic unit (Figure 1). Models 124, 129, 140, 201.