|
| Conventional tools, test equipment |
| Description |
Brand, model, etc. |
| Graduated beaker (0.5 liter, 10 ml graduations) |
local purchase |
|
Before beginning the test, check the oil level in the hydraulic unit
reservoir and top up if needed (Refer to Maintenance Manual job no. 7710).
Brief description:
In order to make an accurate visual inspection for oil loss from the hydraulic
system, the windscreen or other personal belongings should be removed
from the vehicle.
The hydraulic circuits and components for each soft top operation can
be tested separately.
The soft top can be placed in all required positions either by the power
soft top switch or (if needed, with ignition: OFF) by hand.
All of the locks can be locked or unlocked with the soft top wrench.
 WARNING WARNING
Keep clear of the soft top linkage, upper part of the windshield and soft
top compartment during soft top locking or unlocking operations
(risk of personal injury).
Notes for Hydraulic Test:
The following jobs are the same for all test steps:
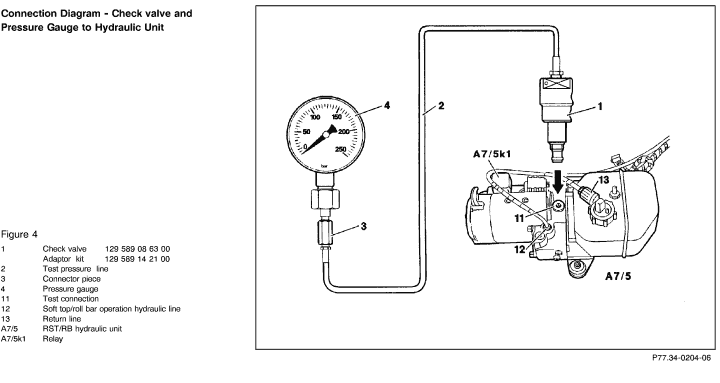
A. Connection of test equipment to hydraulic unit (Figure 4).
Torque check valve 129 589 08 63 00 to 5 Nm.
B. Build up and release test pressure (example).
C. Test hydraulic cylinder only at end position of piston (Observe soft
top positions).
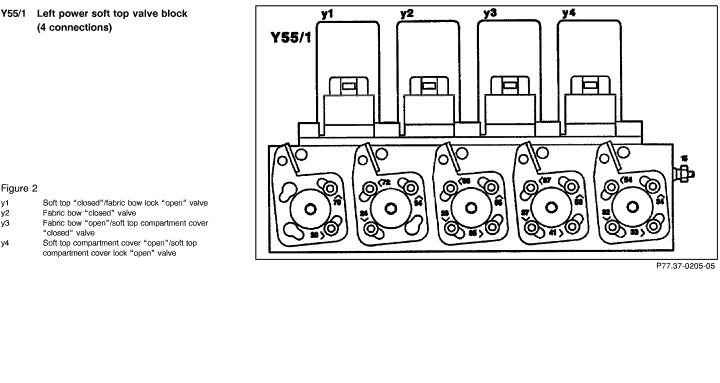
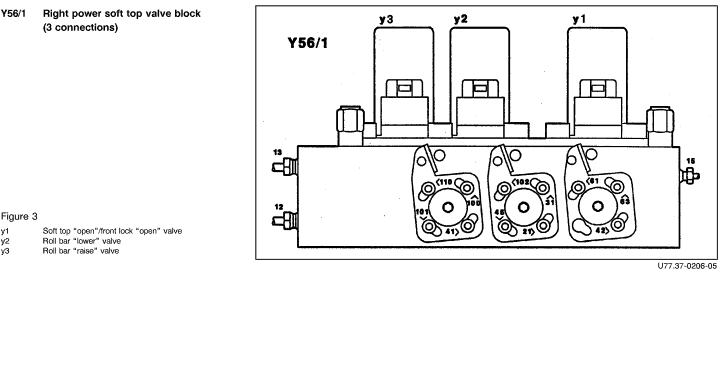
D. If hydraulic lines need to be disconnected from the valve blocks during
pressure tests, the appropriate soft top position (end position of the
hydraulic cylinder) must first be ensured.
 WARNING WARNING
Disconnected hydraulic lines should be held in a container (connect a
transparent hose such as windshield washer hose).
Hydraulic components that leak should be replaced. During pressure tests,
the valve block connections must be plugged with threaded plug
129 589 00 91 01.
If hydraulic components need to be replaced, the disconnected hydraulic
lines must be plugged with plug 129 589 00 91 07, while the connections
of valve blocks, hydraulic cylinders and hydraulic manifolds must be plugged
immediately using plug 129 589 00 91 11 to prevent the possible
entry of dirt.
Example: Building up and releasing test pressure.
Soft top
 1.0 to 16.0 Ignition ON:
Activate power soft top switch (toward lower if the soft top is down,
toward raise if the soft top is up) 1.0 to 16.0 Ignition ON:
Activate power soft top switch (toward lower if the soft top is down,
toward raise if the soft top is up)
for 5 seconds. Have a second technician disconnect relay (A7/5k1, Figure
4).
Hold power soft top switch for 5 additional seconds. Read and record test
pressure.
Release test pressure: Briefly activate power soft top switch several
more times.
Roll bar
 17.0 to 18.0 Ignition ON:
Activate RB switch (toward lower if the roll bar is 17.0 to 18.0 Ignition ON:
Activate RB switch (toward lower if the roll bar is
lowered, toward raise if it is raised) for 5 seconds. Have a second technician
disconnect relay (A7/5k1, Figure 4). Hold roll bar switch for 5 additional
seconds. Read and record test pressure.
Release test pressure: Briefly activate power soft top switch several
more times.
 CAUTION! CAUTION!
Release established test pressure before beginning the next test step.
|
 |
 |
 |
| Hydraulic Test Program - Test |
 |
 |
Test scope |
Test connection |
Test condition |
Nominal value |
Possible cause/Remedy |
| 1.0 |
|
Checking system pressure
(Figure 7) |
Connect pressure gauge according to connection diagram (Figure 4). |
Starting point: soft top completely closed
Ignition: ON
Press and hold RB switch to retract roll bar. Have a second technician unplug relay (A7/5k1, Figure 4) after 5 sec. Keep switch depressed an additional 5 sec.
Read test pressure:
Release test pressure:
Press soft top switch briefly several times.
|
120 - 200 bar |
<120 bar:
 2.0 2.0 |
 |
 |
 |
Test scope |
Test connection |
Test condition |
Nominal value |
Possible cause/Remedy |
| 2.0 |
|
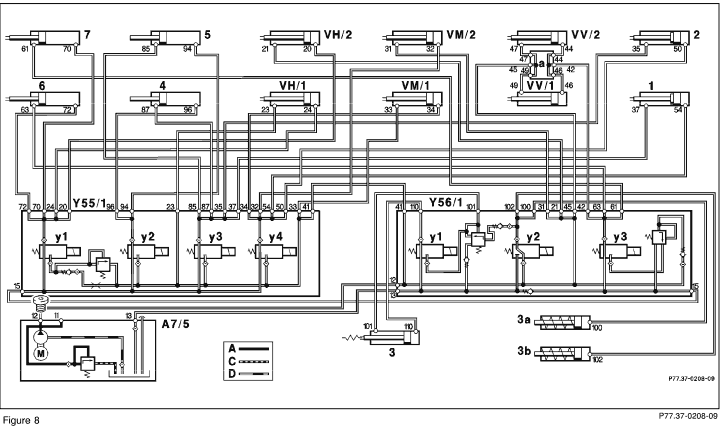
Testing RST/RB hydraulic unit (A7/5)
(Figure 8) |
Connect pressure gauge according to connection diagram (Figure 4).
Disconnect hydraulic line
no. 12 from hydraulic unit (Figure 4). Seal connection with threaded plug
129 589 00 91 03. |
Soft top completely closed
Ignition: ON
Press and hold RB switch to retract roll bar. Have a second technician unplug
relay (A7/5k1, Figure 4) after 5 sec. Keep switch depressed an additional 5 sec.
Read test pressure:
Release test pressure:
Press soft top switch briefly several times. |
180 - 200 bar |
Nominal values ok:
 3.0
3.0
< 180 bar:
Replace hydraulic unit (A7/5)
(SMS, Job No. 77-350). |
 |
 |
 |
Test scope |
Test connection |
Test condition |
Nominal value |
Possible cause/Remedy |
| 3.0 |
|
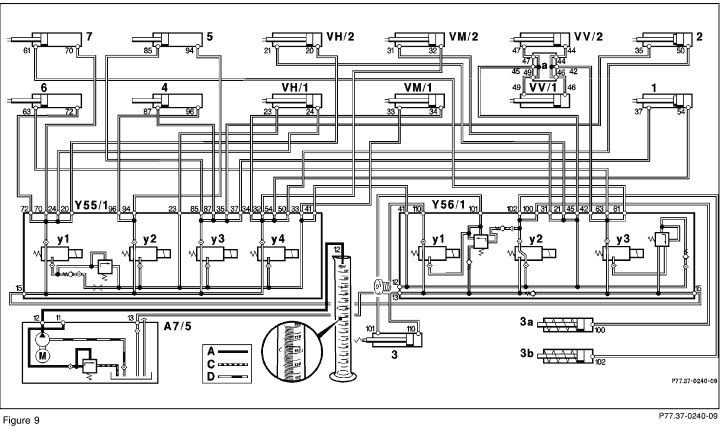
Checking hydraulic fluid volume output of hydraulic unit (A7/5)
(Figure 9)
Note:
Room temperature not to be <70° F. |
Note:
Room temperature must not be < 70oF (18o C).
Disconnect hydraulic line no. 12 from valve block (Y56/1). Seal connection with threaded plug
129 589 00 91 10.
Insert hydraulic line into a graduated beaker.
|
Soft top completely open, roll bar lowered.
Ignition: ON
Press and hold RB switch for 15 seconds to retract.
Read and note hydraulic fluid volume output in graduated beaker: |
>0.15 liter
(150 ml). |
Nominal values ok:
 4.0
4.0
<0.15 liter:
Replace hydraulic unit (A7/5)
(SMS, Job No. 77-350). |
 |
 |
 |
Test scope |
Test connection |
Test condition |
Nominal value |
Possible cause/Remedy |
| 4.0 |
|
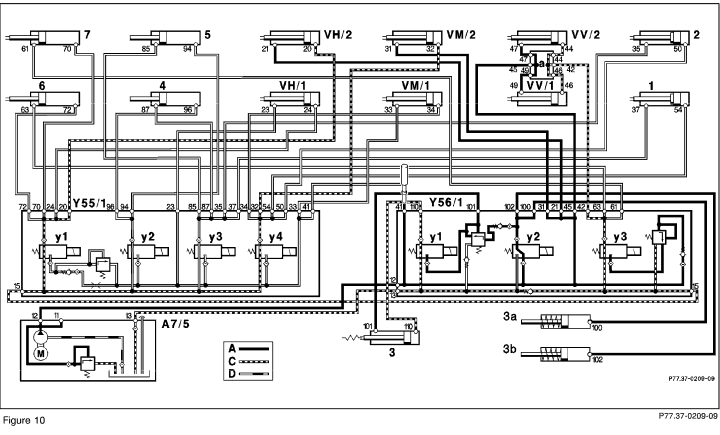
Checking locks
(Figure 10) |
Connect pressure gauge according to connection diagram (Figure 4).
Disconnect hydraulic line no. 41 from valve block (Y56/1). Seal connection with threaded plug
129 589 00 91 01. |
Soft top completely closed
Ignition: ON
Press and hold RB switch to retract roll bar. Have a second technician unplug relay (A7/5k1, Figure 4) after 5 sec. Keep switch depressed an additional 5 sec.
Read test pressure:
Release test pressure:
Press soft top switch briefly several times.
|
120 - 200 bar |
Nominal values ok:
 4.6 4.6
<120 bar:
 4.1 4.1 |
 |
 |
 |
Test scope |
Test connection |
Test condition |
Nominal value |
Possible cause/Remedy |
| 4.1 |
|
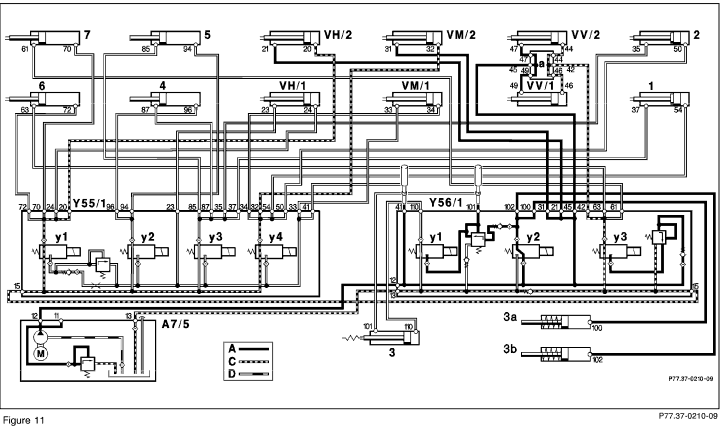
Checking locks
(Figure 11) |
Connect pressure gauge according to connection diagram (Figure 4).
Disconnect hydraulic line no. 101 from valve block (Y56/1). Seal connection with threaded plug
129 589 00 91 01.
 WARNING WARNING
Hydraulic line no. 101 has residual pressure (hydraulic cylinder in pos. 3). Wrap hydraulic line and fitting with a shop towel when it is removed.
Hydraulic line no. 41 remains disconnected.
|
Soft top completely closed
Ignition: ON
Press and hold RB switch to retract roll bar. Have a second technician unplug
relay (A7/5k1, Figure 4) after 5 sec. Keep switch depressed an additional 5 sec.
Read test pressure:
Release test pressure:
Press soft top switch briefly several times. |
120 - 200 bar |
Nominal values ok:
Hydraulic cylinder in support element for roll bar (3) leaking.
Replace support element
(SMS, Job No. 91-920).
<120 bar:
 4.2 4.2 |
 |
 |
 |
Test scope |
Test connection |
Test condition |
Nominal value |
Possible cause/Remedy |
| 4.2 |
|
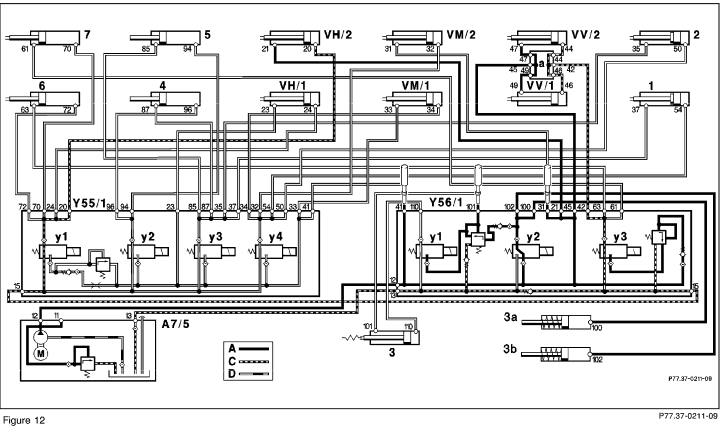
Checking locks
(Figure 12) |
Connect pressure gauge according to connection diagram (Figure 4).
Disconnect hydraulic line no. 31 from valve block (Y56/1). Seal connection with threaded plug
129 589 00 91 01.
Hydraulic lines no. 41 and no. 101 to remain disconnected. |
Soft top completely closed
Ignition: ON
Press and hold RB switch to retract roll bar. Have a second technician unplug relay (A7/5k1, Figure 4) after 5 sec. Keep switch depressed an additional 5 sec.
Read test pressure:
Release test pressure:
Press soft top switch briefly several times.
|
120 - 200 bar |
Nominal values ok:
Hydraulic cylinder of right center lock (VM/2) leaking.
Replace hydraulic cylinder
(SMS, Job No. 77-324).
>120 bar:
 4.3 4.3 |
 |
 |
 |
Test scope |
Test connection |
Test condition |
Nominal value |
Possible cause/Remedy |
| 4.3 |
|
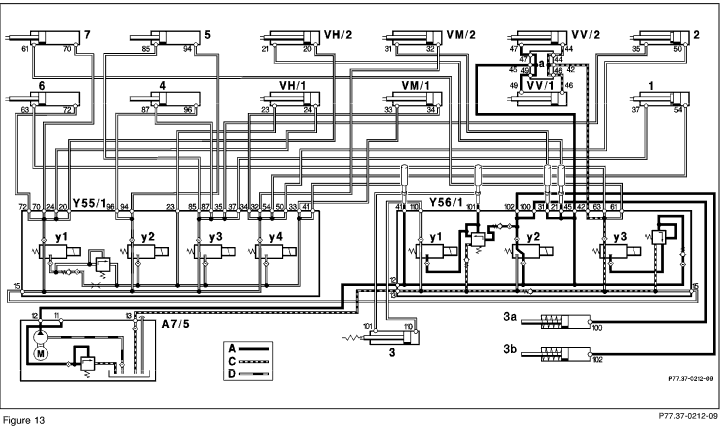
Checking locks
(Figure 13) |
Connect pressure gauge according to connection diagram (Figure 4).
Disconnect hydraulic line no. 21 from valve block (Y56/1). Seal connection with threaded plug
129 589 00 91 01.
Hydraulic lines no. 41, no. 101 and no. 31 to remain disconnected. |
Soft top completely closed
Ignition: ON
Press and hold RB switch to retract roll bar. Have a second technician unplug relay (A7/5k1, Figure 4) after 5 sec. Keep switch depressed an additional 5 sec.
Read test pressure:
Release test pressure:
Press soft top switch briefly several times.
|
120 - 200 bar |
Nominal values ok:
Hydraulic cylinder of right center lock (VH/2) leaking.
Replace hydraulic cylinder
(SMS, Job No. 77-328).
<120 bar:
 4.4 4.4 |
 |
 |
 |
Test scope |
Test connection |
Test condition |
Nominal value |
Possible cause/Remedy |
| 4.4 |
|
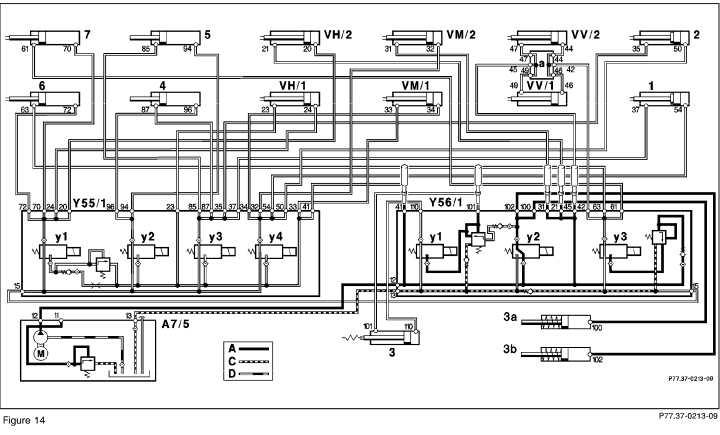
Checking locks
(Figure 14) |
Connect pressure gauge according to connection diagram (Figure 4).
Disconnect hydraulic line no. 45 from valve block (Y56/1). Seal connection with threaded plug
129 589 00 91 01.
Hydraulic lines no. 41, no. 101, no. 31 and no. 21 to remain disconnected. |
Soft top completely closed
Ignition: ON
Press and hold RB switch to retract roll bar. Have a second technician unplug relay (A7/5k1, Figure 4) after 5 sec. Keep switch depressed an additional 5 sec.
Read test pressure:
Release test pressure:
Press soft top switch briefly several times. |
120 - 200 bar |
Nominal values ok:
Hydraulic cylinder of left front lock or right front lock
(VV/1, VV/2) leaking.
 4.5 4.5
<120 bar:
Replace Y56/1
(SMS, Job No. 77-380). |
 |
 |
 |
Test scope |
Test connection |
Test condition |
Nominal value |
Possible cause/Remedy |
| 4.5 |
|
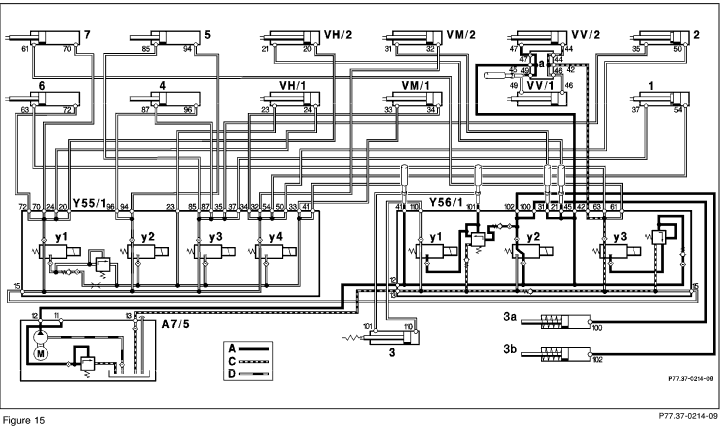
Checking locks
(Figure 15) |
Connect pressure gauge according to connection diagram (Figure 4).
Disconnect hydraulic line no. 49 from hydraulic manifold (a) at A-pillar cross member. Seal connection with threaded plug 129 589 00 91 01.
Reconnect hydraulic line no. 45 to valve block (Y56/1).
Hydraulic lines no. 41, no. 101, no. 31 and no. 21 to remain disconnected.
|
Soft top completely closed
Ignition: ON
Press and hold RB switch to retract roll bar. Have a second technician unplug relay (A7/5k1, Figure 4) after 5 sec. Keep switch depressed an additional 5 sec.
Read test pressure:
Release test pressure:
Press soft top switch briefly several times. |
120 - 200 bar |
Nominal vales ok:
Hydraulic cylinder of left front lock (VV/1) leaking.
Replace hydraulic cylinder
(SMS, Job No. 77-335).
<120 bar:
Hydraulic cylinder of right front lock (VV/2) leaking.
Replace hydraulic cylinder
(SMS, Job No. 77-335). |
 |
 |
 |
Test scope |
Test connection |
Test condition |
Nominal value |
Possible cause/Remedy |
| 4.6 |
|
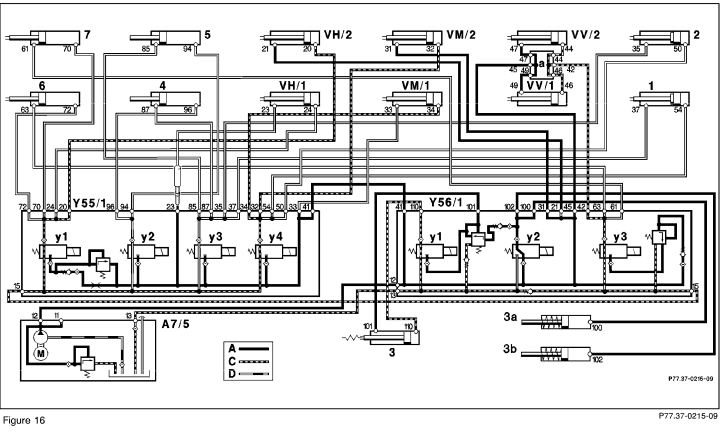
Checking locks
(Figure 16) |
Connect pressure gauge according to connection diagram (Figure 4).
Disconnect hydraulic line no. 23 from valve block (Y55/1). Seal connection with threaded plug
129 589 00 91 01.
Reconnect hydraulic lines no. 21, no. 31, no. 41 and no.101 to connections on valve block (Y56/1).
 WARNING WARNING
Hydraulic line no. 101 has residual pressure. Wrap hydraulic line and threaded plug (129 589 00 91 01) with a shop towel when removing threaded plug. |
Soft top completely closed
Ignition: ON
Press and hold RB switch to retract roll bar. Have a second technician unplug relay (A7/5k1, Figure 4) after 5 sec. Keep switch depressed an additional 5 sec.
Read test pressure:
Release test pressure:
Press soft top switch briefly several times. |
120 - 200 bar |
Nominal values ok:
Hydraulic cylinder of left rear lock (VH/1) leaking.
Replace hydraulic cylinder
(SMS, Job No. 77-328).
<120 bar:
 4.7 4.7 |
 |
 |
 |
Test scope |
Test connection |
Test condition |
Nominal value |
Possible cause/Remedy |
| 4.7 |
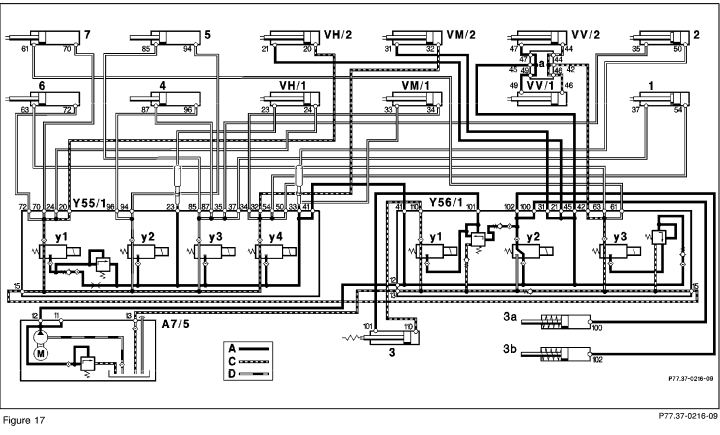
|
Checking locks
(Figure 17) |
Connect pressure gauge according to connection diagram (Figure 4).
Disconnect hydraulic line no. 33 from valve block (Y55/1). Seal connection with threaded plug
129 589 00 91 01
Hydraulic line no. 23, to remain disconnected.
|
Soft top completely closed
Ignition: ON
Press and hold RB switch to retract roll bar. Have a second technician unplug relay (A7/5k1, Figure 4) after 5 sec. Keep switch depressed an additional 5 sec.
Read test pressure:
Release test pressure:
Press soft top switch briefly several times.
|
120 - 200 bar |
Nominal values ok:
Hydraulic cylinder of left center lock (VM/1) leaking.
Replace hydraulic cylinder
(SMS, Job No. 77-324).
<120 bar:
Replace Y55/1
(SMS, Job No. 77-380).
|
 |
 |
 |
Test scope |
Test connection |
Test condition |
Nominal value |
Possible cause/Remedy |
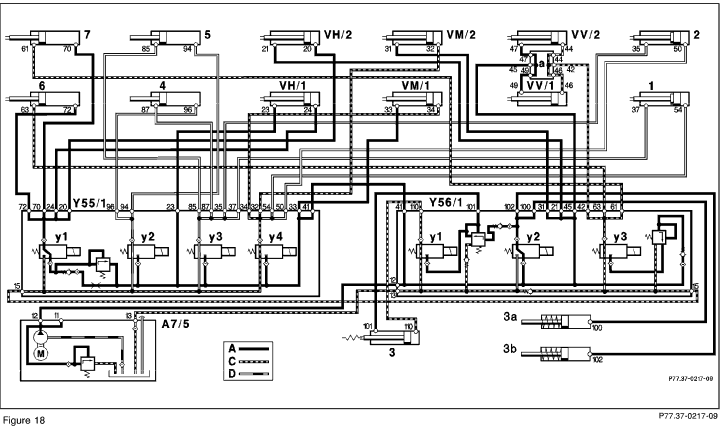
| 5.0 |
|
Open rear locks (VH/1, VH/2)
(Figure 18) |
Connect pressure gauge according to connection diagram (Figure 4). |
Soft top completely closed
Ignition: ON
Press and hold soft top switch: "lower". Have a second technician unplug relay (A7/5k1, Figure 4) after 5 sec. Keep switch depressed an additional 5 sec.
Read test pressure:
Release test pressure:
Press soft top switch briefly several times.
|
120 - 200 bar |
Nominal values ok:
Should the rear locks (VH/1, VH/2) not open, check adjustment of fabric bow latch pins.
Also check for mechanical fault in one or both of the locks.
Check adjustment of latch pins (SMS, Job No. 77-303).
Replace the rear locks, if above remedies are without effect
(SMS, Job No. 77-325).
<120 bar:
 5.1 5.1 |
 |
 |
 |
Test scope |
Test connection |
Test condition |
Nominal value |
Possible cause/Remedy |
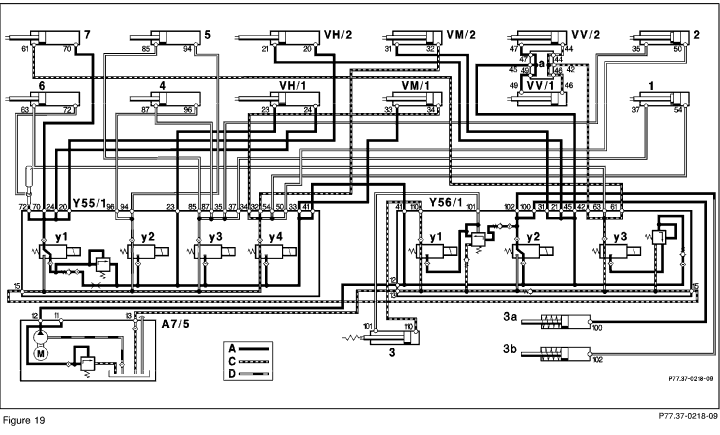
| 5.1 |
|
Open rear locks (VH/1, VH/2)
(Figure 19) |
Connect pressure gauge according to connection diagram (Figure 4).
Disconnect connector at valve block (Y55/1y3).
Disconnect hydraulic line no. 72 from valve block (Y55/1). Seal connection with threaded plug
129 589 00 91 01. |
Mechanically unlock left/right rear
locks (VH/1, VH/2)
(see owner's manual)
Ignition: ON
Press and hold soft top switch: "lower". Have a second technician unplug relay (A7/5k1, Figure 4) after 5 sec. Keep switch depressed an additional 5 sec.
Read test pressure:
Release test pressure:
Press soft top switch briefly several times.
|
120 - 200 bar |
Nominal values ok:
Left Hydraulic cylinder (6) for soft top actuation leaking.
Replace hydraulic cylinder
(SMS, Job No. 77-355).
<120 bar:
 5.2 5.2
|
 |
 |
 |
Test scope |
Test connection |
Test condition |
Nominal value |
Possible cause/Remedy |
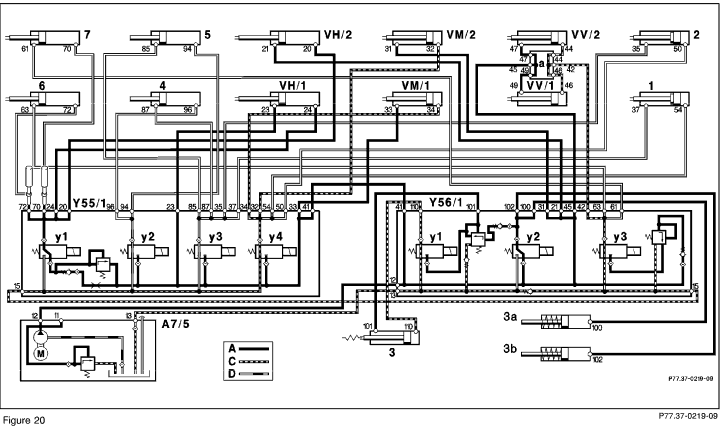
| 5.2 |
|
Open rear locks (VH/1, VH/2)
(Figure 20) |
Connect pressure gauge according to connection diagram (Figure 4).
Disconnect hydraulic line no. 70 from valve block (Y55/1). Seal connection with threaded plug
129 589 00 91 01.
Connector at valve
block (Y55/1y3) to remain disconnected.
Hydraulic line no. 72 to remain disconnected. |
Rear locks (VH/1, VH/2) unlocked
Ignition: ON
Press and hold soft top switch: "lower". Have a second technician unplug relay (A7/5k1, Figure 4) after 5 sec. Keep switch depressed an additional 5 sec.
Read test pressure:
Release test pressure:
Briefly activate power soft top switch several times.
|
120 - 200 bar |
Nominal values ok:
Right Hydraulic cylinder(7) for soft top actuation leaking.
Replace hydraulic cylinder
(SMS, Job No. 77-355).
<120 bar:
 4.0 4.0
|
 |
 |
 |
Test scope |
Test connection |
Test condition |
Nominal value |
Possible cause/Remedy |
| 6.0 |
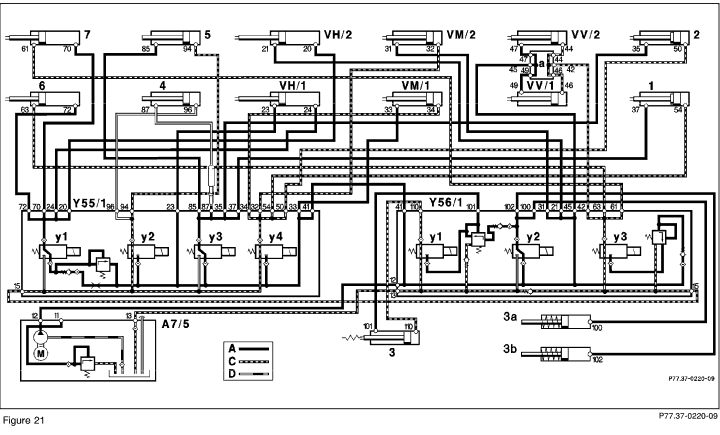
|
Raise fabric bow
(Figure 21) |
Connect pressure gauge according to connection diagram (Figure 4).
Disconnect connector at valve block (Y55/1y4).
Disconnect hydraulic line no. 87 from valve block (Y55/1). Seal connection with threaded plug
129 589 00 91 01. |
Fabric bow up
Ignition: ON
Press and hold soft top switch: "lower". Have a second technician unplug relay (A7/5k1, Figure 4) after 5 sec. Keep switch depressed an additional 5 sec.
Read test pressure:
Release test pressure:
Briefly activate power soft top switch several times. |
120 - 200 bar |
Nominal values ok:
Left hydraulic cylinder (4) for fabric bow leaking.
Replace hydraulic cylinder
(SMS, Job No. 77-360).
<120 bar:
 6.1 6.1 |
 |
 |
 |
Test scope |
Test connection |
Test condition |
Nominal value |
Possible cause/Remedy |
| 6.1 |
|
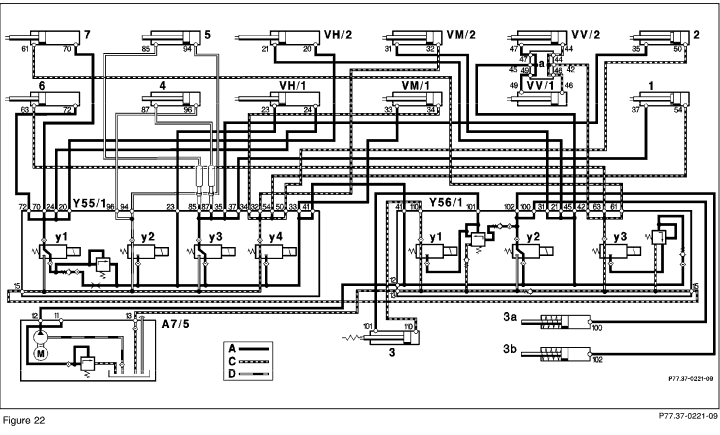
Raise fabric bow
(Figure 22) |
Connect pressure gauge according to connection diagram (Figure 4).
Disconnect hydraulic line no. 85 from valve block (Y55/1). Seal connection with threaded plug
129 589 00 91 01.
Connector at valve block (Y55/1y4) to remain disconnected.
Hydraulic line no. 87 to remain disconnected.
|
Fabric bow up
Ignition: ON
Press and hold soft top switch: "lower". Have a second technician unplug relay (A7/5k1, Figure 4) after 5 sec. Keep switch depressed an additional 5 sec.
Read test pressure:
Release test pressure:
Press soft top switch briefly several times. |
120 - 200 bar |
Nominal value ok:
Right hydraulic cylinder (5) for fabric bow leaking.
Replace hydraulic cylinder
(SMS, Job No. 77-360).
<120 bar:
 6.2 6.2 |
 |
 |
 |
Test scope |
Test connection |
Test condition |
Nominal value |
Possible cause/Remedy |
| 6.2 |
|
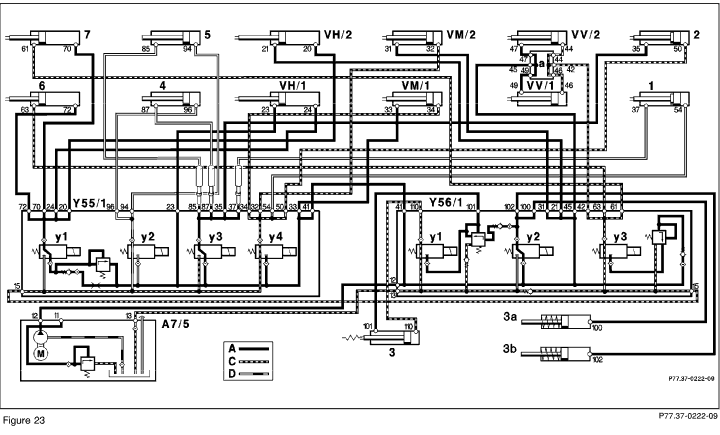
Raise fabric bow
(Figure 23) |
Connect pressure gauge according to connection diagram (Figure 4).
Disconnect hydraulic line no. 37 from valve block (Y55/1). Seal connection with threaded plug
129 589 00 91 01.
Connector at valve block (Y55/1y4) to remain disconnected.
Hydraulic lines no. 85, no. 87 to remain disconnected.
|
Fabric bow up
Ignition: ON
Press and hold soft top switch: "lower". Have a second technician unplug relay (A7/5k1, Figure 4) after 5 sec. Keep switch depressed an additional 5 sec.
Read test pressure:
Release test pressure:
Press soft top switch briefly several times. |
120 - 200 bar |
Nominal value ok:
Left hydraulic cylinder (1) for soft top compartment cover leaking.
Replace hydraulic cylinder
(SMS, Job No. 77-370).
<120 bar:
 6.3 6.3 |
 |
 |
 |
Test scope |
Test connection |
Test condition |
Nominal value |
Possible cause/Remedy |
| 6.3 |
|
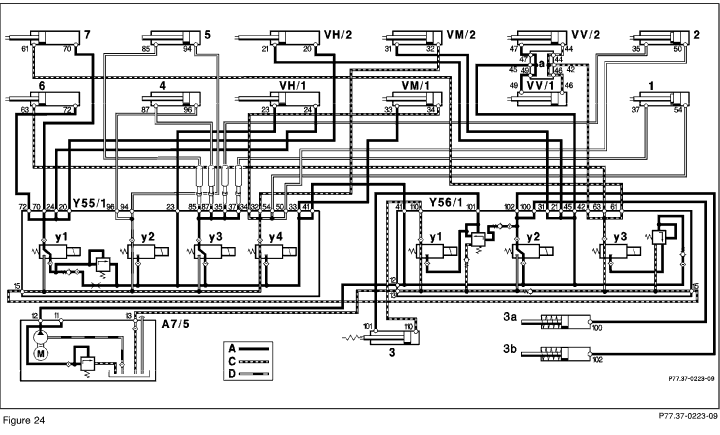
Raise fabric bow
(Figure 24) |
Connect pressure gauge according to connection diagram (Figure 4).
Disconnect hydraulic line no. 35 from valve block (Y55/1). Seal connection with threaded plug
129 589 00 91 01.
Connector at valve block (Y55/1y4) to remain disconnected.
Hydraulic lines no. 37, no. 85 and no. 87 to remain disconnected.
|
Fabric bow up
Ignition: ON
Press and hold soft top switch: "lower". Have a second technician unplug relay (A7/5k1, Figure 4) after 5 sec. Keep switch depressed an additional 5 sec.
Read test pressure:
Release test pressure:
Press soft top switch briefly several times. |
120 - 200 bar |
Nominal value ok:
Right hydraulic cylinder (2) for soft top compartment cover leaking.
Replace hydraulic cylinder
(SMS, Job No. 77-370).
<120 bar:
 5.1 5.1 |
 |
 |
 |
Test scope |
Test connection |
Test condition |
Nominal value |
Possible cause/Remedy |
| 7.0 |
|
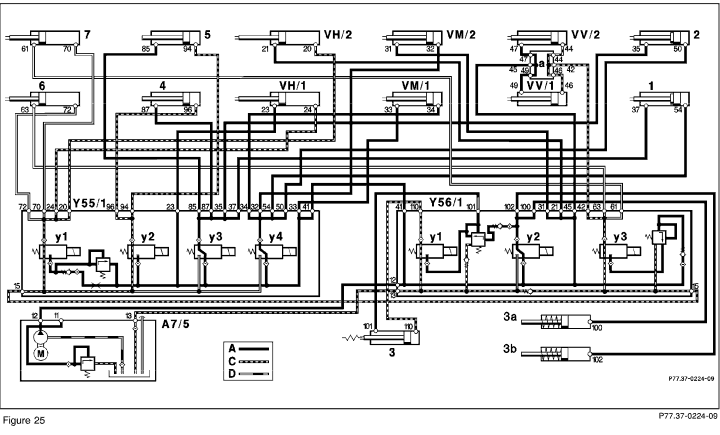
Opening center locks (VM/1, VM/2)
(Figure 25)
Raise soft top compartment cover
(Figure 25) |
Connect pressure gauge according to connection diagram (Figure 4). |
Fabric bow up
Ignition: ON
Press and hold soft top switch: "lower". Have a second technician unplug relay (A7/5k1, Figure 4) after 5 sec. Keep switch depressed an additional 5 sec.
Read test pressure:
Release test pressure:
Press soft top switch briefly several times.
|
120 - 200 bar |
Nominal values ok:
Should center locks (VM/1, VM/2) not open, check adjustment of soft top compartment cover latch pin.
Also check for mechanical fault in one or both center locks.
Check adjustment of center locking pins.
Replace center locks, if locks do not open with above remedies when using soft top switch
(SMS, Job No. 77-320).
Additionally check soft top compartment hinges or gas pressure shock if soft top cover does not raise and all remedies are without effect.
<120 bar:
 6.0 6.0
|
 |
 |
 |
Test scope |
Test connection |
Test condition |
Nominal value |
Possible cause/Remedy |
| 8.0 |
|
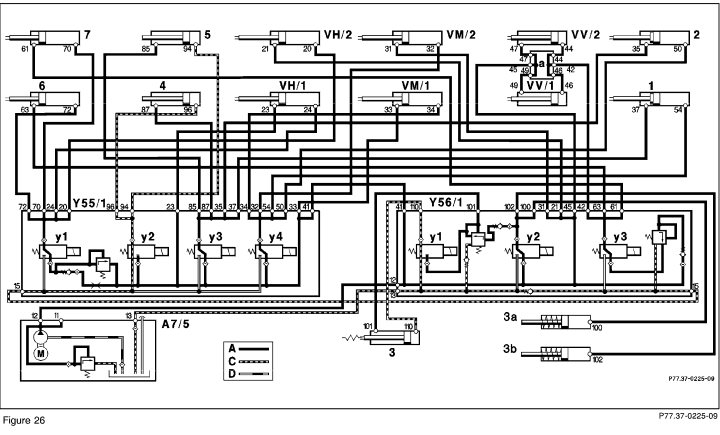
Open front locks (VV/1, VV/2)
(Figure 26) |
Connect pressure gauge according to connection diagram (Figure 4). |
Fabric bow up,
soft top compartment cover up
Ignition: ON
Press soft top switch: "lower".
Read test pressure while pressing the soft top switch
|
180 - 200 bar |
Nominal values ok:
Should front locks (VV/1, VV/2) not open, check adjustment of soft top latch pins.
Also check for mechanical fault in one or both front locks.
Check the adjustment of latch pins (SMS, Job No. 77-303).
Replace the locks, if nominal values are met but locks still do not open
(SMS, Job No. 77-330).
<180 bar:
 6.0 6.0
|
 |
 |
 |
Test scope |
Test connection |
Test condition |
Nominal value |
Possible cause/Remedy |
| 9.0 |
|
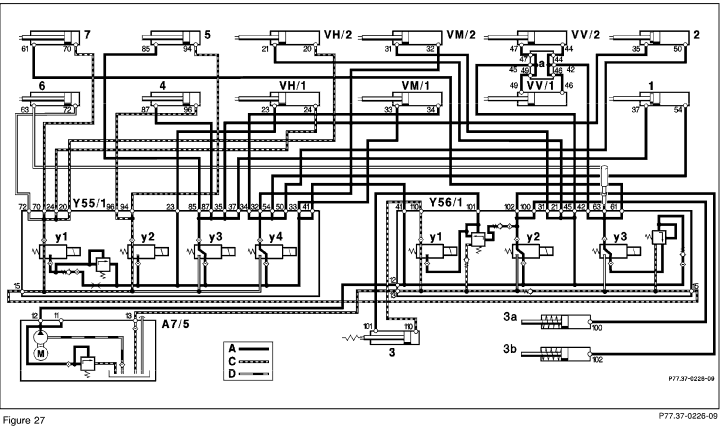
Open soft top
(Figure 27) |
Connect pressure gauge according to connection diagram (Figure 4).
Disconnect connector S84/3x (see  11/1; Pos. 2, Figure 1). 11/1; Pos. 2, Figure 1).
Disconnect hydraulic line no. 63 from valve block (Y56/1). Seal connection with threaded plug
129 589 00 91 01.
|
Soft top retracted in soft top compartment,
soft top compartment cover up
Ignition: ON
Press and hold soft top switch: "lower". Have a second technician unplug relay (A7/5k1, Figure 4) after 5 sec. Keep switch depressed an additional 5 sec.
Read test pressure:
Release test pressure:
Press soft top switch briefly several times.
|
120 - 200 bar |
Nominal values ok:
Left hydraulic cylinder (6) for soft top actuation leaking.
Replace hydraulic cylinder
(SMS, Job No. 77-355).
<120 bar:
 9.1 9.1 |
 |
 |
 |
Test scope |
Test connection |
Test condition |
Nominal value |
Possible cause/Remedy |
| 9.1 |
|
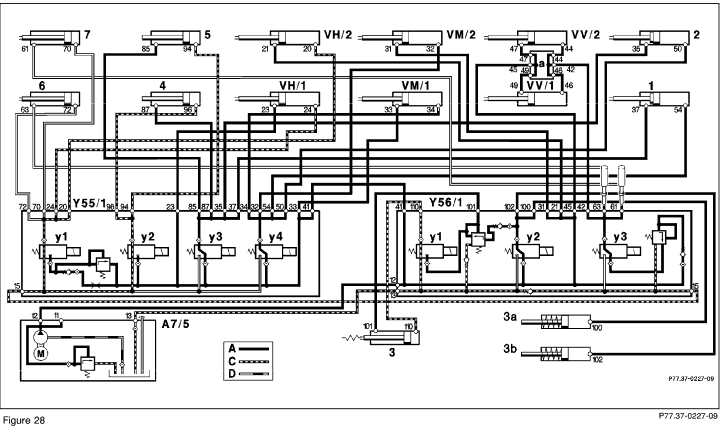
Open soft top
(Figure 28) |
Connect pressure gauge according to connection diagram (Figure 4).
Disconnect hydraulic line no. 61 from valve block (Y56/1). Seal connection with threaded plug
129 589 00 91 01.
Connector S84/3x
(see  11/1; 2, Figure 1) to remain disconnected. 11/1; 2, Figure 1) to remain disconnected.
Hydraulic line no. 63 to remain disconnected. |
Soft top inside soft top compartment,
soft top compartment cover up
Ignition: ON
Press and hold soft top switch: "lower". Have a second technician unplug relay (A7/5k1, Figure 4) after 5 sec. Keep switch depressed an additional 5 sec.
Read test pressure:
Release test pressure:
Press soft top switch briefly several times.
|
120 - 200 bar |
Nominal values ok:
Right hydraulic cylinder (7) for soft top actuation leaking.
Replace hydraulic cylinder
(SMS, Job No. 77-355).
<120 bar:
 9.2 9.2
|
 |
 |
 |
Test scope |
Test connection |
Test condition |
Nominal value |
Possible cause/Remedy |
| 9.2 |
|
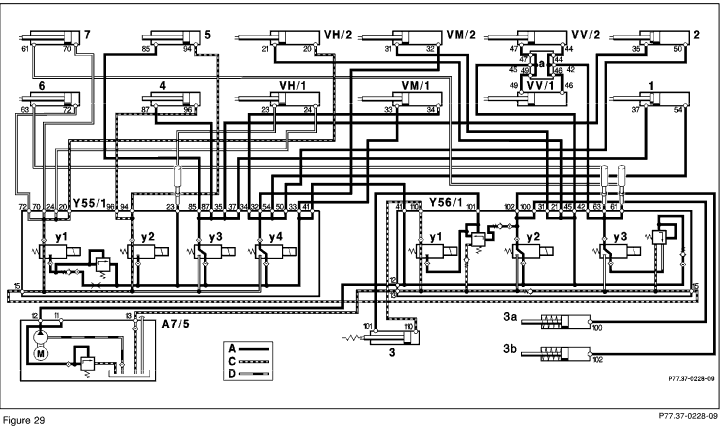
Open soft top
(Figure 29) |
Connect pressure gauge according to connection diagram (Figure 4).
Disconnect hydraulic line no. 23 from valve block (Y55/1). Seal connection with threaded plug
129 589 00 91 01.
Connector S84/3x
(see  11/1; 2, Figure 1) to remain disconnected. 11/1; 2, Figure 1) to remain disconnected.
Hydraulic lines no. 61 and no. 63 to remain disconnected.
|
Soft top retracted in soft top compartment,
soft top compartment cover up
Ignition: ON
Press and hold soft top switch: "lower". Have a second technician unplug relay (A7/5k1, Figure 4) after 5 sec. Keep switch depressed an additional 5 sec.
Read test pressure:
Release test pressure:
Press soft top switch briefly several times.
|
120 - 200 bar |
Nominal values ok:
Hydraulic cylinder in left rear lock (VH/1) leaking.
Replace hydraulic cylinder
(SMS, Job No. 77-328).
<120 bar:
 9.3 9.3
|
 |
 |
 |
Test scope |
Test connection |
Test condition |
Nominal value |
Possible cause/Remedy |
| 9.3 |
|
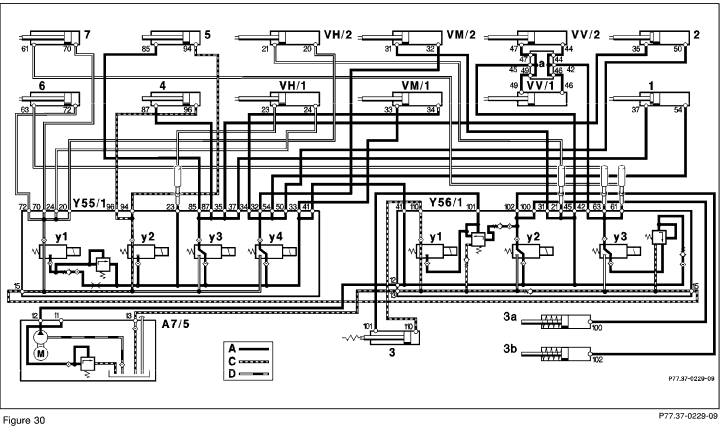
Open soft top
(Figure 30) |
Connect pressure gauge according to connection diagram (Figure 4).
Disconnect hydraulic line no. 21 from valve block (Y56/1). Seal connection with threaded plug
129 589 00 91 01.
Connector S84/3x
(see  11/1; 2, Figure 1) to remain disconnected. 11/1; 2, Figure 1) to remain disconnected.
Hydraulic lines no. 23, no. 61 and no. 63 to remain disconnected.
|
Soft top inside soft top compartment,
soft top compartment cover up
Ignition: ON
Press and hold soft top switch: "lower". Have a second technician unplug relay (A7/5k1, Figure 4) after 5 sec. Keep switch depressed an additional 5 sec.
Read test pressure:
Release test pressure:
Press soft top switch briefly several times.
|
120 - 200 bar |
Nominal values ok:
Hydraulic cylinder in the right rear lock (VH/2) leaking.
Replace hydraulic cylinder
(SMS, Job No. 77-328).
<120 bar:
 6.0 6.0
|
 |
 |
 |
Test scope |
Test connection |
Test condition |
Nominal value |
Possible cause/Remedy |
| 10.0 |
|
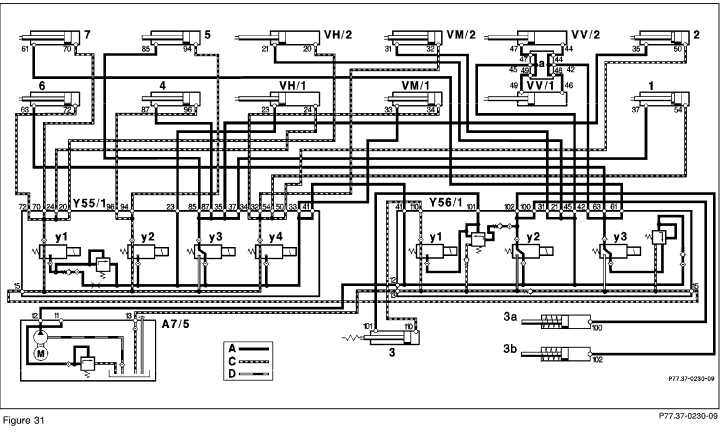
Close soft top compartment cover
(Figure 31)
Lock center
latches (VM/1, VM/2)
(Figure 31) |
Connect pressure gauge according to connection diagram (Figure 4). |
Soft top inside soft top compartment,
soft top compartment cover closed
(see owner's manual)
Ignition: ON
Press and hold soft top switch: "lower". Have a second technician unplug relay (A7/5k1, Figure 4) after 5 sec. Keep switch depressed an additional 5 sec.
Read test pressure:
Release test pressure:
Press soft top switch briefly several times.
|
120 - 200 bar |
Nominal values ok:
Check adjustment of latch pins for soft top compartment cover.
Center latches (VM/1, VM/2) have mechanical fault.
Replace center latches
(SMS, Job No. 77-320).
<120 bar:
 9.0,
9.0,
 6.2,
6.2,
 4.0
4.0 |
 |
 |
 |
Test scope |
Test connection |
Test condition |
Nominal value |
Possible cause/Remedy |
| 11.0 |
|
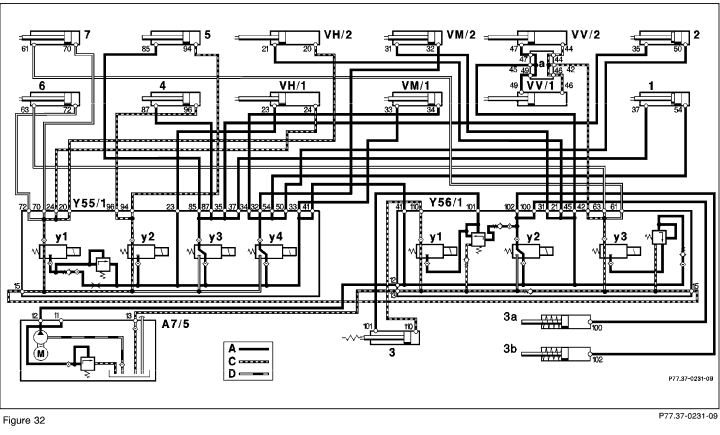
Open center
latches (VM/1, VM/2)
(Figure 32)
Raise soft top compartment cover
(Figure 32) |
Connect pressure gauge according to connection diagram (Figure 4). |
Starting point:
Soft top completely up
Ignition: ON
Press and hold soft top switch: "close". Have a second technician unplug relay (A7/5k1, Figure 4) after 5 sec. Keep switch depressed an additional 5 sec.
Read test pressure:
Release test pressure:
Press soft top switch briefly several times.
|
120 - 200 bar |
Nominal values ok:
Should center latches (VM/1,VM/2) not open, check adjustment of latch pins for soft top compartment cover. Also check both center latches for mechanical fault. Check the adjustment of latch pins.
Replace center locks, if locks do not open when using soft top switch (SMS, Job No. 77-320).
Additionally check soft top compartment hinges or gas pressure shock, if soft top cover does not raise and above remedies are without effect.
<120 bar:
 9.2,
9.2,
 6.0,
6.0,
 11.1
11.1
|
 |
 |
 |
Test scope |
Test connection |
Test condition |
Nominal value |
Possible cause/Remedy |
| 11.1 |
|
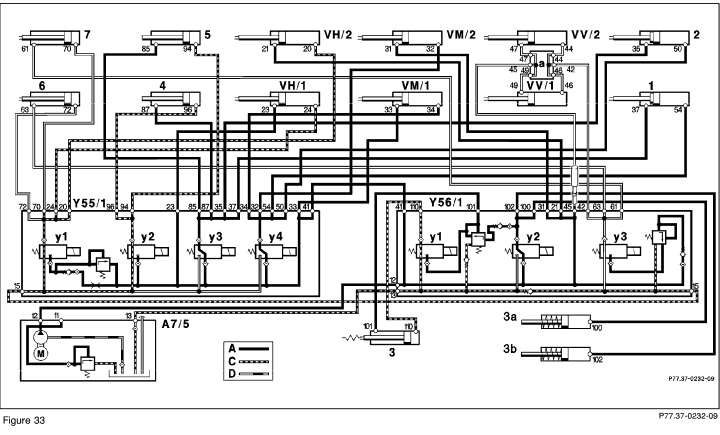
Open center
latches (VM/1, VM/2)
(Figure 33) |
Connect pressure gauge according to connection diagram (Figure 4).
Disconnect hydraulic line no. 45 from valve block (Y56/1). Seal connection with threaded plug
129 589 00 91 01.
Disconnect connector at valve block (Y55/1y1).
|
Soft top compartment cover raised,
soft top in soft top compartment
Ignition: ON
Press and hold soft top switch: "close". Have a second technician unplug relay (A7/5k1, Figure 4) after 5 sec. Keep switch depressed an additional 5 sec.
Read test pressure:
Release test pressure:
Press soft top switch briefly several times.
|
120 - 200 bar |
Nominal values ok:
 11.2. 11.2.
<120 bar:
 9.2,
9.2,
 6.0,
6.0, |
 |
 |
 |
Test scope |
Test connection |
Test condition |
Nominal value |
Possible cause/Remedy |
| 11.2 |
|
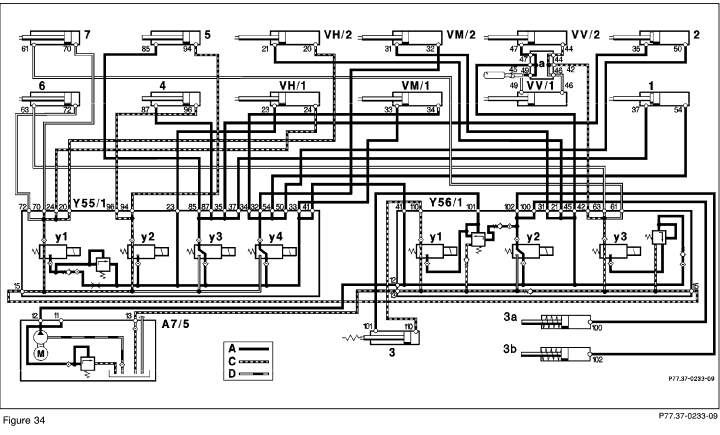
Open center
latches (VM/1, VM/2)
(Figure 34) |
Connect pressure gauge according to connection diagram (Figure 4).
Disconnect hydraulic line no. 49 from hydraulic manifold (a) at A-pillar crossmember.
Reconnect hydraulic line no. 45.
Connector at valve block (Y55/1y1) to remain disconnected. |
Soft top compartment cover raised,
soft top in soft top compartment
Ignition: ON
Press and hold soft top switch: "close". Have a second technician unplug relay (A7/5k1, Figure 4) after 5 sec. Keep switch depressed an additional 5 sec.
Read test pressure:
Release test pressure:
Press soft top switch briefly several times.
|
120 - 200 bar |
Nominal values ok:
Hydraulic cylinder in left front lock (VV/1) leaking.
Replace hydraulic cylinder
(SMS, Job No. 77-335).
<120 bar:
Hydraulic cylinder in right front lock (VV/2) leaking.
Replace hydraulic cylinder
(SMS, Job No. 77-335). |
 |
 |
 |
Test scope |
Test connection |
Test condition |
Nominal value |
Possible cause/Remedy |
| 12.0 |
|
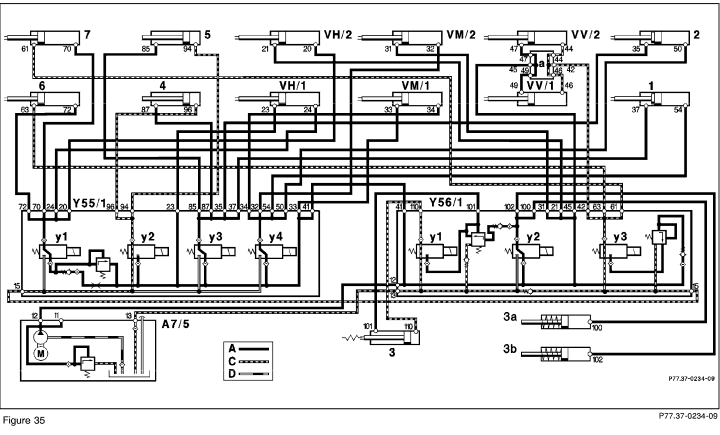
Close soft top
(Figure 35) |
Connect pressure gauge according to connection diagram (Figure 4).
Install shim between windshield crossmember and soft top so that latch pins do not engage into left and right front latches (VV/1, VV/2).
Disconnect connector at valve block (Y56/1y3). |
Close soft top, soft top compartment cover raised, fabric bow raised
Ignition: ON
Press soft top switch:
"Close".
Read test pressure while pressing soft top switch
Release test pressure:
Press soft top switch briefly several times.
|
120 - 200 bar |
Nominal values ok:
Mechanical fault in soft top frame assembly.
<120 bar:
 5.1,
5.1,
 6.0,
6.0,
 11.1
11.1 |
 |
 |
Test scope |
Test connection |
Test condition |
Nominal value |
Possible cause/Remedy |
| 13.0 |
|
Lock front locks (VV/1, VV/2) |
Connect pressure gauge according to connection diagram (Figure 4).
Remove shim between windshield crossmember and soft top. Insert latch pins into front latches (VV/1, VV/2). |
Soft top lowered unto winshield crossmember, soft top compartment cover up, fabric bow raised
Ignition: ON
Press soft top switch:
"Close".
Read test pressure while pressing soft top switch
|
180 - 200 bar |
Nominal values ok:
Check the adjustment of front latch pins on soft top frame
(SMS, Job No. 77-303).
Replace front locks if nominal values are met but locks still do not lock (SMS, Job No. 77-330).
<180 bar:
 5.1,
5.1,
 6.0,
6.0,
 11.1
11.1
|
 |
 |
 |
Test scope |
Test connection |
Test condition |
Nominal value |
Possible cause/Remedy |
| 14.0 |
|
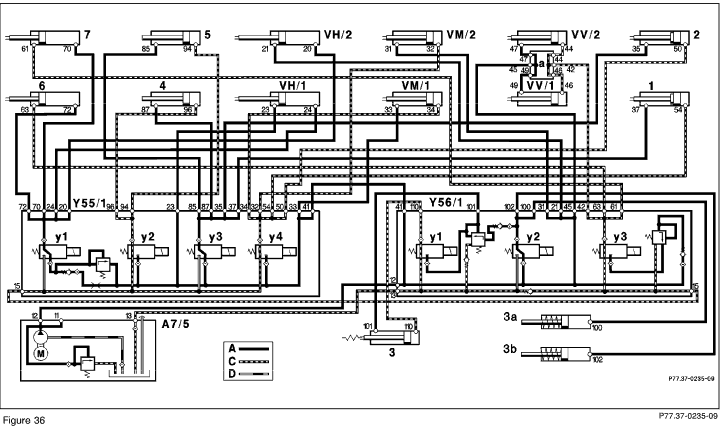
Close soft top compartment cover
(Figure 36)
Lock center
locks (VM/1, VM/2)
(Figure 36) |
Connect pressure gauge according to connection diagram (Figure 4).
Disconnect connector at valve block (Y55/1y2).
|
Front of soft top locked, fabric bow raised, soft top compartment cover closed and center locks (VM/1, VM/2) locked
Ignition: ON
Press and hold soft top switch: "close". Have a second technician unplug relay (A7/5k1, Figure 4) after 5 sec. Keep switch depressed an additional 5 sec.
Read test pressure:
Release test pressure:
Press soft top switch briefly several times.
|
120 - 200 bar |
Nominal values ok:
Check adjustment of soft top compartment cover latch pins.
Replace center locks, if locks do not lock when using the soft top switch (SMS, Job No. 77-320).
<120 bar:
 4.0,
4.0,
 6.2,
6.2,
 9.0
9.0 |
 |
 |
 |
Test scope |
Test connection |
Test condition |
Nominal value |
Possible cause/Remedy |
| 15.0 |
|
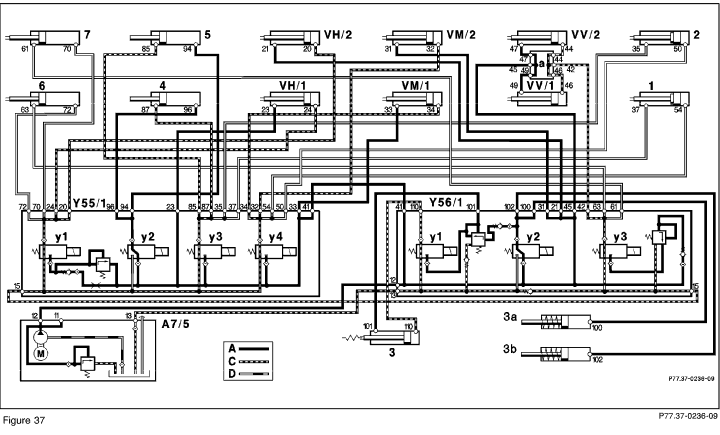
Retract fabric bow
(Figure 37) |
Connect pressure gauge according to connection diagram (Figure 4). |
Soft top completely closed
Ignition: ON
Press and hold soft top switch: "close". Have a second technician unplug relay (A7/5k1, Figure 4) after 5 sec. Keep switch depressed an additional 5 sec.
Read test pressure:
Release test pressure:
Press soft top switch briefly several times.
|
120 - 200 bar |
Nominal values ok:
Mechanical fault in soft top frame assembly.
<120 bar:
 4.0,
4.0,
 15.1
15.1 |
 |
 |
 |
Test scope |
Test connection |
Test condition |
Nominal value |
Possible cause/Remedy |
| 15.1 |
|
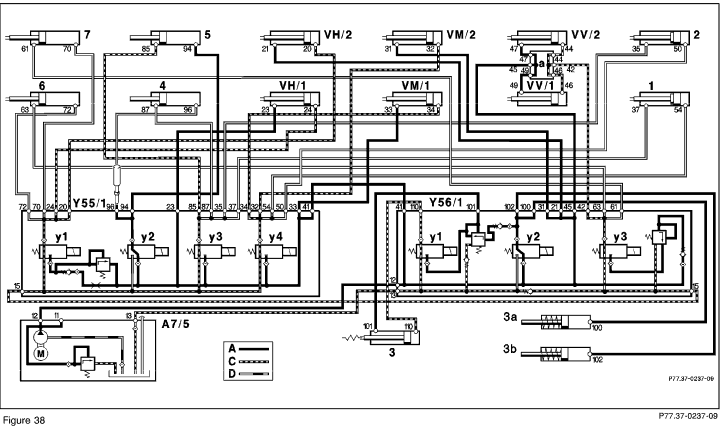
Retract fabric bow
(Figure 38) |
Connect pressure gauge according to connection diagram (Figure 4).
Disconnect hydraulic line no. 96 from valve block (Y55/1). Seal connection with threaded plug
129 589 00 91 01.
|
Soft top completely closed
Ignition: ON
Press and hold soft top switch: close. Have a second technician unplug relay (A7/5k1, Figure 4) after 5 sec. Keep switch depressed an additional 5 sec.
Read test pressure:
Release test pressure:
Press soft top switch briefly several times.
|
120 - 200 bar |
Nominal values ok:
Hydraulic cylinder of left fabric bow (4) leaking.
Replace hydraulic cylinder
(SMS, Job No. 77-360).
<120 bar:
Hydraulic cylinder of right fabric bow (5) leaking.
Replace hydraulic cylinder
(SMS, Job No. 77-360). |
 |
 |
Test scope |
Test connection |
Test condition |
Nominal value |
Possible cause/Remedy |
| 16.0 |
|
Lock rear locks (VH/1, VH/2) |
Connect pressure gauge according to connection diagram (Figure 4). |
Soft top completely closed
Ignition: ON
Press and hold soft top switch: "close". Have a second technician unplug relay (A7/5k1, Figure 4) after 5 sec. Keep switch depressed an additional 5 sec.
Read test pressure:
Release test pressure:
Press soft top switch briefly several times.
|
120 - 200 bar |
Nominal values ok:
Check adjustment of latch pins on fabric bow
(SMS, Job No. 77-303).
Replace rear latches if locking is not possible and nominal values are met (SMS, Job No. 77-328).
<120 bar:
 4.0
4.0 |
 |
 |
 |
Test scope |
Test connection |
Test condition |
Nominal value |
Possible cause/Remedy |
| 17.0 |
|
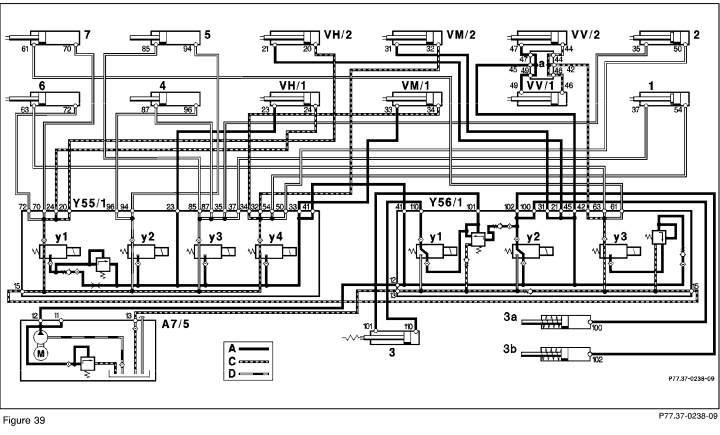
Raise roll bar
(Figure 39) |
Connect pressure gauge according to connection diagram (Figure 4). |
Roll bar lowered
Ignition: ON
Press and hold RB switch: "raise". Have a second technician unplug relay (A7/5k1, Figure 4) after 5 sec. Keep switch depressed an additional 5 sec.
Read test pressure:
Release test pressure:
Press soft top switch briefly several times.
|
120 - 200 bar |
Nominal values ok:
Hydraulic cylinder lock in roll bar support element (3) does not unlock.
Replace support element
(SMS, Job No. 91-920).
<120 bar:
 4.0
4.0 |
 |
 |
 |
Test scope |
Test connection |
Test condition |
Nominal value |
Possible cause/Remedy |
| 18.0 |
|
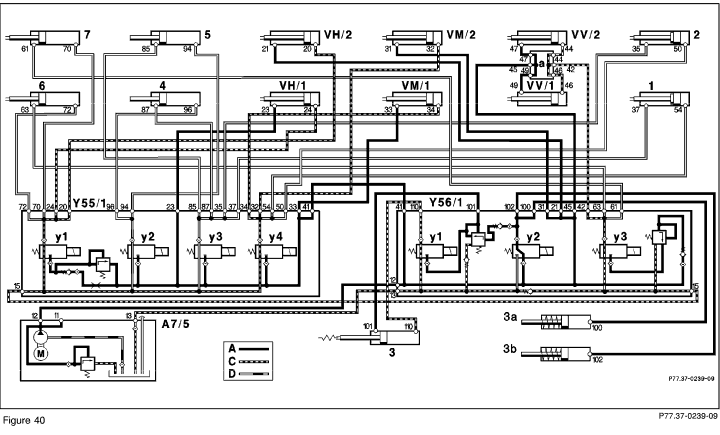
Lower roll bar
(Figure 40) |
Connect pressure gauge according to connection diagram (Figure 4). |
Roll bar raised
Ignition: ON
Press and hold RB switch: "lower". Have a second technician unplug relay (A7/5k1, Figure 4) after 5 sec. Keep switch depressed an additional 5 sec.
Read test pressure:
Release test pressure:
Press soft top switch briefly several times.
|
120 - 200 bar |
Nominal values ok:
Left/right locking pawls
(3a/3b) do not release.
Replace locking pawls.
Mechanical fault in support element (3).
Replace support element
(SMS, Job No. 91-920).
<120 bar:
 4.0
4.0 |
|

 Printable
version


 Printable
version