|
 CAUTION! CAUTION!
Injury hazard from pinching and crushing, in extreme cases extremities
can even be severed when caught in the mechanism.
Do not allow any body parts to be in the general area of the moving components.
Preparation for Test:
1. Review entire 11.2 section, especially  32, prior to performing any of the following tests on the soft top.
Notes for Hydraulic Test:
The following jobs are the same for all test steps:
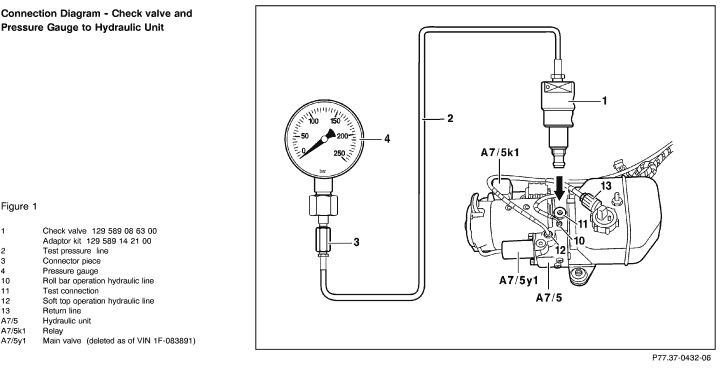
A. Connection of test equipment to hydraulic unit (Figure 1).
Torque check valve 129 589 08 63 00 to 5 Nm.
B. Build up and release test pressure (see example).
C. Test hydraulic cylinder only at end position of piston (Observe soft
top positions).
D. If hydraulic lines need to be disconnected from the valve blocks during
pressure tests, the appropriate soft top position (end position of the
hydraulic cylinder) must first be ensured.
Disconnected hydraulic lines should be held in a container (connect a
transparent hose such as windshield washer hose).
Hydraulic components that leak should be replaced. During pressure tests,
the valve block connections must be plugged with plug 129 589 00
91 01.
If hydraulic components need to be replaced, the disconnected hydraulic
lines must be plugged with plug 129 589 00 91 07, while the connections
of valve blocks, hydraulic cylinders and hydraulic manifolds must be plugged
immediately using plug 129 589 00 91 11 to prevent the possible
entry of dirt.
Example: Building up and releasing test pressure.
Soft top
Ignition ON:
Activate power soft top switch (toward lower if the soft top is down,
toward raise if the soft top is up) for 5 seconds. Have a second technician
disconnect relay (A7/5k1, Figure 1).
Hold power soft top switch for 5 additional seconds. Read and record test
pressure.
Release test pressure:
Briefly activate power soft top switch several more times.
Roll bar
Ignition ON:
Activate RB switch (toward lower if the roll bar is lowered, toward raise
if it is raised) for 5 seconds. Have a second technician disconnect relay
(A7/5k1, Figure 1). Hold roll bar switch for 5 additional seconds. Read
and record test pressure.
Release test pressure:
Briefly activate power soft top switch several more times.
 CAUTION! CAUTION!
Release established test pressure before beginning the next test step.
|
 |
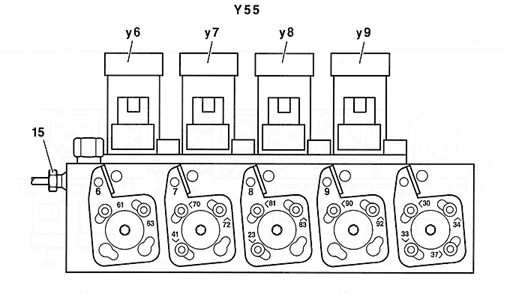
Y55 Left RST valve block
(4 connections)
Figure 2
Y55 Left RST valve block (4 connections)
y6 Soft top "open" valve
y7 Soft top "close" valve
y8 Fabric bow "raise" valve
y9 Fabric bow "lower" valve |
|
 |
| |
|
P77.39-0272-05 |
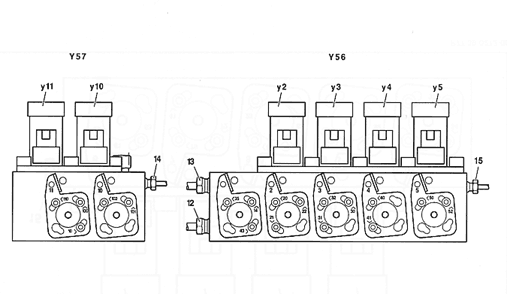
Y56 Right RST Valve Block
(4 connections)
and
Y57 Roll bar Valve Block
(2 connections)
Figure 2
Y56 Left RST valve block (4 connections)
y2 Rear locks valve
y3 Center locks valve
y4 Front locks valve
y5 Soft top compartment cover valve
Y57 Roll Bar valve block (2 connections)
y10 Roll bar "Lower" valve
y11 Roll bar "raise" valve |
|
 |
| |
|
P77.39-0273-09 |
 |
 |
 |
Test scope |
Test connection |
Test condition |
Nominal value |
Possible cause/Remedy |
| 1.0 |
|
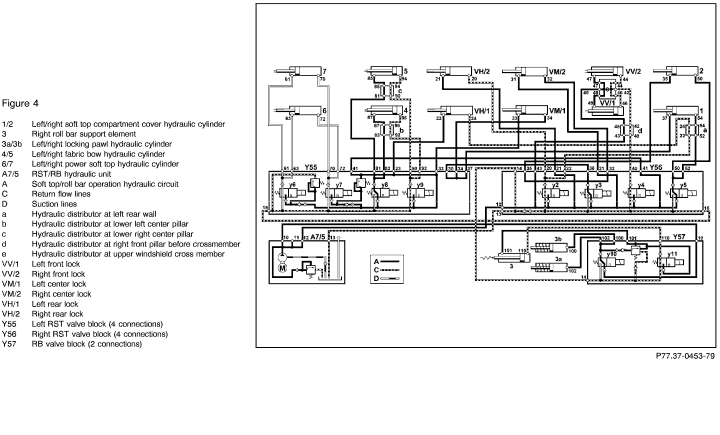
Open center locks (VM/1, VM/2)
(Figure 4) |

Connect pressure gauge according to connection diagram (Figure 1).
Disconnect connector at valve block (Y56y4). |
Soft top closed.
Fabric bow up,
Center locks (VM/1,VM/2) manually open,
Soft top compartment cover up.
Ignition: ON
Press and hold soft top switch to "close". Have a second technician unplug relay (A7/5k1, Figure 1) after 5 sec. Keep switch depressed an additional 5 sec.
Read test pressure:
Release test pressure:
Press soft top switch briefly several times.
|
120 - 200 bar |
If nominal values ok:
If the center locks do not open, check the adjustment of the locking pins for the soft top compartment cover,
See SMS, Job no. 77-0303
<120 bar:
33 5.0,
33 7.0,
If the opening of the center locks is still not possible using the soft top switch, see:
1.1 |
 |
|
|
Test scope |
Test connection |
Test condition |
Nominal value |
Possible cause/Remedy |
| 1.1 |
|
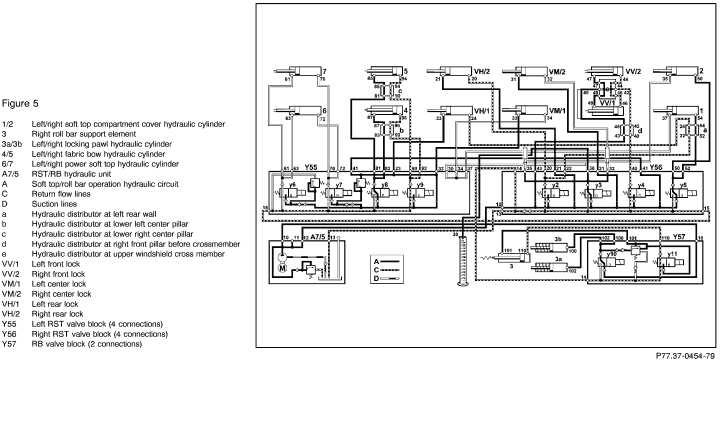
Open center locks (VM/1, VM/2)
(Figure 5) |
Disconnect hydraulic lines
no. 30, 32, 50 from valve block (Y56) (Figure 5).
Seal connections no. 32, 35 with threaded plugs
129 589 00 91 01.
Install hydraulic line 129 806 34 83 to no. 30 on valve block (Y56) and place end of hydraulic line into clean container.
Reconnect connector after test to valve block (Y56y4).
|
Soft top closed,
Fabric bow raised,
Center locks (VM/1, VM/2) manually opened,
Soft top compartment cover open.
Ignition: ON
Press and hold soft top switch to "close" for 2 seconds. |
|
Observe hydraulic fluid flow from hydraulic line 129 806 34 83, if no or weak uneven hydraulic flow is noted:
Replace valve (y3) at Y56,
See SMS, Job no. 77-0385
If the opening of the center locks using the soft top switch is still not possible, replace the center locks,
See SMS, Job no. 77-0320 |
 |
|
|
Test scope |
Test connection |
Test condition |
Nominal value |
Possible cause/Remedy |
| 2.0 |
|
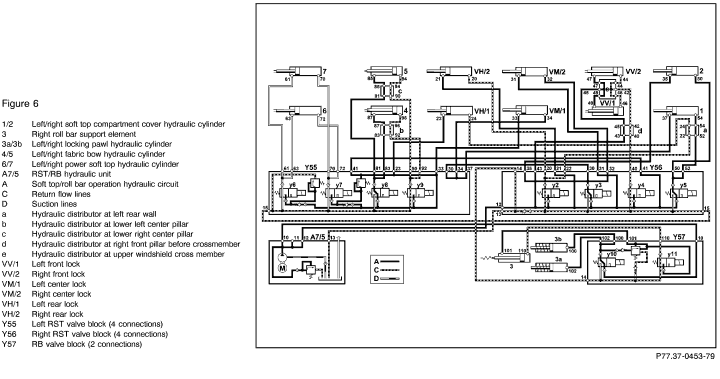
Raise soft top compartment cover
(Figure 6) |
Connect pressure gauge
according to connection diagram (Figure 1).
Disconnect connector at valve block (Y56y4). |
Soft top closed,
Fabric bow raised,
Center locks (VM/1, VM/2) manually opened,
Soft top compartment cover raised.
Ignition: ON
Press and hold soft top switch: "close". Have a second technician unplug relay (A7/5k1, Figure 4) after 5 sec. Keep switch depressed an additional 5 sec.
Read test pressure:
Release test pressure:
Press soft top switch briefly several times.
|
120 - 200 bar |
If nominal values ok:
Check for fault with soft top compartment cover hinges or gas pressure shock.
<120 bar:
33 5.0
34 1.0 |
 |
|
|
Test scope |
Test connection |
Test condition |
Nominal value |
Possible cause/Remedy |
| 3.0 |
|
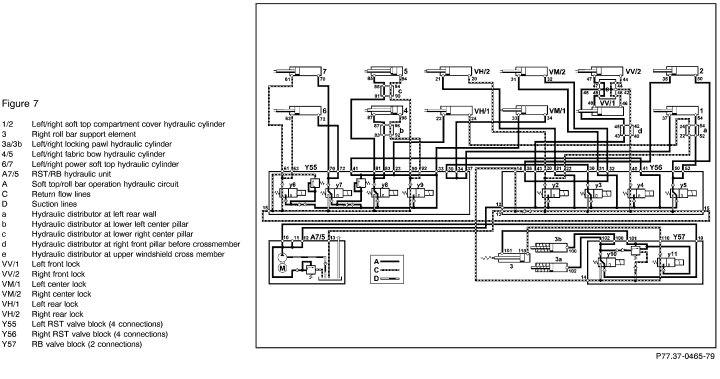
Close soft top
(Figure 7) |
Connect pressure gauge
according to connection diagram (Figure 1).
Install shim between windshield crossmember and soft top so that latch pins do not engage into left and right front locks
(VV/1, VV/2).
Disconnect connector at valve block (Y55y6). |
Soft top positioned over windshield crossmember,
Soft top compartment cover raised,
Fabric bow raised.
Ignition: ON
Press and hold soft top switch to "close". Have a second technician unplug
relay (A7/5k1, Figure 1) after 5 sec. Keep switch depressed an additional 5 sec.
Read test pressure:
Release test pressure:
Press soft top switch briefly several times.
|
120 - 200 bar |
If nominal values ok:
Check for mechanical fault within soft top frame.
< 120 bar:
3.1 |
 |
|
|
Test scope |
Test connection |
Test condition |
Nominal value |
Possible cause/Remedy |
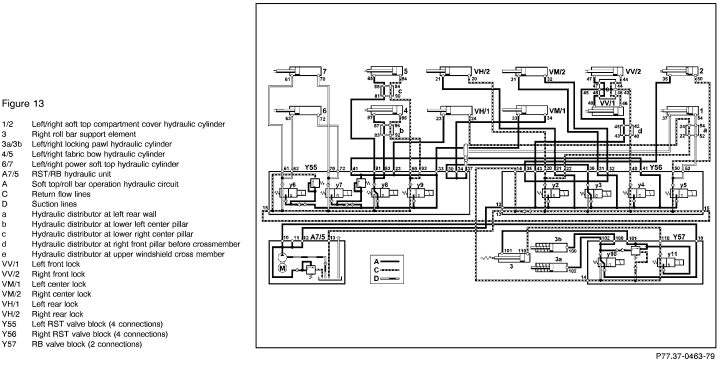
| 3.1 |
|
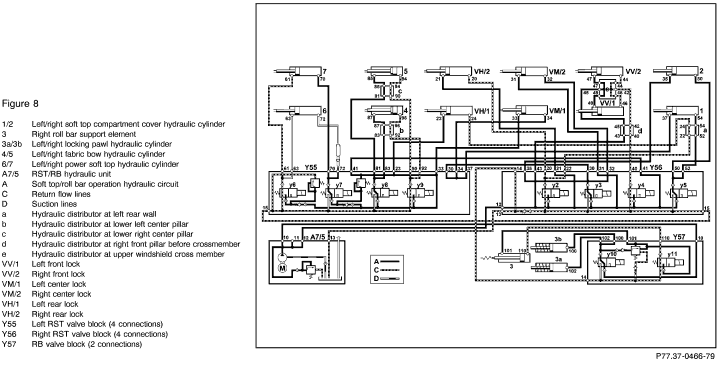
Close soft top
(Figure 8) |
Connect pressure gauge
according to connection diagram (Figure 1).
Install shim between windshield crossmember and soft top so that latch pins do not engage into left and right front locks
(VV/1, VV/2).
Disconnect hydraulic line
no. 72 from valve block (Y55) (Figure 8).
Seal connection with threaded plugs
129 589 00 91 02/03.
|
Close soft top,
Soft top compartment cover raised,
Fabric bow raised.
Ignition: ON
Press and hold soft top switch to "close". Have a second technician unplug
relay (A7/5k1, Figure 1) after 5 sec. Keep switch depressed an additional 5 sec.
Read test pressure:
Release test pressure:
Press soft top switch briefly several times.
|
120 - 200 bar |
If nominal values ok:
Left power soft top hydraulic cylinder(6, Figure 8) leaking:
Replace hydraulic cylinder,
See SMS, Job No. 77-0355
<120 bar:
3.2 |
 |
|
|
Test scope |
Test connection |
Test condition |
Nominal value |
Possible cause/Remedy |
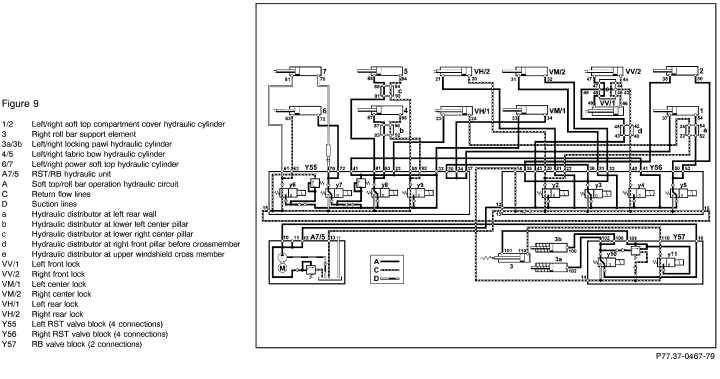
| 3.2 |
|
Close soft top
(Figure 9) |
Connect pressure gauge
according to connection diagram (Figure 1).
Install shim between windshield crossmember and soft top so that latch pins do not engage into left and right front locks
(VV/1, VV/2).
Reconnect hydraulic line no. 72 to valve block (Y55).
Disconnect hydraulic line no. 70 from valve block (Y55).
Seal connection with threaded plug
129 589 00 91 01.
|
Close soft top,
Soft top compartment cover raised,
Fabric bow raised.
Ignition: ON
Press and hold soft top switch: "close". Have a second technician unplug relay (A7/5k1, Figure 1) after 5 sec. Keep switch depressed an additional 5 sec.
Read test pressure:
Release test pressure:
Press soft top switch briefly several times.
|
120 - 200 bar |
Nominal values ok:
Right power soft top hydraulic cylinder (7, Figure 9) leaking:
Replace hydraulic cylinder,
See SMS, Job No. 77-0355
<120 bar:
5.0,
If the soft top continues not to close even after nominal values are met:
3.3 |
 |
|
|
Test scope |
Test connection |
Test condition |
Nominal value |
Possible cause/Remedy |
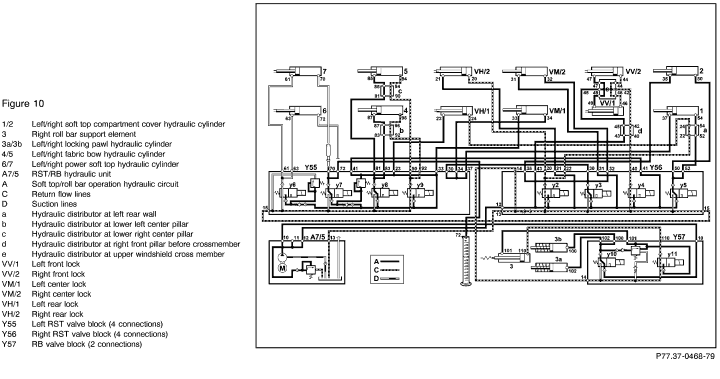
| 3.3 |
|
Close soft top
(Figure 10) |
Install shim between windshield crossmember and soft top so that latch pins do not engage into left and right front locks
(VV/1, VV/2).
Disconnect hydraulic lines no. 70, 72 from valve block (Y55).
Seal connection no. 72 with threaded plug
129 589 00 91 01.
Connect hydraulic line no. 129 806 34 83 to hydraulic line connection no. 70 at Y55 and hold into clean container.
Reconnect connector after test to valve block (Y55y6).
|
Close soft top,
Soft top compartment cover raised,
Fabric bow raised.
Ignition: ON
Press and hold soft top switch: "close" for 2 seconds. |
|
Observe hydraulic fluid flow from hydraulic line 129 806 34 83, if no or weak uneven hydraulic flow is noted:
Replace valve (y7) at Y55,
See SMS, Job no. 77-0385 |
 |
|
|
Test scope |
Test connection |
Test condition |
Nominal value |
Possible cause/Remedy |
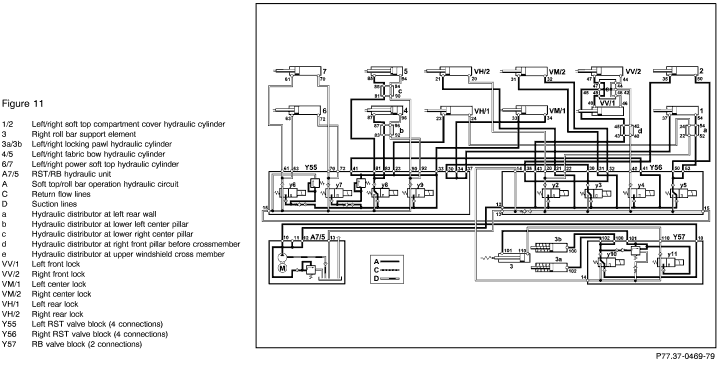
| 4.0 |
|
Lock front locks (VV/1, VV/2)
(Figure 11) |
Connect pressure gauge
according to connection diagram (Figure 1). |
Soft top lowered unto windshield crossmember,
Engage lock pins into front locks (VV/1, VV/2),
Soft top compartment cover raised,
Fabric bow raised.
Ignition: ON
Press and hold soft top switch: "close".
Read pressure while pressing soft top switch.
|
180 - 200 bar |
If Nominal values ok:
Check adjustment of lock pins on front soft top frame,
See SMS, Job no. 77-0303
If the locking of the front locks is not possible even if the nominal values are met:
Replace locks,
See SMS, Job No. 77-0303
>180 bar:
33 5.0 |
 |
|
|
Test scope |
Test connection |
Test condition |
Nominal value |
Possible cause/Remedy |
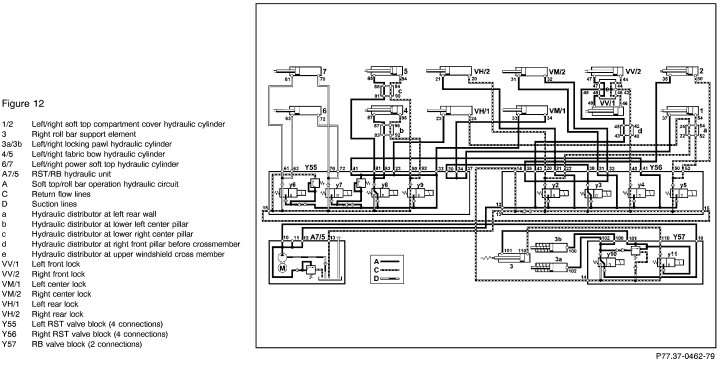
| 5.0 |
|
Close soft top compartment cover,
Lock center locks (VM/1, VM/2)
(Figure 12) |
Connect pressure gauge
according to connection diagram (Figure 1).
Remove both lock pins on soft top compartment cover. |
Soft top (front) closed,
Fabric bow raised,
Center locks (VM/1, VM/2) opened,
Soft top compartment cover pressed closed by hand.
Ignition: ON
Press and hold soft top switch to "close". Have a second technician unplug relay (A7/5k1, Figure 1) after 5 sec. Keep switch depressed an additional 5 sec.
Read test pressure:
Release test pressure:
Press soft top switch briefly several times.
|
120 - 200 bar |
If nominal values ok:
Check adjustment of soft top compartment cover lock pins.
If the locking of the soft top compartment using the soft top switch still not possible:
Replace locks,
see SMS, Job No. 77-0320
<120 bar:
5.1 |
 |
|
|
Test scope |
Test connection |
Test condition |
Nominal value |
Possible cause/Remedy |
| 5.1 |
|
Close soft top compartment cover,
Lock center locks (VM/1, VM/2)
(Figure 13) |
Connect pressure gauge
according to connection diagram (Figure 1).
Disconnect hydraulic line no. 37 from valve block (Y55).
Seal connection with threaded plug
129 589 00 91 01. |
Front of soft top closed,
Fabric bow raised,
Center locks (VM/1, VM/2) opened,
Soft top compartment cover manually pressed closed by hand.
Ignition: ON
Press and hold soft top switch: "close". Have a second technician unplug relay (A7/5k1, Figure 1) after 5 sec. Keep switch depressed an additional 5 sec.
Read test pressure:
Release test pressure:
Press soft top switch briefly several times.
|
120 - 200 bar |
If nominal values ok:
Left soft top compartment cover hydraulic cylinder (1, Figure 13) leaks,
Replace hydraulic cylinder,
See SMS, Job no. 77-0370
<120 bar:
5.2 |
 |
|
|
Test scope |
Test connection |
Test condition |
Nominal value |
Possible cause/Remedy |
| 5.2 |
|
Close soft top compartment cover,
Lock center locks (VM/1, VM/2)
(Figure 14) |
Connect pressure gauge
according to connection diagram (Figure 1).
Reconnect hydraulic line no. 37 to valve block (Y55).
Disconnect hydraulic line no. 35 from valve block (Y56).
Seal connection with threaded plug
129 589 00 91 01.
Reinstall both locks on soft top cover after performing test. |
Front of soft top closed,
Fabric bow raised,
Center locks (VM/1, VM/2) opened,
Soft top compartment cover manually pressed closed by hand.
Ignition: ON
Press and hold soft top switch to"close". Have a second technician unplug relay (A7/5k1, Figure 1) after 5 sec. Keep switch depressed an additional 5 sec.
Read test pressure:
Release test pressure:
Press soft top switch briefly several times.
|
120 - 200 bar |
If nominal vales ok:
Right soft top compartment cover hydraulic cylinder (2, Figure 14) leaks,
Replace hyraulic cylinder,
See SMS, Job No. 77-0370
<120 bar:
33 5.0
34 1.0 |
 |
|
|
Test scope |
Test connection |
Test condition |
Nominal value |
Possible cause/Remedy |
| 6.0 |
|
Retract fabric bow
(Figure 15) |
Connect pressure gauge
according to connection diagram (Figure 1).
Remove both locking pins from the fabric bow. |
Front of soft top closed,
Soft top compartment cover closed,
Fabric bow manually lowered by hand.
Ignition: ON
Press and hold soft top switch to"close". Have a second technician unplug relay (A7/5k1, Figure 1) after 5 sec. Keep switch depressed an additional 5 sec.
Read test pressure:
Release test pressure:
Press soft top switch briefly several times.
|
120 - 200 bar |
If nominal values ok:
Mechanical fault in soft top frame.
<120 bar:
6.1 |
 |
|
|
Test scope |
Test connection |
Test condition |
Nominal value |
Possible cause/Remedy |
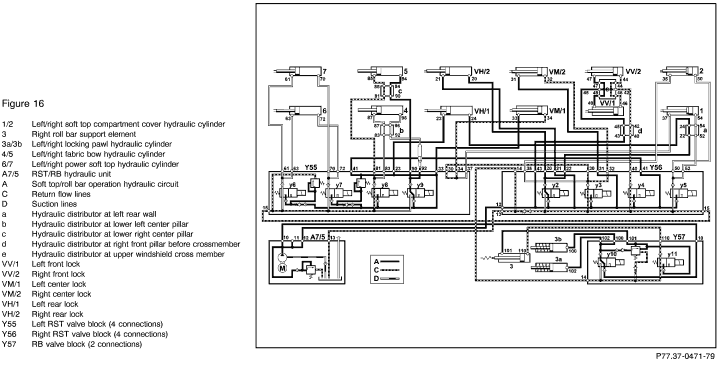
| 6.1 |
|
Retract fabric bow
(Figure 16) |
Connect pressure gauge
according to connection diagram (Figure 1).
Disconnect hydraulic line no. 92 from Valve block (Y55).
Seal connection with threaded plug
129 589 00 91 01.
Do not reinstall both locking pins of fabric bow at this time. |
Front of Soft top closed,
Soft top compartment cover closed,
Fabric bow manually lowered by hand.
Ignition: ON
Press and holdsoft top switch to "close". Have a second technician unplug relay (A7/5k1, Figure 1) after 5 sec. Keep switch depressed an additional 5 sec.
Read test pressure:
Release test pressure:
Press soft top switch briefly several times.
|
120 - 200 bar |
If nominal values ok:
Left fabric bow hydraulic cylinder (4, Figure 16) leaks:
Replace hydraulic cylinder,
See SMS, Job No. 77-0360
<120 bar:
Right fabric bow hydraulic cylinder (5, Figure 16) leaks:
Replace hydraulic cylinder
See SMS, Job No. 77-0360
If the fabric bow cannot be lowered using the soft top switch, check:
6.2 |
 |
|
|
Test scope |
Test connection |
Test condition |
Nominal value |
Possible cause/Remedy |
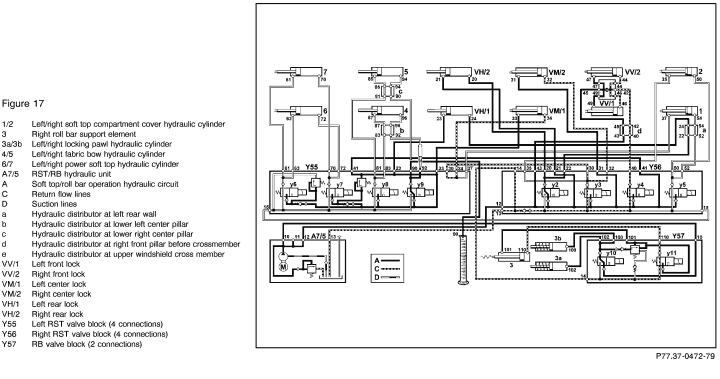
| 6.2 |
|
Retract fabric bow
(Figure 17) |
Hydraulic line connection no. 92, on valve block (Y55) to remain plugged.
Disconnect hydraulic no. 90 from valve block (Y55).
Connect hydraulic line no. 129 806 34 83 to hydraulic line connection no. 90, from valve block (Y55) and hold into clean container.
Locking pins for fabric bow to remain removed from fabric bow.
|
Front of soft top closed,
Soft top compartment cover closed,
Manually by hand, retract fabric bow.
Ignition: ON
Press and hold soft top switch: "close" for 2 seconds. |
|
Observe hydraulic fluid flow from hydraulic line 129 806 34 83, if no or weak uneven hydraulic flow is noted:
Replace valve (y9) at Y55,
See SMS, Job no. 77-0385 |
 |
|
|
Test scope |
Test connection |
Test condition |
Nominal value |
Possible cause/Remedy |
| 7.0 |
|
Lock rear locks (VH/1, VH/2)
(Figure 18) |
Connect pressure gauge
according to connection diagram (Figure 1). |
Soft top completely closed.
Ignition: ON
Press and hold soft top switch: "close". Have a second technician unplug relay (A7/5k1, Figure 1) after 5 sec. Keep switch depressed an additional 5 sec.
Read test pressure:
Release test pressure:
Press soft top switch briefly several times.
|
120 - 200 bar |
If nominal values ok:
Check adjustment of locking pins for fabric bow,
See SMS, Job No. 77-0303
If the locks do not lock properly, even after nominal values have been met:
Replace locks,
See SMS, Job No. 77-0328
<120 bar:
33 5.0
|
|


 Printable
version
Printable
version