Listing of Test Steps
| 1 |
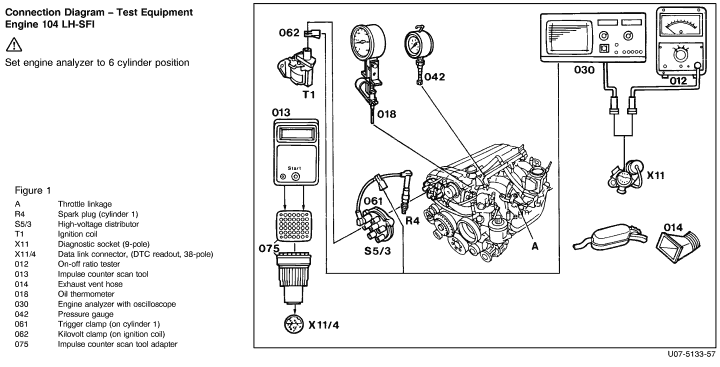
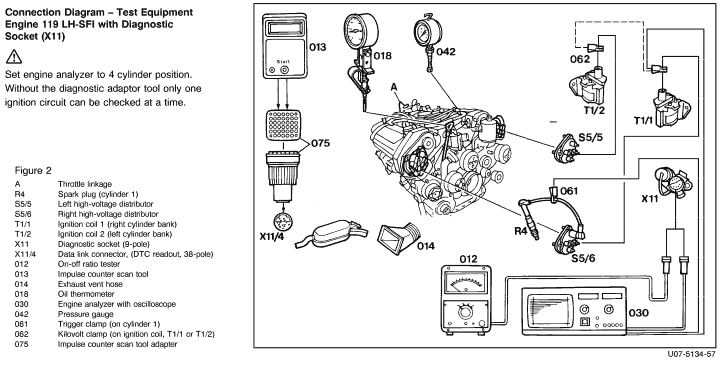
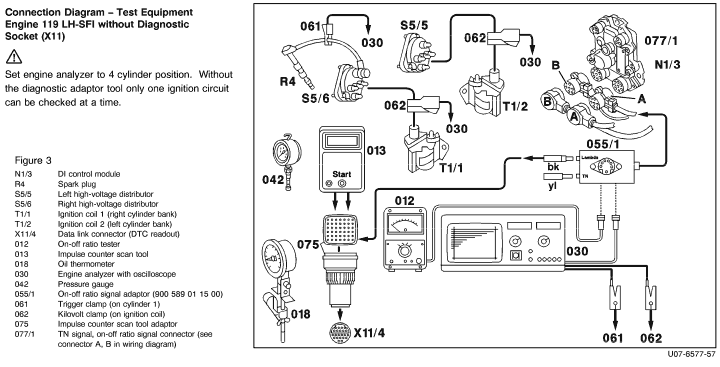
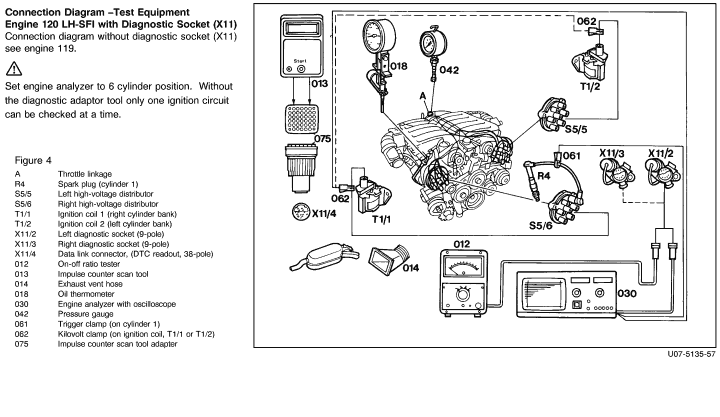
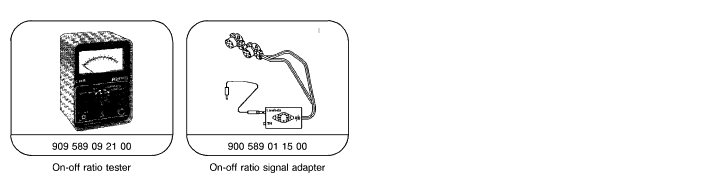
Test equipment |
connect/disconnect according to Connection Diagram. |
| 2 |
Base module DTC readout  Ignition: ON Ignition: ON |
perform. |
| 3 |
LH-SFI control module DTC readout Ignition: ON |
perform. |
| 4 |
DI control module DTC readout Ignition: ON |
perform. |
| 5.0 |
EA/CC/ISC control module DTC readout Ignition: ON |
perform. |
| 5.1 |
CC/ISC control module DTC readout Ignition: ON |
perform. |
| 6 |
Air filter |
remove and install. |
| 7.0 |
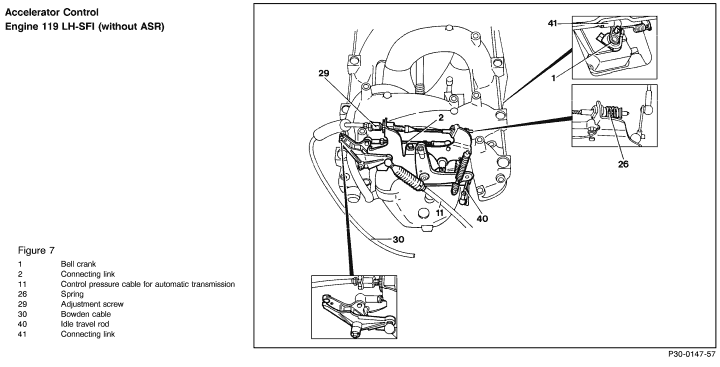
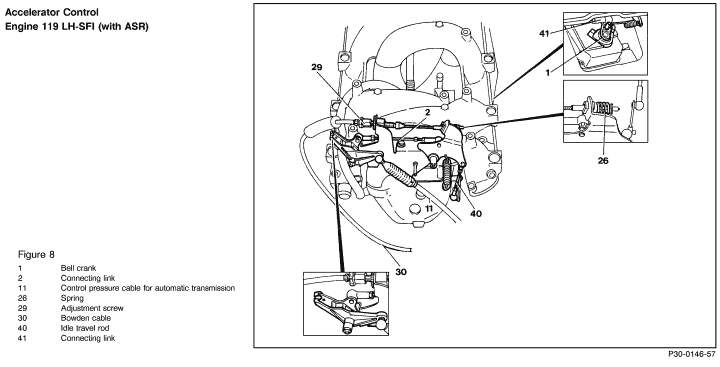
Throttle control linkage |
check throttle valve for free movement and condition. Lubricate all bearings, gate levers and ball sockets. |
| 7.1 |
WOT contact |
check, adjust. |
| 7.2 |
CTP contact |
check using accelerator pedal, adjust. |
| 8 |
Control pressure cable of AT |
check, adjust. |
| 9 |
Fuel pressure |
check. (Engine must be at closed throttle to test) |
| 10 |
Engine coolant level |
check, correct. |
| 11 |
Engine oil level |
check, observe condition of oil. |
| 12 |
Ignition system, primary, secondary Engine: at Idle |
check (see Test and Adjustment Data, Section A). |
| 13 |
Ignition timing and vacuum advance Engine: at Idle |
check (see Test and Adjustment Data, Section A). |
| 14 |
Oscilloscope pattern brief acceleration to 3000 rpm Engine: at Idle |
evaluate (see Test and Adjustment Data section C). |
| 15 |
Engine oil temperature |
approximately 80 °C. |
| 16 |
CTP RPM |
check. |
| 17 |
On-off ratio control system |
check(readout oscillates). |
| 18 |
Not applicable for U.S. version vehicles |
- |
| 19 |
CTP speed under load |
check in TR "D" (service and parking brake applied) and with all accessories turned on. |
| Test step/Test sequence |
Test condition |
Nominal value |
Possible cause/Remedy 1) |
1
Connect test equipment according to diagram
|
Ignition: OFF |
- |
- |
2
Base module
DTC readout |
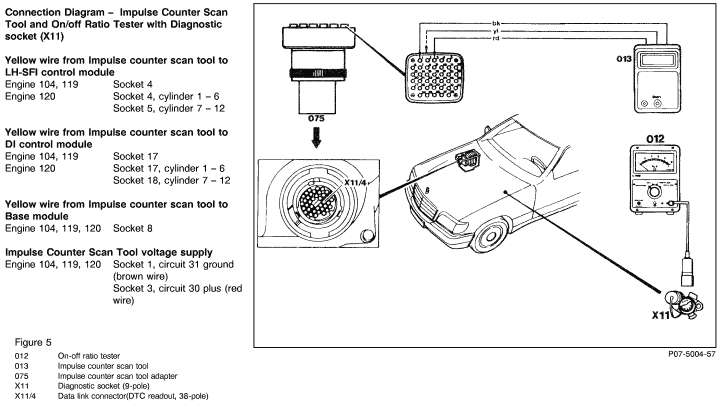
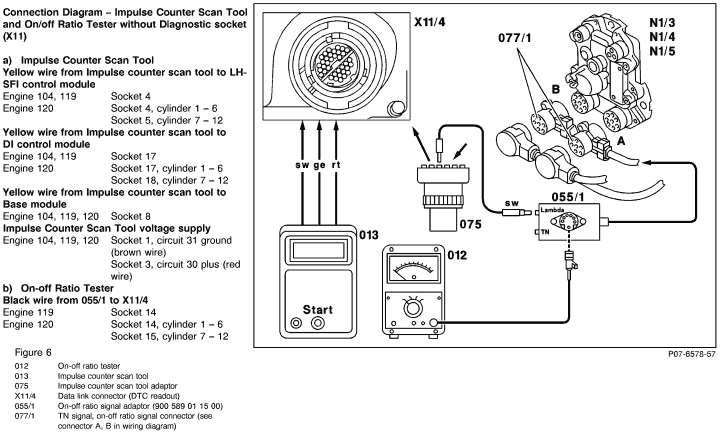
Connect impulse counter scan tool:
Yellow wire to socket 8 of data link connector (X11/4)
Ignition: ON
|
DTC readout   |
See DM Engines, Vol. 2 - 3.1 or 3.2
|
3
LH-SFI control module
DTC readout
|
Connect impulse counter scan tool:
Yellow wire to data link connector (X11/4).
Engine 104, 119
Socket 4
Engine 120
Socket 5, left LH-SFI control module
(cyl. 7 - 12)
Socket 4, right LH-SFI control module (cyl. 1 - 6)
Ignition: ON
|
DTC readout |
See DM Engines, Vol. 2 - 3.1 or 3.2 |
4
DI control module
DTC readout |
Connect impulse counter scan tool:
yellow wire to data link connector (X11/4)
Engine 104, 119
Socket 17
Engine 120
Socket 18, left DI control module
(cyl. 7 - 12)
Socket 17, right DI control module
(cyl. 1 - 6)
Ignition: ON
|
DTC readout
|
See DM Engines, Vol. 2 - 5.2 or 5.3 |
5.0
EA/CC/ISC control module (N4/1)
DTC readout |
Connect impulse counter scan tool:
yellow wire to socket 7 of data link connector X11/4
Ignition: ON
|
DTC readout
|
See DM Engines, Vol. 2 - 6.2 or 6.3 |
5.1
CC/ISC control module (N4/3)
DTC readout |
Connect impulse counter scan tool:
yellow wire to socket 7 of data link connector X11/4
Ignition: ON
|
DTC readout
|
See DM Engines, Vol. 2 - 7.1 |
5.2
Not applicable for U.S. version vehicles |
- |
- |
- |
6
Remove and install air cleaner |
Ignition: OFF
|
- |
-
|
7
Check condition and free movement of throttle linkage and throttle valve
|
Ignition: OFF
Actuate throttle linkage |
Smooth operation, no binding should be evident. |
Lubricate all bearings and ball sockets.
|
7.1
Check WOT position |
Ignition: OFF
Accelerator pedal at WOT position (do not actuate kickdown switch).
|
Throttle valve lever must rest against wide open throttle stop (audible contact). |
Adjust WOT stop
(SMS, Job No. 30 - 1010).
|
7.2
Check CTP |
Ignition: OFF
Accelerator pedal at CTP.
|
Throttle valve lever must rest against closed throttle stop (audible contact). |
Adjust CTP stop on engine
(SMS, Job No. 30 - 1010). |
8
Check automatic transmission control pressure cable |
Ignition: OFF
Accelerator pedal at CTP.
|
Arrows must align. |
Adjust control pressure cable
(SMS, Job No. 30 - 1010). |
9
Check fuel pressure
|
Connect/disconnect pressure gauge
Engine: at Idle |
3.2 to 3.6 bar |
Check fuel pumps and FP relay module (DM Engines, Vol. 2 - 3.1 or 3.2).
|
10
Engine coolant level
|
Ignition: OFF |
Marking: min - max |
Correct engine coolant level |
11
Engine oil level
|
Ignition: OFF |
Marking: min - max |
Correct engine oil level |
12
Check primary and secondary ignition circuits
|
Ignition: at Idle |
See Test and Adjustment Data (Section A) |
Check ignition system
(DM Engines, Vol. 2 - 5.2 or 5.3) |
13
Check ignition timing with and without vacuum
|
Engine: at Idle
Transmission range "P"
Climate control system: OFF |
See Test and Adjustment Data (Section A) |
Check ignition system
(DM Engines, Vol. 2 - 5.2 or 5.3) |
14
Evaluate oscilloscope patterns |
Engine: at Idle
Briefly accelerate to 3000 rpm |
Voltage difference between
cylinders  3kV. 3kV.
Voltage increase with engine accelerated should be no more than 6 kV over idle value.
|
Check ignition system
(DM Engines, Vol. 2 - 5.2 or 5.3) |
15
Warm engine oil to operating temperature
|
Engine rpm: Maintain at approx.
3000 rpm |
Engine oil temperature approx. 80 °C |
- |
16
Check closed throttle (idle) rpm |
Engine: at Idle
Selector lever in "P",
climate control system "OFF".
|
See Test and adjustment data
(section A) |
Test program:
Check EA/CC/ISC system
(DM Engines, Vol. 3 - 6.2 or 6.3),
Check CC/ISC system
(DM Engines, Vol. 3 - 7.1)
|
17
Check on-off ratio control system
|
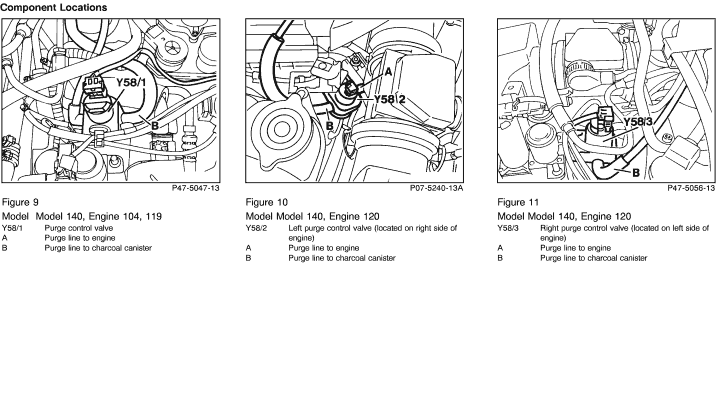
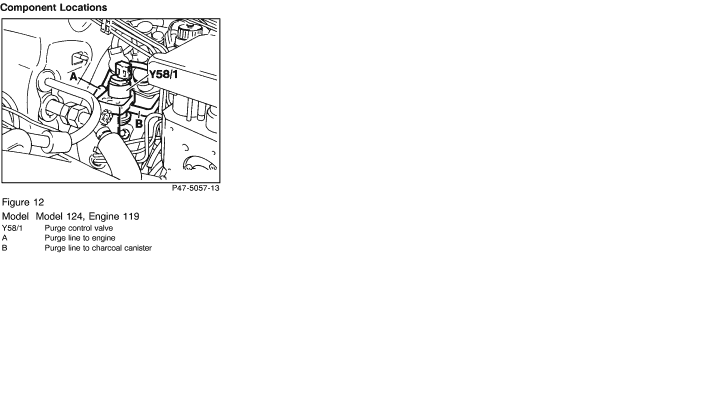
Selector lever in "P",
Climate control system OFF. Disconnect and plug purge line (A or B) at switchover valve (Figure 1, 3 and 4). Reconnect line after measurment.
Engine: at Idle
|
See Test and adjustment data
(section A) |
Check electonic components with socket box tester
(DM Engines, Vol. 2 - 3.1 or 3.2) |
18
Not applicable for U.S. version vehicles |
- |
- |
- |
19
Check CTP speed under load |
Engine: at Idle
TR "D" (service and parking brake applied),
Switch on all electrical consumers,
Turn steering wheel to full lock.
|
Engine must continue to idle within specified range. |
Test program:
Check EA/CC/ISC system
(DM Engines, Vol. 3 - 6.2 or 6.3),
Check CC/ISC system
(DM Engines, Vol. 3 - 7.1) |


 Printable version

 22
22