|
  |
Test scope |
Test
connection |
Test condition |
Nominal value |
Possible cause/Remedy |
| 1.0 |
|
LH-SFI control
module (N3/2 or N3/3)
Voltage supply
Circuit 30 |
64 
(1.23) |
N3/2 or N3/3

 |
 67
(1.26)
|
Ignition: ON |
11 - 14 V |
1.1 - 1.4 |
| 1.1 |
|
Ground connection |
N3/2
or
N3/3
64
(1.23) |
|
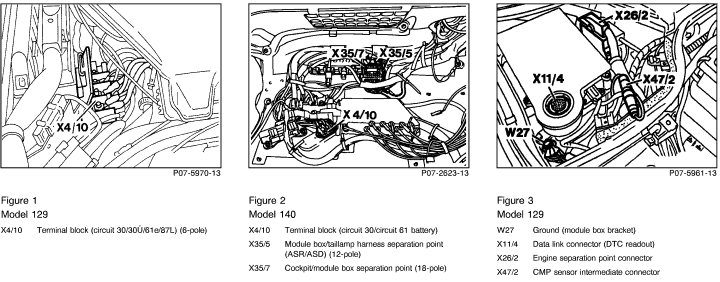
X11/4
2 |
Ignition: ON |
11 - 14 V |
Wiring,
Model 129
Ground (module box bracket) (W27, Figure 3)
Model 140
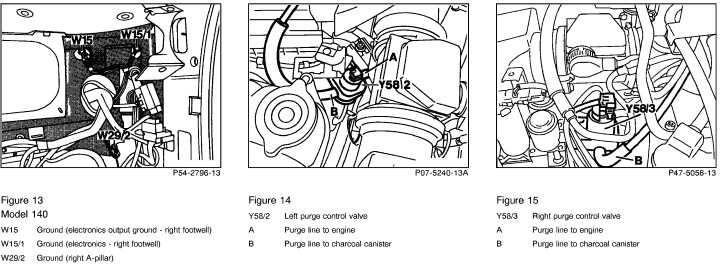
Ground (electronics output ground - right footwell) (W15, Figure 13).
|
| 1.2 |
|
Base module (N16/1)
Voltage supply
Circuit 30 |
28
(1.28) |
N16/1
|
1
(1.1)
|
Ignition: OFF
Connect socket box to N16/1.
Ignition: ON |
11 - 14 V |
Wire to terminal block (X4/10) (Figures 1 - 2). |
| 1.3 |
9 |

DTC readout from base
module (N16/1)
Voltage supply from N16/1 to right LH-SFI control
module (N3/3)
Circuit 30
|
29
(1.29) |
N16/1
|
12
(1.12) |
Ignition: ON |
11 - 14 V |
N16/1. |
| 1.4 |
8 |
DTC readout from base
module (N16/1)
Voltage supply from N16/1 to left LH-SFI control
module (N3/2)
Circuit 30
|
29
(1.29) |
N16/1
|
11
(1.11) |
Ignition: ON |
11 - 14 V |
N16/1. |
| 2.0 |
|
LH-SFI control
module (N3/2 or N3/3)
Voltage supply
Circuit 87/M1e |
76
(1.35) |
N3/2 or N3/3
|
77
(1.36)
|
Ignition: ON |
11 - 14 V |
2.1 - 2.6 |
| 2.1 |
|
Ground, electronics (W15/1)
(right footwell) |
N3/2
or
N3/3
76
(1.35)
|
|
X11/4
2 |
Ignition: ON |
11 - 14 V |
W15/1. |
| 2.2 |
|
Base module (N16/1)
Voltage supply
Circuit 15 unfused |
28
(1.28) |
N16/1
|
34
(1.34)
|
Connect socket box to N16/1.
Ignition: ON
Ignition: OFF |
11 - 14 V
< 1 V
|
Wiring,
Ignition/starter switch (S2/1),
Wiring,
Ignition/starter switch (S2/1). |
| 2.3 |
|
Base module (N16/1)
Voltage supply
Circuit 15 |
28
(1.28) |
N16/1
|
15
(1.15)
|
Ignition: ON
Ignition: OFF
|
11 - 14 V
< 1 V |
Wiring,
Fuse. |
| 2.4 |
|
Output ground,
base module (N16/1) |
N16/1
28
(1.28)
N16/1
29 (1.29)
|
and
|
X11/4
2
X11/4
2 |
Ignition: ON |
11 - 14 V
11 - 14 V |
Ground wire W15/1. |
| 2.5 |
1 0 |
DTC readout from base
module (N16/1)
Voltage supply (fused) for right LH-SFI control
module (N3/3)
|
28
(1.28) |
N16/1
|
7
(1.7) |
Ignition: ON
Ignition: OFF |
11 - 14 V
< 1 V |
Fuse (F2) at N16/1,
N16/1. |
| 2.6 |
1 3 |
DTC readout from base
module (N16/1)
Voltage supply (fused) for
left LH-SFI control
module (N3/2)
|
28
(1.28) |
N16/1
|
26
(1.26) |
Ignition: ON
Ignition: OFF |
11 - 14 V
< 1 V |
Fuse (F4) at N16/1,
N16/1. |
| 3.0 |
|
LH-SFI control
module (N3/2 or N3/3)
Voltage supply
Circuit 87 |
78
(1.37) |
N3/2 or N3/3
|
65
(1.24)
|
Ignition: ON |
11 - 14 V |
Wiring,
3.1. |
| 3.1 |
|
Ground output (W15)
(right footwell) |
N3/2
or
N3/3
78
(1.37)
|
|
X11/4
2 |
Ignition: ON |
11 - 14 V |
Ground, output (W15, right footwell). |
| 4.0 |
1 0 |
DTC readout from base
module (N16/1)
Voltage supply
for right bank injectors (Y64)
|
28
(1.28) |
N16/1
|
38
(2.38) |
Connect socket box to N16/1.
Ignition: ON
Ignition: OFF |
11 - 14 V
< 1 V |
Fuse (F2) at N16/1. |
| 5.0 |
1 3 |
DTC readout from base
module (N16/1)
Voltage supply
for left bank injectors (Y63)
|
28
(1.28) |
N16/1
|
18
(2.18) |
Connect socket box to N16/1.
Ignition: ON
Ignition: OFF |
11 - 14 V
< 1 V |
Fuse (F4) at N16/1,
N16/1. |
| 6.0 |
4 2) |
Hot wire MAF sensor (B2/3 or B2/4)
Voltage at hot wire |
34
(2.34) |
N3/2 or N3/3
|
17
(2.17)
|
Ignition: ON
Engine: at Idle |
1.0 - 1.2 V
1.3 - 1.7 V 1) |
Wiring,
6.1 ,
7.0 ,
B2/3 or B2/4. |
| 6.1 |
|
Hot wire MAF sensor (B2/3 or B2/4)
Voltage supply |
64
(1.23) |
N3/2 or N3/3
|
23
(2.23) |
Ignition: ON |
11 - 14 V |
LH-SFI control module (N3/2 or N3/3),
7.0 |
| 7.0 |
4 2) |
Ground wire for hot wire MAF sensor (B2/3 or B2/4) |
34
(2.34) |
N3/2 or N3/3
 |
76
(1.35)
|
Ignition: OFF |
< 6  |
Ground wire (W16) (front spring tower). |
| 8.0 |
1 2 |
Hot wire MAF sensor (B2/3 or B2/4)
Burn-off control |
76
(1.35) |
N3/2 or N3/3
|
37
(2.37)
|
Ignition: OFF
Unplug N3/2 or N3/3, wait for approx. 5 sec. and then plug back in again.
Engine: Start
Engine coolant tempera-
ture > 60 oC.
Engine speed > 2000 rpm for 15 seconds.
Turn off engine.
|
After approx.
4 sec., 3 - 5 V for approx. 1 sec.
Simultaneous visual check:
hot-wire glows briefly |
Wiring,
B2/3 or B2/4,
LH-SFI control module (N3/2 or N3/3). |
| 9.0 |
9 |
FP relay module (K27/1 or K27/2)
Control |
66
(1.25) |
N3/2 or N3/3
|
65
(1.24)
|
Engine: Start |
11 - 14 V
while cranking. |
9.1 ,
N3/2 or N3/3. |
| 9.1 |
|
Starter signal
circuit 50 |
64
(1.23) |
N3/2 or N3/3
|
75
(1.34)
|
Engine: Start |
11 - 14 V
while cranking. |
Wiring. |
| 10.0 |
2 |
ECT sensor (B11/9 or B11/10)
Voltage at sensor circuit 1 |
16
(2.16) |
N3/2 or N3/3
|
18
(2.18) |
Ignition: ON |
°C |
V |
|
10.1 ,
LH-SFI control module (N3/2 or N3/3). |
| 20 |
3.5 |
2500 |
| 30 |
3.1 |
1700 |
| 40 |
2.7 |
1170 |
| 50 |
2.3 |
830 |
| 60 |
1.9 |
600 |
| 70 |
1.5 |
435 |
| 80 |
1.2 |
325 |
| 90 |
1.0 |
245 |
| 100 |
0.8 |
185 |
|
± 5% |
± 5% |
| 10.1 |
|
Resistance
Sensor circuit 1 |
16
(2.16) |
N3/2 or N3/3
|
18
(2.18)
|
Ignition: OFF
Disconnect N3/2 or N3/3 from contact box (070). |
Nominal values, see 10.0 |
Wiring,
10.2 |
| 10.2 |
|
Resistance
ECT sensor (B11/9 or B11/10)
Sensor circuit 1 |
2 |
B11/9 or B11/10
|
4 |
Connector on B11/9 or B11/10 unplugged. |
Nominal values, see 10.0 , Connection see Figure 20.
|
B11/9 or B11/10. |
| 11.0 |
3 |
ECT sensor (B11/9 or B11/10)
Voltage at sensor circuit 2 |
16
(2.16) |
N3/2 or N3/3
|
31
(2.31) |
Ignition: ON |
°C |
V |
|
Wiring,
11.1 ,
LH-SFI control module (N3/2 or N3/3). |
| 20 |
3.5 |
2500 |
| 30 |
3.1 |
1700 |
| 40 |
2.7 |
1170 |
| 50 |
2.3 |
830 |
| 60 |
1.9 |
600 |
| 70 |
1.5 |
435 |
| 80 |
1.2 |
325 |
| 90 |
1.0 |
245 |
| 100 |
0.8 |
185 |
|
± 5% |
± 5% |
| 11.1 |
|
Resistance
Sensor circuit 2 |
16
(2.16) |
N3/2 or N3/3
|
31
(2.31)
|
Ignition: OFF
Disconnect N3/2 or N3/3 from contact box (070). |
Nominal values, see 11.0 |
Wiring,
11.2 |
| 11.2 |
|
Resistance
ECT sensor (B11/9) or (B11/10)
Sensor circuit 2 |
1 |
B11/9 or B11/10
|
3 |
Connector on B11/9 or B11/10 unplugged. |
Nominal values, see 11.0 , Connection see Figure 20.
|
B11/9 or B11/10. |
| 12.0 |
1 3 |
IAT sensor (B17/5 or B17/6)
Voltage |
16
(2.16) |
N3/2 or N3/3
|
8
(2.8) |
Ignition: ON |
°C |
V |
|
12.1 ,
LH-SFI control module (N3/2 or N3/3). |
| 10 |
1.8 |
3700 |
| 20 |
3.5 |
2500 |
| 30 |
3.1 |
1700 |
| 40 |
2.7 |
1170 |
| 50 |
2.3 |
830 |
| 60 |
1.9 |
600 |
| 70 |
1.5 |
435 |
| 80 |
1.2 |
325 |
| |
± 5% |
± 5% |
| 12.1 |
|
Resistance |
16
(2.16) |
N3/2 or N3/3
|
8
(2.8)
|
Ignition: OFF
Disconnect N3/2 or N3/3 from socket box. |
Nominal values, see 12.0 |
Wiring,
B17/5 or B17/6. |
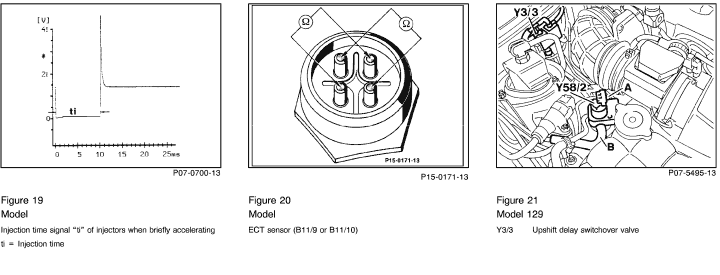
| 13.0 |
7 |
TN-signal (rpm signal) - input
from DI control
module (N1/4 or N1/5) |
76
(1.35)
76
(1.35) |
|
5
(2.5)
5
(2.5)
|
Engine: Start
Engine: at Idle |
Signal, see Figure 17.
5 - 7.5 V |
Wiring,
DI control module (N1/4 or N1/5),
LH-SFI control module (N3/2 or N3/3). |
| 14.0 |
|
TN-signal (rpm signal) - output
Right LH-SFI control
module (N3/3) |
76
(1.35) |
N3/3
|
69
(1.28)
|
Engine: Start
Engine: at Idle |
5 - 7.5 V |
Wiring,
N3/3,
Base module (N16/1). |
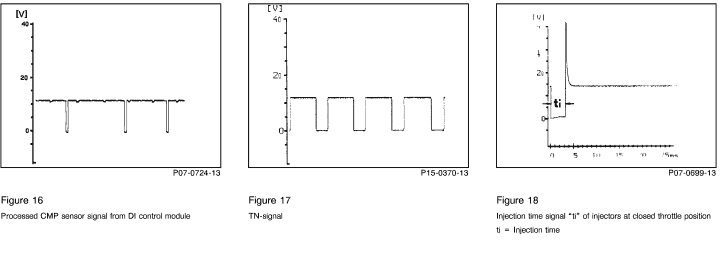
| 15.0 |
8 |
CMP sensor (L5/2 or L5/3) signal
from DI control
module (N1/4 or N1/5) |
77
(1.36)
77
(1.36) |
|
6
(2.6)
6
(2.6)
|
Engine: Start
Engine: at Idle |
Signal, see Figure 16.
0.8 - 1.8 V~ |
Wiring,
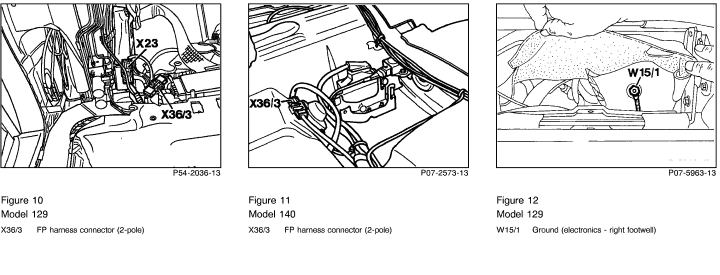
L5/2 or L5/3 (Test, see DM, Engines, Vol. 2, section 5.2),
N1/4 or N1/5. |
| 16.0 |
10 5) |
CTP (idle) recognition signal
from EA/CC/ISC
actuator (M16/3 or M16/4) |
76
(1.35) |
N3/2 or N3/3
|
52
(1.11) |
Ignition: ON
Accelerator pedal in
CTP (idle)
Accelerator pedal in
WOT (full throttle)
|
 4.8 V 4.8 V
 5.5 V 5.5 V |
Wiring,
M16/3 or M16/4 (Test see DM, Engines, Vol. 3, section 6.2),
EA/CC/ISC control module (N4/1). |
| 17.0 |
|
Fuel safety shut-off
from EA/CC/ISC
actuator (M16/3 or M16/4) |
76
(1.35) |
N3/2 or N3/3
|
71
(1.30) |
Ignition: ON |
2.2 - 11 V
(Fluctuates on an even rhythmic cycle). |
Wiring
M16/3 or M16/4 (Test, see DM, Engines, Vol. 3, section 6),
N4/1. |
| 18.0 |
|
Fuel safety shut-off |
76
(1.35) |
N3/2 or N3/3
 |
71
(1.30)
|
Engine: Start and apply WOT (full throttle). |
Engine speed surges between 1200 - 1600 rpm. |
LH-SFI control module (N3/2 or N3/3). |
| 19.0 |
2 1 |
O2S 1 (before TWC) (G3/3 or G3/4)
Signal |
15
(2.15) |
N3/2 or N3/3
|
14
(2.14)
|
Engine: at Idle
and at operating temperature > 80 oC let engine run for a minimum of 2 minutes. |
Oscillates between
-0.2 and +1.0 V by more than 0.3 V |
Wiring,
G3/3 or G3/4,
19.1 ,
19.2 ,
20.0. |
| 19.1 |
|
Insulation, O2S 1 wire |
13
(2.13) |
N3/2 or N3/3
|
14
(2.14)
|
Ignition: OFF
Disconnect N3/2 or N3/3 from contact box (070). |
 |
Wiring. |
| 19.2 |
|
O2S 1 control from
LH-SFI control module (N3/2 or N3/3) |
14
(2.14) |
N3/2 or N3/3
|
76
(1.35)
|
On-off ratio tester connected.
Engine: at Idle
and at operating temperature > 80 oC |
90 - 100% at on-off ratio tester |
N3/2 or N3/3. |
| 20.0 |
2 2 |
O2S 1 (before TWC) heater (G3/3 or G3/4)
Control signal |
15
(2.15) |
N3/2 or N3/3
|
9
(2.9)
|
Engine: at Idle
Engine coolant tempera-
ture > 80 oC |
11 - 14 V |
20.1 ,
LH-SFI control module (N3/2 or N3/3). |
| 20.1 |
|
O2S 1 (before TWC) heater
Current draw |
9
(2.9) |
N3/2 or N3/3
 |
77
(1.36)
|
Disconnect N3/2 or N3/3 from contact box (070).
Ignition: ON |
0.6 - 3.4 A |
Wiring,
G3/3 or G3/4. |
| 21.0 |
16 6) |
EGR switchover
valve (Y27/2 or Y27/3)
Control signal |
39
(2.39) |
N3/2 or N3/3
|
77
(1.36)
|
Engine: at Idle
Engine coolant tempera-
ture > 60 oC
Accelerate briefly |
11 - 14 V |
22.0 - 23.0,
Wiring,
N3/2 or N3/3. |
| 21.1 |
|
Current draw |
64
(1.23) |
N3/2 or N3/3
|
39
(2.39)
|
Disconnect N3/2 or N3/3 from contact box (070).
Ignition: ON |
0.3 - 0.5 A |
Wiring,
Y27/2 or Y27/3. |
| 22.0 |
|
EGR switchover
valve (Y27/2 or Y27/3)
Vacuum control |
35 |
|
10 |
Test connection note:
Connect vacuum tester to EGR valve with Y-fitting.
N3/2 or N3/3 plugged in.
Engine: at Idle
Engine coolant tempera-
ture > 60 oC.
Accelerate briefly.
|
> 400 mbar |
Vacuum lines,
EGR valve,
Y27/2 or Y27/3. |
| 23.0 |
|
Left or right EGR valve
Mechanical test |
|
|
|
Test connection note:
Connect vacuum tester directly to left or right EGR valve.
Using vacuum tester, apply 500 mbar vacuum.
Disconnect vacuum line on EGR valve
|
Left or right EGR valve closes audibly.
|
EGR valve. |
| 24.0 |
11 7) |
Right cylinder bank only
AIR relay module (K17)
Control signal |
19
(2.19) |
N3/3
|
77
(1.36)
|
Unplug right ECT sensor (B11/10) and simulate 2.5 k at sockets 2 and 4 with resistance substitution unit.
Engine: at Idle
|
11 - 14 V
for approx. 2 minutes after start and AIR pump runs. |
24.1 ,
N3/3. |
| 24.1 |
|
AIR relay module (K17)
Current draw |
64
(1.23) |
N3/3
|
19
(2.19)
|
Disconnect right LH-SFI control module (N3/3) from contact module (072).
Ignition: ON |
0.1 - 0.3 A |
Wiring,
K17. |
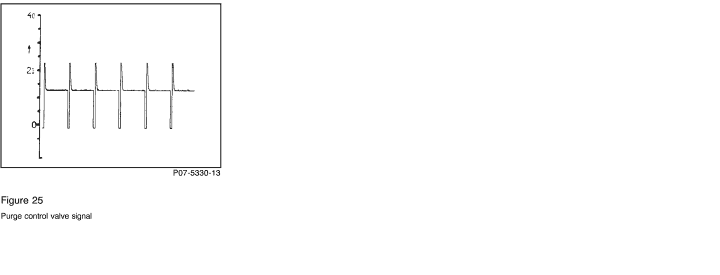
| 25.0 |
2 3 |
Purge control valve (Y58/2 or Y58/3)
Control signal |
38
(2.38) |
N3/2 or N3/3
 |
77
(1.36)
|
Engine: at Idle
and at operating temperature. |
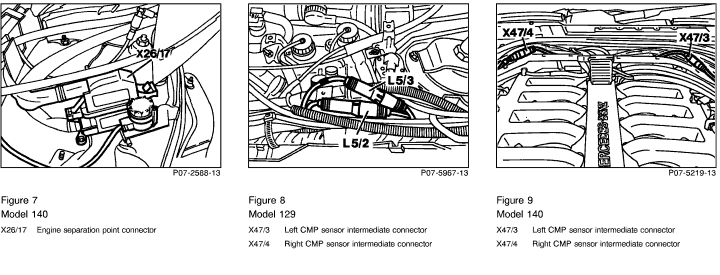
After approx. 1 minute, purge control valve Y58/2 or Y58/3, (Figure 14 and 15) must cycle noticeable.
Signal, see Figure 26.
|
25.1 ,
26.0.
LH-SFI control module (N3/2 or N3/3). |
| 25.1 |
|
Current draw |
64
(1.23) |
N3/2 or N3/3
|
38
(2.38) |
Disconnect N3/2 or N3/3 from contact module (072).
Ignition: ON |
0.2 - 0.4 A |
Wiring,
Y58/2 or Y58/3. |
| 26.0 |
|
Purge control valve (Y58/2 or Y58/3)
Vacuum control |
|
|
|
Test connection note:
Connect vacuum tester to Y58/2 or Y58/3 (Figure 14 and 15), connection (B).
Engine: at Idle
and at operating temperature. Increase engine speed slowly to max. 3000 rpm. |
After approx. 1 minute,
> 400 mbar |
Vacuum lines,
25.0 ,
Y58/2 or Y58/3. |
| 27.0 |
2 5 |
Left or right adjustable camshaft timing solenoid (Y49/1 or Y49/2)
Current draw |
1 |
Y49/1 or Y49/2
|
2 |
Test connection note:
Connect test cable (102 589 04 63 00) to solenoid.
Engine: Start and raise engine speed to approx. 3000 rpm
|
Briefly approx. 1.5 A,
then 1 A |
27.1 ,
28.0 ,
N3/2 or N3/3. |
| 27.1 |
|
Resistance |
41
(2.41) |
N3/2 or N3/3
|
77
(1.36)
|
Disconnect LH-SFI control module (N3/2 or N3/3) from contact box (070). |
4 - 6 |
Wiring,
Y49/1 or Y49/2. |
| 28.0 |
|
Left or right adjustable camshaft timing solenoid (Y49/1 or Y49/2)
Mechanical operation |
41
(2.41) |
N3/2 or N3/3
|
76
(1.35)
|
Engine: at Idle
Bridge socket box sockets for maximum of 10 seconds. |
Engine runs unevenly after approx. 5 sec. |
27.0
Mechanical camshaft adjustment (see SMS, Job No. 05-216). |
| 29.0 |
6 |
Non-USA vehicles only.
Continue to next test step. |
|
|
|
|
|
|
| 30.0 |
2 8 |
Non-USA vehicles only.
Continue to next test step. |
|
|
|
|
|
|
| 31.0 |
2 7 |
Injectors (Y63 or Y64)
Resistance and assignment
(N3/3) (N3/2)
right left
cylinder cylinder
bank bank
_____________
Cyl. 1 / 12
Cyl. 2 / 11
Cyl. 3 / 10
Cyl. 4 / 9
Cyl 5 / 8
Cyl. 6 / 7 |
27 (2.27)
25
(2.25)
26
(2.26)
2
(2.2)
4
(2.4)
3
(2.3) |
|
77
(1.36)
77
(1.36)
77
(1.36)
77
(1.36)
77
(1.36)
77
(1.36)
|
Test connection note:
Connect ohmmeter to socket box for each subsequent injector.
Disconnect N3/2 or N3/3 from contact box (070).
Connector on injector connected.
Connector on injector unplugged. |
14 - 16
|
Wiring,
Y63 or Y64,
Wires reversed. |
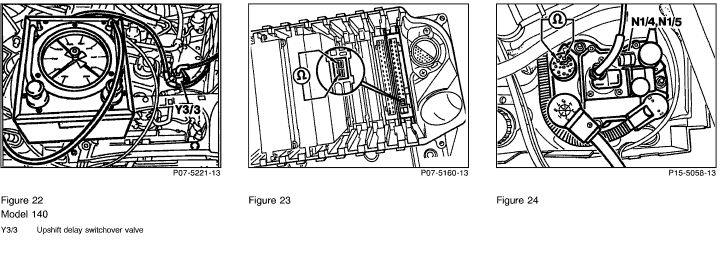
| 32.0 |
|
Injectors (Y63) or (Y64)
Control and injection time |
|
N3/2 or N3/3
|
|
Test connection note:
For connection information on individual injectors, see 31.0.
Engine coolant temperature approx.
20 ° C
at start 
Engine coolant temperature approx.
80 ° C
at idle
accelerate briefly |
Injection time:
approx. 8 ms
approx. 3 - 5 ms
approx. 17 ms
(see signals, Figures 18 and 19)
|
Wiring,
ECT sensor (B11/9 or B11/10),
IAT sensor (B17/5 or B17/6),
O2S 1 (before TWC) (G3/3 or G3/4).
LH-SFI control module (N3/2 or N3/3). |
| 33.0 |
26 9) |
Right cylinder bank only
Upshift delay switchover 8)
valve (Y3/3)
Current draw
|
64
(1.23) |
N3/3
|
20
(2.20) |
Disconnect right LH-SFI control module (N3/3) from contact box (070).
Ignition: ON |
450 ± 80 mA |
Wiring,
Y3/3. |
| 34.0 |
|
Pneumatic upshift delay 8)
Vacuum control and sealing |
64
(1.23) |
N3/3
|
20
(2.20) |
Test connection note:
Connect vacuum tester to upshift delay switchover valve (Y3/3) according to Figure 22 and connect bridge to socket box.
Engine: at Idle
|
> 400 mbar |
Vacuum lines,
Y3/3. |
| 35.0 |
1 5 |
DTC readout from base module (N16/1)
Automatic transmission kickdown valve (Y3)
Voltage supply
|
28
(1.28) |
N16/1
|
36
(1.36) |
Connect socket box to N16/1.
Engine: at Idle
Engine: OFF |
11 - 14 V
< 1 V |
Wiring,
N16/1,
35.1 |
| 35.1 |
|
Automatic transmission kickdown valve (Y3)
Current draw |
36
(1.36) |
N16/1
|
34
(1.34) |
N16/1 disconnected from contact box (070).
Ignition: ON
Accelerator pedal in wide open throttle position and kickdown switch engaged.
|
950 ± 80 mA |
Wiring,
Y3,
Kickdown switch (S16/6). |
| 36.0 |
|
Diagnostic wire activation |
76
(1.35) |
N3/2 or N3/3
|
54
(1.13)
|
Engine: ON |
11 - 14 V |
Wiring,
N3/2 or N3/3. |
| 37.0 |
1 5 |
Right cylinder bank only
Fuel consumption
indicator (A1p10) |
76
(1.35) |
N3/3
|
50
(1.9)
|
Engine: at Idle
and briefly depress accelerator pedal. |
> 0.5 V |
Wiring,
N3/3,
A1p10. |
| 38.0 |
|
Left cylinder bank only
Serial data bus coding |
43
(1.2) |
N3/2
|
67
(1.26)
|
|
11 - 14 V |
Wiring to electronics
ground (W15/1). |
| 39.0 |
1 7
18 10)
1 9 |
Serial data bus (CAN) |
L |
N3/3
|
H
|
Ignition: OFF
Remove contact module or N3/3 and measure resistance directy at CAN connector for right LH-SFI control module (Figure 23).
|
55 - 65 |
Data line,
39.1
39.2 |
| 39.1 |
|
CAN element in left
DI control module (N1/4) |
3  |
N1/4
|
 4 |
Disconnect connector (B) on N1/4 and measure directly on control module
(Figure 24).
|
115 - 125 |
N1/4. |
| 39.2 |
|
CAN element in right
DI control module (N1/5) |
3 |
N1/5
|
4 |
Disconnect connector (B) on N1/5 and measure directly on control module
(Figure 24).
|
115 - 125 |
N1/5. |
| 40.0 |
2 8 |
Coding,
LH-SFI control module (N3/2 or N3/3) |
30
(2.30) |
N3/2 or N3/3
|
77
(1.36) |
Ignition: ON |
11 - 14 V |
Wiring. |
| 41.0 |
|
Non-USA vehicles only.
Continue to next test step. |
|
|
|
|
|
|
| 42.0 |
1 5 |
Non-USA vehicles only.
Continue to next test step. |
|
|
|
|
|
|


 Printable version