
Diagnostic Manual, Engines, Volume 2
Electrical Test Program - Preparation for Test
Preliminary work: Diagnosis - Diagnostic Trouble Code (DTC) Memory  11 11 |
Preparation for Test
1. Ignition: OFF
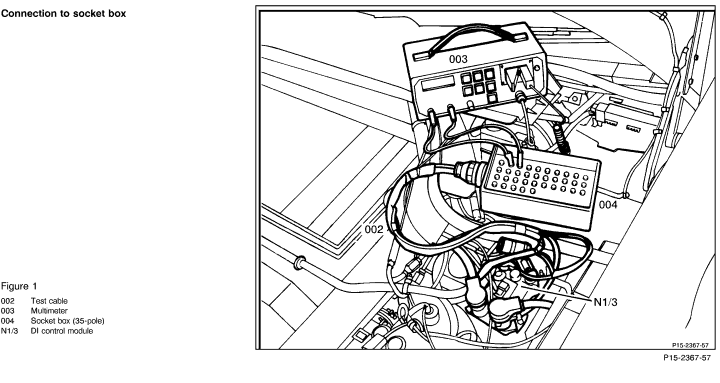
2. Connect socket box with test cable to DI control module (N1/3) according to connection diagram.

When performing test and adjustment work, the engine rpm should only be raised using the accelerator pedal.
If the engine speed is raised via the control linkage in the engine compartment, the "limp-home" mode will become active and will be registered in the electronic accelerator malfunction memory as a fault. The ASR MIL will also come on.
Electrical wiring diagrams :
Electrical Troubleshooting Manual.
Note regarding "Test Connection" column:
The numbers indicated in parentheses, for example, 6  1.0 (A.2) signify: 1.0 (A.2) signify:
A= Connector A,
2= Socket 2 in wiring diagram. |
Conventional tools, test equipment
| Description |
Brand, model, etc. |
| Multimeter 1) |
Fluke models 23, 83, 85, 87 |
| Engine analyzer 1) |
Bear DACE (Model 40-960)
Sun MEA-1500MB |
| 1) Available through the MBUSA Standard Equipment Program. |
Safety Precautions
The increased demands on the ignition systems of modern engines and the desire for maintenance-free operation have lead to the introduction of electronic ignition systems.
As a rule, the sparking power of an electronic system is higher than a conventional system; additional increases in performance are characteristic of this type of system.
DANGER! Contact with high-voltage components or connectors can be fatal.
Therefore, when working on the electronic ignition system (DI), the following safety precautions must be observed:
 Before performing work that requires cranking the engine (e.g. compression test) turn off ignition and disconnect connector 2 on the DI control module (N1/3) or connect safety plug, part no. 102 589 02 21 00 to diagnostic socket. Before performing work that requires cranking the engine (e.g. compression test) turn off ignition and disconnect connector 2 on the DI control module (N1/3) or connect safety plug, part no. 102 589 02 21 00 to diagnostic socket.
Persons with pacemakers should not work on this type of ignition system.
Perform installation work on the ignition system or ignition wires only when the engine/ignition is turned off (as well as connecting/disconnecting sensors only with the ignition switched off).
No exposed metal connectors or sending units may be installed in the ignition wires (e.g. ignition wire, cylinder 1).
To Avoid Damage to the Ignition System
To avoid damage to the DI control module (N1/3), connect/disconnect the control module connectors only when the ignition is turned off.
Do not connect a test lamp to circuit 1 of the ignition coil.
Circuit 1 of the ignition coil may not be shorted to ground, e.g. theft deterrence.
To avoid reversing polarity, the threads on the ignition coil have different diameters (M5 and M6).
Only original equipment components should be installed in the ignition system.
Do not operate the ignition system at cranking speed unless the ignition harness is completely connected.
To avoid damage to the DI control module (N1/3), the high output side of the ignition system must carry at least 2 k  of load (distributor rotor 1 k , each connection on the distributor cap 1 k ). Do not install a of load (distributor rotor 1 k , each connection on the distributor cap 1 k ). Do not install a
5 k distributor rotor for noise suppression.
Do not perform any tests (grounding ignition cable 4, disconnecting a spark plug connector or pulling cable 4 out of the ignition coil) at cranking or idle speed.
To better dissipate heat, the DI control module (N1/3) is installed with thermal paste on the wheel well. When exchanging the control module, do not remove the foil shield, it does not influence heat dissipation.
If the circuit breaker is activated (power balance test), and the engine stalls, then the test procedure with this tester cannot be performed.
When testing the ignition coil separately, do not load the coil with more than 28 kV in order to avoid damage to the coil.
If assisting a disabled vehicle and it becomes necessary to perform an ignition spark test, perform this test only on one ignition cable/spark plug. Ensure good ground connection to the spark plug.
High Voltage!
Using Test Equipment
Ensure that the engine and ignition are turned off when connecting/disconnecting equipment such as voltage signal pick-up on ignition cable 4 and trigger pick-up on cylinder 1. |
 |
|


 Printable version