 |
 |
Test scope |
Test connection |
Test condition |
Nominal value |
Possible cause/Remedy |
| 1.0 |
P 0 5 6 0 |
Engine control module
(ME-SFI) (N3/10)
Voltage supply
Circuit 30 |
26 
(1.26) |
N3/10

 |
 35
(1.35)
|
Ignition: ON
|
11 - 14 V
|
 1.1 1.1
|
| 1.1 |
|
Ground wire |
N3/10

26 
(1.26)
39 
(1.39) |
|
X11/4
 2
 2 |
Ignition: ON |
11 - 14 V |
Wiring,
Model 129:
Ground, module box bracket (W27),
Model 140:
Output ground (W15), right footwell,
Model 210:
Electronic ground (W16/6), right component compartment,
 1.2 1.2 |
| 1.2 |
|
Voltage supply
Circuit 30 |
X11/4
1  |
|
N3/10

 35
(1.35)
|
Ignition: ON |
11 - 14 V |
Wiring,
Model 129, 140:
Base module (N16/1) or fuse on base module,
Model 210:
Relay module (K40). |
| 2.0 |
P 0 5 6 0
|
Engine control module
(ME-SFI) (N3/10)
Voltage supply
Circuit 87M
|
38 
(1.38) |
N3/10

 |
 25
(1.25)
|
Ignition: ON |
11 - 14 V |
 2.1 2.1 |
| 2.1 |
|
Electronics ground |
N3/10

38 
(1.38) |
|
X11/4
 2 |
Ignition: ON |
11 - 14 V |
Wiring,
Model 129 and 140:
Electronic ground (W15/1), right footwell,
Model 210:
Electronic ground (W16/6), right component compartment,
 2.2 2.2
|
| 2.2 |
|
Voltage supply
Circuit 87M |
X11/4
1  |
|
N3/10

 25
(1.25)
|
Ignition: ON
Ignition: OFF |
11 - 14 V
< 1 V
|
Wiring,
Model 129, 140:
Base module (N16/1) or fuse on base module,
Model 210:
Relay module (K40). |
| 3.0 |
P 0 5 6 0 |
Engine control module
(ME-SFI) (N3/10)
Voltage supply
Circuit 87M
|
39 
(1.39) |
N3/10

 |
 36
(1.36) |
Ignition: ON
Ignition: OFF
|
11 - 14 V
< 1 V |
Wiring,
Model 129, 140:
Base module (N16/1) or fuse on base module,
Model 210:
Relay module (K40). |
| 4.0 |
P 0 1 0 0 |
Hot film MAF
sensor (B2/5)
Voltage at hot film
|
68 
(2.68) |
N3/10

 |
 67
(2.67) |
Engine: at Idle
Engine coolant
temperature >70°C |
0.7 - 1.0 V 2) |
Wiring
 5.0 , 5.0 ,
Air intake system leak,
B2/5
|
| 5.0 |
P 0 1 0 0 |
Ground wire for hot film MAF sensor (B2/5) |
38 
(1.38) |
N3/10

 |
 67
(2.67)
|
Ignition: OFF
Disconnect MAF sensor (B2/5) connector. Bridge sockets 1 and 4.
|
< 1  |
Ground wire. |
| 6.0 |
P 0 1 0 5 |
Pressure sensor (B28)
Sensor signal
|
87 
(2.87) |
N3/10

 |
 65
(2.65) |
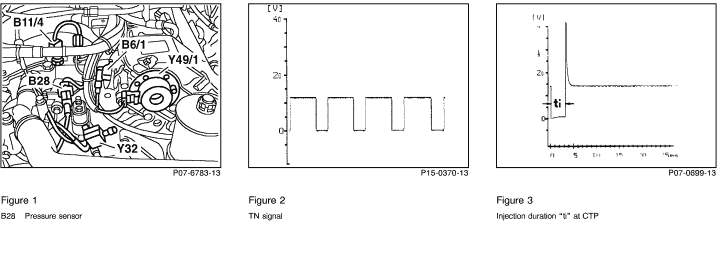
Connect vacuum tester to pressure sensor (B28) using Y-fitting (Figure 1).
Ignition: ON
Engine: at Idle
|
> 3.5 V
< 2 V and pressure climbs to > 500 mbar.
|
Vacuum line,
Wiring,
 6.1 6.1
B28 |
| 6.1 |
|
Pressure sensor (B28)
Voltage supply
|
87 
(2.87) |
N3/10

 |
 88
(2.88)
|
Ignition: ON
|
4.7 - 5.3 V |
N3/10 |
| 7.0 |
|
Model 129, 140
FP relay module (K27)
Model 210
Relay module (K40)
Control signal |
24 
(1.24) |
N3/10

 |
 25
(1.25)
|
Ignition: ON
Engine: Start |
11 - 14 V for approx. 1 sec.
11 - 14 V during cranking and while engine runs.
|
 7.1 , 7.1 ,
N3/10 |
| 7.1 |
|
Current draw
K27 or K40 |
26 
(1.26) |
N3/10

 |
 24
(1.24)
|
Ignition: ON |
0.1 - 0.3 A |
Wiring,
K27 or K40 |
| 8.0 |
P 0 1 1 5 |
ECT sensor (B11/4)
Voltage |
87 
(2.87) |
N3/10

 |
 76
(2.76) |
Ignition: ON |
°C
|
V |
 8.1 , 8.1 ,
N3/10 |
| 20 |
3.5 |
| 30 |
3.1 |
| 40 |
2.7 |
| 50 |
2.3 |
| 60 |
1.9 |
| 70 |
1.5 |
| 80 |
1.2 |
| 90 |
1.0 |
| 100 |
0.8 |
±5 % |
| 8.1 |
|
Resistance (B11/4) |
87 
(2.87) |
N3/10

 |
 76
(2.76) |
Ignition: OFF
Disconnect connector 2
on engine control
module (N3/10). |
°C
|
 |
Wiring,
 8.2 8.2 |
| 20 |
2500 |
| 30 |
1700 |
| 40 |
1170 |
| 50 |
830 |
| 60 |
600 |
| 70 |
435 |
| 80 |
325 |
| 90 |
245 |
| 100 |
185 |
±5 % |
| 8.2 |
|
ECT sensor (B11/4)
Resistance |
1 |
B11/4

|
4 |
Disconnect connector on ECT sensor (B11/4). |
Nominal value, see  8.1 8.1 |
B11/4
|
| 9.0 |
P 0 1 1 0 |
IAT sensor (B17)
Voltage |
87 
(2.87) |
N3/10

 |
 64
(2.64)
|
Ignition: ON |
°C
|
V |
 9.1 , 9.1 ,
N3/10 |
| 10 |
3.2 |
| 20 |
2.6 |
| 30 |
2.1 |
| 40 |
1.6 |
| 50 |
1.2 |
| 60 |
0.9 |
| 70 |
0.7 |
±5 % |
| 9.1 |
|
Resistance (B17) |
87 
(2.87) |
N3/10

 |
 64
(2.64)
|
Ignition: OFF
Disconnect connector 2
on engine control
module (N3/10). |
°C
|
 |
Wiring,
 9.2 9.2 |
| 10 |
9670 |
| 20 |
6060 |
| 30 |
3900 |
| 40 |
2600 |
| 50 |
1760 |
| 60 |
1220 |
| 70 |
860 |
±5 % |
| 9.2 |
|
IAT sensor (B17)
Resistance |
1 |
B17

|
2 |
Disconnect connector from IAT sensor (B17). |
Nominal value, see  9.1 9.1
|
B17 |
| 10.0 |
|
Engine control module (N3/10)
TN-signal output |
38 
(1.38)
38 
(1.38) |
|
 56
(1.56)
 56
(1.56)
|
Engine: Start or
Engine: at Idle |
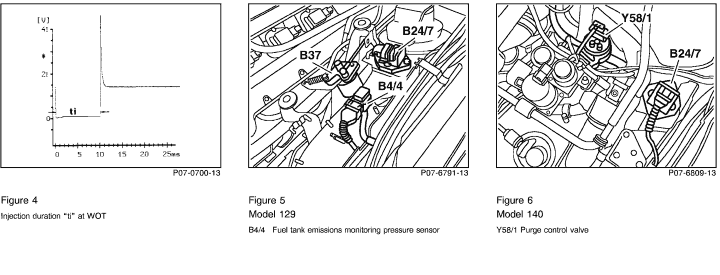
Signal: see
Figure 2.
5 - 7.5 V |
Wiring,
N3/10 |
| 11.0 |
P 0 1 5 0
P 0 1 5 3 |
Left O2S 1
(before TWC) (G3/3)
O2S signal |
40 
(1.40) |
N3/10

 |
 49
(1.49) |
ECT > 80 ° C, run engine at idle for at least two minutes.
|
fluctuates from
- 0.2 V to + 1.0 V, by more
than 0.3 V
|
Wiring,
G3/3,
 13.0 13.0 |
| 12.0 |
P 0 1 3 0
P 0 1 3 3 |
Right O2S 1
(before TWC) (G3/4)
O2S signal |
40 
(1.40) |
N3/10

 |
 41
(1.41) |
ECT > 80 ° C, run engine at idle for at least two minutes.
|
fluctuates from
- 0.2 V to + 1.0 V, by more
than 0.3 V |
Wiring,
G3/4,
 13.0 13.0 |
| 13.0 |
P 0 1 3 5
P 0 1 5 5 |
Left O2S 1
(before TWC) (G3/3)
Right O2S 1
(before TWC) (G3/4)
O2S heater control signal |
13 
(1.13) |
N3/10

 |
 25
(1.25) |
ECT > 80 ° C, run engine at idle for at least two minutes. |
11 - 14 V |
 13.1 , 13.1 ,
N3/10 |
| 13.1 |
|
O2S 1 (G3/3 and G3/4)
Current draw |
26 
(1.26) |
N3/10

 |
 13
(1.13)
|
Ignition: ON |
1.2 - 6.8 A 5) |
Wiring,
G3/3 or G3/4 |
| 14.0 |
P 0 1 5 6
P 0 1 6 0
|
Left O2S 2
(afterTWC) (G3/5)
O2S signal
|
40 
(1.40) |
N3/10

 |
 50
(1.50) |
ECT > 80° C,
Engine: Start
Raise and hold engine speed at 2000 - 3000 rpm for approx. three minutes until O2S 2 heater turns on (see HHT).
Briefly depress accelerator pedal to WOT.
|
450 mV constant
Voltage changes.
Voltage changes
by > 100 mV.
|
Wiring,
 16.0 16.0 |
| 15.0 |
P 0 1 3 6
P 0 1 4 0 |
Right O2S 2
(afterTWC) (G3/6)
O2S signal |
40 
(1.40) |
N3/10

 |
 42
(1.42) |
ECT > 80° C,
Engine: Start
Raise and hold engine speed at 2000 - 3000 rpm for approx. three minutes until O2S 2 heater turns on (see HHT).
Briefly depress accelerator pedal to WOT.
|
450 mV constant
Voltage changes.
Voltage changes
by > 100 mV.
|
Wiring,
 16.0 16.0 |
| 16.0 |
P 0 1 4 1
P 0 1 6 1 |
Left O2S 2
(after TWC) (G3/5)
Right O2S 2
(after TWC) (G3/6)
O2S heater control signal |
12 
(1.12) |
N3/10

 |
 25
(1.25) |
Engine: at Idle
ECT > 80° C, run engine at idle for at least two minutes.
|
11 - 14 V |
 16.1 , 16.1 ,
N3/10 |
| 16.1 |
|
O2S 2 (G3/5 or G3/6)
Current draw |
26 
(1.26) |
N3/10

 |
 12
(1.12)
|
Ignition: ON |
1.2 - 6.8 A 5) |
Wiring,
G3/5 or G3/6 |
| 17.0 |
P 0 2 0 1 |
Injector (Y62y1)
Activation and injection duration |
72 
(2.72) |
N3/10

 |
 25
(1.25) |
ECT approx. 20° C
at start
ECT approx. 80° C
at idle
accelerate briefly |
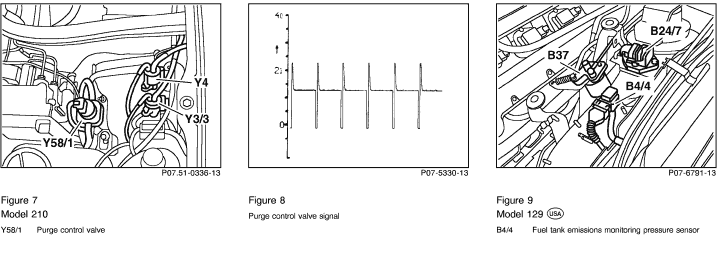
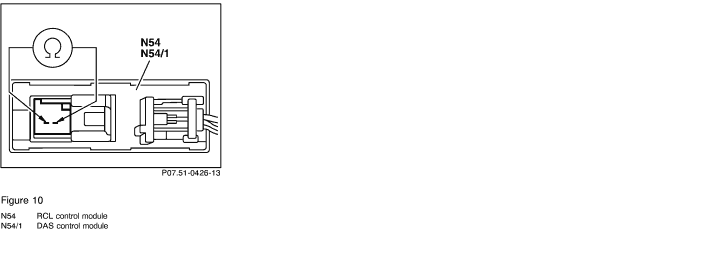
Injection time:
approx. 8 ms
approx. 3 - 5 ms
approx. 14 ms
(signal see Figures 3 and 4)
|
 17.1 , 17.1 ,
N3/10,
Further possibilities:
ECT sensor (B11/4),
IAT sensor (B17),
O2S 1 (G3/3 or G3/4). |
| 17.1 |
|
Resistance (Y62y1) |
72 
(2.72) |
N3/10

 |
 25
(1.25) |
Ignition: OFF
|
14 - 17 
|
Wiring,
Y62y1. |
| 18.0 |
P 0 2 0 2 |
Injector (Y62y2)
Activation and injection duration |
112 
(2.112) |
N3/10

 |
 25
(1.25) |
ECT approx. 20° C
at start
ECT approx. 80° C
at idle
accelerate briefly |
Injection time:
approx. 8 ms
approx. 3 - 5 ms
approx. 14 ms
(signal see Figures 3 and 4)
|
 18.1 , 18.1 ,
N3/10,
Further possibilities:
ECT sensor (B11/4),
IAT sensor (B17),
O2S 1 (G3/3 or G3/4). |
| 18.1 |
|
Resistance (Y62y2) |
112 
(2.112) |
N3/10

 |
 25
(1.25) |
Ignition: OFF
|
14 - 17 
|
Wiring,
Y62y2 |
| 19.0 |
P 0 2 0 3 |
Injector (Y62y3)
Activation and injection duration |
69 
(2.69) |
N3/10

 |
 25
(1.25) |
ECT approx. 20° C
at start
ECT approx. 80° C
at idle
accelerate briefly |
Injection time:
approx. 8 ms
approx. 3 - 5 ms
approx. 14 ms
(signal see Figures 3 and 4)
|
 19.1 , 19.1 ,
N3/10,
Further possibilities:
ECT sensor (B11/4),
IAT sensor (B17),
O2S 1 (G3/3 or G3/4). |
| 19.1 |
|
Resistance (Y62y3) |
69 
(2.69) |
N3/10

 |
 25
(1.25)
|
Ignition: OFF
|
14 - 17 
|
Wiring,
Y62y3 |
| 20.0 |
P 0 2 0 4 |
Injector (Y62y4)
Activation and injection duration |
93 
(2.93) |
N3/10

 |
 25
(1.25) |
ECT approx. 20° C
at start
ECT approx. 80° C
at idle
accelerate briefly |
Injection time:
approx. 8 ms
approx. 3 - 5 ms
approx. 14 ms
(signal: see Figures 3 and 4)
|
 20.1 , 20.1 ,
N3/10
Further possibilities:
ECT sensor (B11/4),
IAT sensor (B17),
O2S 1 (G3/3 or G3/4). |
| 20.1 |
|
Resistance (Y62y4) |
93 
(2.93) |
N3/10

 |
 25
(1.25)
|
Ignition: OFF
|
14 - 17 
|
Wiring,
Y62y4 |
| 21.0 |
P 0 2 0 5 |
Injector (Y62y5)
Activation and injection duration |
71 
(2.71) |
N3/10

 |
 25
(1.25) |
ECT approx. 20° C
at start
ECT approx. 80° C
at idle
accelerate briefly |
Injection time:
approx. 8 ms
approx. 3 - 5 ms
approx. 14 ms
(signal: see Figures 3 and 4)
|
 21.1 , 21.1 ,
N3/10
Further possibilities:
ECT sensor (B11/4),
IAT sensor (B17),
O2S 1 (G3/3 or G3/4). |
| 21.1 |
|
Resistance (Y62y5) |
71 
(2.71) |
N3/10

 |
 25
(1.25)
|
Ignition: OFF
|
14 - 17 
|
Wiring,
Y62y5 |
| 22.0 |
P 0 2 0 6 |
Injector (Y62y6)
Activation and injection duration |
70 
(2.70) |
N3/10

 |
 25
(1.25) |
ECT approx. 20° C
at start
ECT approx. 80° C
at idle
accelerate briefly |
Injection time:
approx. 8 ms
approx. 3 - 5 ms
approx. 14 ms
(signal see Figures 3 and 4)
|
 22.1 , 22.1 ,
N3/10,
Further possibilities:
ECT sensor (B11/4),
IAT sensor (B17),
O2S 1 (G3/3 or G3/4). |
| 22.1 |
|
Resistance (Y62y6) |
70 
(2.70) |
N3/10

 |
 25
(1.25)
|
Ignition: OFF
|
14 - 17 
|
Wiring,
Y62y6 |
| 23.0 |
P 0 2 0 7 |
Injector (Y62y7)
Activation and injection duration |
103 
(2.103) |
N3/10

 |
 25
(1.25) |
ECT approx. 20° C
at start
ECT approx. 80° C
at idle
accelerate briefly |
Injection time:
approx. 8 ms
approx. 3 - 5 ms
approx. 14 ms
(signal see Figures 3 and 4)
|
 23.1 , 23.1 ,
N3/10,
Further possibilities:
ECT sensor (B11/4),
IAT sensor (B17),
O2S 1 (G3/3 or G3/4). |
| 23.1 |
|
Resistance (Y62y7) |
103 
(2.103) |
N3/10

 |
 25
(1.25)
|
Ignition: OFF
|
14 - 17 
|
Wiring,
Y62y7 |
| 24.0 |
P 0 2 0 8 |
Injector (Y62y8)
Activation and injection duration |
82 
(2.82) |
N3/10

 |
 25
(1.25) |
ECT approx. 20° C
at start
ECT approx. 80° C
at idle
accelerate briefly |
Injection time:
approx. 8 ms
approx. 3 - 5 ms
approx. 14 ms
(signal: see Figures 3 and 4)
|
 24.1 , 24.1 ,
N3/10
Further possibilities:
ECT sensor (B11/4),
IAT sensor (B17),
O2S 1 (G3/3 or G3/4). |
| 24.1 |
|
Resistance (Y62y8) |
82 
(2.82) |
N3/10

 |
 25
(1.25)
|
Ignition: OFF
|
14 - 17 
|
Wiring,
Y62y8 |
| 25.0 |
P 0 4 1 0
P 1 4 5 3 |
Only 
Model 129, 140
AIR relay module (K17)
Model 210
Relay module (K40)
Activation |
Models
129/140
57 
(1.57)
Model
210
92 
(2.92) |
|
 25
(1.25)
 25
(1.25)
|
Disconnect ECT sensor
(B11/4) connector.
Simulate 2.5 k 
resistance at sockets 1
and 4 with resistance
substitution unit.
Engine: at Idle
|
11 - 14 V
for approx. two minutes and AIR pump runs. |
 25.1 , 25.1 ,
N3/10 |
| 25.1 |
|
Model 129, 140
AIR relay module (K17)
Model 210
Relay module (K40)
Current draw |
Models
129/140
38 
(1.38)
Model
210
38 
(1.38) |
|
 57
(1.57)
 92
(2.92)
|
Ignition: ON |
0.1 - 0.3 A |
Wiring,
K17 or K40
|
| 26.0 |
P 0 4 1 0
P 1 4 2 0 |
Only 
AIR pump switchover valve (Y32)
Activation |
114 
(2.114) |
N3/10


|
 25
(1.25)
|
Disconnect ECT sensor (B11/4) connector. Simulate 2.5 k  resistance at sockets 1 and 4 with resistance substitution unit. resistance at sockets 1 and 4 with resistance substitution unit.
Engine: at Idle
|
11 - 14 V
for approx. two minutes and AIR pump runs. |
N3/10
|
| 26.1 |
|
Current draw (Y32) |
38 
(1.38) |
N3/10


|
 114
(2.114)
|
Ignition: ON |
0.3 - 0.5 A |
Wiring,
Y32 |
| 27.0 |
P 1 5 2 2
P 1 5 3 3 |
Left adjustable camshaft timing solenoid (Y49/1)
Current draw |
1 
|
Y49/1

|
 2
|
Connect test cable
(102 589 04 63 00) to solenoid.
Engine: Start
and increase engine speed to 3000 rpm. |
approx. 1.3 A
|
 27.1 , 27.1 ,
 29.0 , 29.0 ,
N3/10 |
| 27.1 |
|
Resistance Y49/1 and Y49/2 |
111 
(2.111) |
N3/10


|
 113
(2.113)
|
Ignition: OFF
|
14 - 24  6) 6) |
Wiring,
Y49/1 or Y49/2 |
| 28.0 |
P 1 5 1 9
P 1 5 2 5 |
Right adjustable camshaft timing solenoid (Y49/2)
Current draw |
1  |
Y49/2

|
 2 |
Connect test cable
(102 589 04 63 00) to solenoid.
Engine: Start
and increase engine speed to 3000 rpm.
|
approx. 1.3 A |
 28.1 , 28.1 ,
 30.0 , 30.0 ,
N3/10 |
| 28.1 |
|
Resistance Y49/2 and Y49/1 |
113 
(2.113) |
N3/10


|
 111
(2.111)
|
Ignition: OFF |
14 - 24  6) 6) |
Wiring,
Y49/2 or Y49/1 |
| 29.0 |
P 1 5 2 2
P 1 5 3 3 |
Left adjustable camshaft timing solenoid (Y49/1)
Mechanical function |
111 
(2.111) |
N3/10


|
 38
(1.38)
|
Engine: at Idle
Bridge sockets on socket box for a maximum of 10 seconds.
|
Engine runs rough after approx. 5 seconds. |
Check function of camshaft adjuster (see SMS, Engine 119, Job NO. 05-2160). |
| 30.0 |
P 1 5 1 9
P 1 5 2 5 |
Right adjustable camshaft timing solenoid (Y49/2)
Mechanical function |
113 
(2.113) |
N3/10


|
 38
(1.38)
|
Engine: at Idle
Bridge sockets on socket box for a maximum of 10 seconds.
|
Engine runs rough after approx. 5 seconds. |
Check function of camshaft adjuster (see SMS, Engine 119, Job NO. 05-2160). |
| 31.0 |
P 0 4 4 0
P 0 4 4 1
P 0 4 4 3
P 0 4 4 6
|
Purge control
valve (Y58/1)
Activation |
10 
(1.10) |
N3/10

 |
 25
(1.25) |
Engine: at Idle
and at operating temperature. |
After approx. 1 minute, purge control valve (Y58/1) must noticeably cycle (Fig. 5 to 7) Signal: see Figure 8.
|
 31.1 , 31.1 ,
 32.0 , 32.0 ,
N3/10 |
| 31.1 |
|
Current draw (Y58/1) |
38 
(1.38) |
N3/10

 |
 10
(1.10)
|
Ignition: ON |
0.1 - 0.3 A |
Wiring,
Y58/1 |
| 32.0 |
P 0 4 4 0
P 0 4 4 1
|
Purge control
valve (Y58/1)
Vacuum control |
|
|
|
Connect vacuum tester
to purge control valve
(Y58/1) connector (A)
(Figure 5 and 6).
Engine at operating temperature and at idle.
Slowly increase engine speed to 3000 rpm.
|
After approx. 1 minute,
> 50 mbar and needle oscillates.
|
Vacuum line,
Y58/1 |
| 33.0 |
P 0 4 4 0
P 0 4 4 2
P 0 4 4 6
P 0 4 5 5
|
Only  , Model 140, 210, Model 129 as of 09/97 , Model 140, 210, Model 129 as of 09/97
Purge system
Leaks
Activated charcoal canister shut-off valve (Y58/4) Activated
|
26 
(1.26) |
N3/10


|
 34
(1.34)
|
Disconnect purge line (A) to charcoal canister on purge control valve (Y58/1). Connect vacuum tester to purge line (Figure 6 and 7).
Ignition: ON
Apply approx. 25 mbar of vacuum.
|
After approx. 1 minute,
< 5 mbar vacuum loss.
|
Fuel tank cap,
Purge line to charcoal canister,
Purge line from charcoal canister to Y58/4,
Charcoal canister,
Y58/4 |
| 34.0 |
P 0 4 4 6 |
Only  , Model 140, 210, , Model 140, 210,
Model 129 as of 09/97
Activated charcoal canister shut-off valve (Y58/4)
Current draw
|
38 
(1.38) |
N3/10


|
 34
(1.34)
|
Ignition: ON |
0.5 - 0.9 A |
Wiring,
Y58/4 |
| 35.0 |
P 0 4 4 6
P 0 4 5 0
P 0 4 5 5 |
Only  , Model 140, 210, , Model 140, 210,
Model 129 as of 09/97
Fuel tank pressure
sensor (B4/3)
Sender signal
Activated charcoal canister shut-off valve (Y58/4) activated
|
53 
(1.53)
26 
(1.26) |
|
 51
(1.51)
 34
(1.34)
|
Disconnect purge line (A) to charcoal canister on purge control valve (Y58/1). Connect vacuum tester to purge line (Figure 6 and 7).
Ignition: ON
Apply approx. 25 mbar of vacuum.
|
> 3 V
< 2.5 V
|
 35.1 , 35.1 ,
Wiring,
Vacuum line,
Charcoal canister plugged,
B4/3 |
| 35.1 |
|
Only 
Fuel tank pressure
sensor (B4/3)
Voltage supply |
53 
(1.53) |
N3/10


|
 44
(1.44)
|
Ignition: ON |
4.7 - 5.3 V |
N3/10 |
| 36.0 |
P 0 4 5 0
|
Only  , Model 129, up to 08/97 , Model 129, up to 08/97
Purge monitoring pressure
sensor (B4/4)
Sender signal |
53 
(1.53) |
N3/10


|
 51
(1.51)
|
Disconnect purge line on purge monitoring pressure sensor (B4/4). Connect vacuum tester to pressure sensor (Figure 5).
Ignition: ON
Apply approx. 300 mbar of vacuum.
|
> 3.5 V
< 3 V
|
Wiring,
 36.1 , 36.1 ,
B4/4 |
| 36.1 |
|
Fuel tank pressure
sensor (B4/4)
Voltage supply |
53 
(1.53) |
N3/10


|
 44
(1.44)
|
Ignition: ON |
4.7 - 5.3 V |
N3/10 |
| 37.0 |
P 0 6 0 0
P 1 5 7 0
P 1 7 4 7 |
CAN data bus
|
60 
(1.60) |
N3/10
 |
 61
(1.61) |
Ignition: OFF
Disconnect connector 1 from test cable and measure resistance directly at connector 1 (interior) of engine harness using an ohmmeter. Wire connections see  22 22
|
115 - 125  |
 37.1 , 37.1 ,
Data line. |
| 37.1 |
|
Model 129/140 up to 05/96
CAN element in RCL control module (N54)
Model 129/140 as of 06/96 and Model 210.072
CAN element in DAS control module (N54/1)
Resistance
|
L  |
N54
N54/1


|
 H |
Ignition: OFF
Disconnect control module (N54 or N54/1) and test directly at pins of control module (Figure 10).
|
115 - 125  |
N54 or N54/1 |
| 38.0 |
|
CAN element in engine control module (N3/10)
Resistance |
60  |
N3/10


|
 61 |
Ignition: OFF
Disconnect control module connector 1 (interior) from N3/10 and test directly at control module.
|
115 - 125  |
N3/10 |
| 39.0 |
P 1 1 6 3 |
Oil level switch (S43) |
32 
(1.32) |
N3/10

 |
 25
(1.25)
|
Ignition: ON
Oil level okay.
Oil level low. |
11 - 14 V
< 1 V |
Wiring,
S43 |
| 40.0 |
|
Model 129/140 up to 05/96
Model 210 up to 05/97
(afterwards via CAN)
Fuel consumption signal |
25 
(1.25) |
N3/10

 |
 58
(1.58)
|
Engine: at Idle and briefly accelerate engine.
|
> 0.5 V |
Wiring,
N3/10 |
| 41.0 |
|
Diagnosis line
Activation |
26 
(1.26) |
N3/10

 |
 55
(1.55)
|
Ignition: ON
|
11 - 14 V |
Wiring,
N3/10 |
| 42.0 |
P 1 6 0 5 |
(only until 05/96, as of 06/96 deleted)
Body acceleration
sensor (B24)
Sensor signal static
Sensor signal dynamic
|
53 
(1.53)
53 
(1.53) |
|
 48
(1.48)
 48
(1.48) |
Ignition: ON
Vigorously move left front corner of vehicle by hand.
|
2.35 - 2.65 V
> 5 mV~
Note:
Value changes with movement.
|
Wiring,
 42.1 , 42.1 ,
B24 |
| 42.1 |
|
Voltsge supply (B24/7) |
53 
(1.53) |
N3/10
 |
 44
(1.44)
|
Ignition: ON |
4.7 - 5.3 V |
N3/10 |
| 43.0 |
P 1 4 4 4 |
Not applicable to U.S.A. version vehicles |
|
|
|
|
|
|
| 44.0 |
P 1 4 3 7
P 1 4 4 4 |
Not applicable to U.S.A. version vehicles |
|
|
|
|
|
|
| 45.0 |
|
Model 140 til 05/96
Model 210 til 05/97
(afterwards via CAN)
Fuel tank cap open signal |
23 
(1.23)
|
N3/10


|
 25
(1.25)
|
Engine: at Idle
Tank cap open
Tank cap closed
after approx. 18 minutes |
11 - 14 V
< 1 V
|
Leak in purge system,  33.0 33.0 |
| 46.0 |
|
Model 140 til 05/96
Model 210 til 05/97
(afterwards via CAN)
"CHECK ENGNE"
MIL (A1e26) |
11 
(1.11) |
N3/10


|
 25
(1.25)
|
Ignition: ON |
11 - 14 V |
N3/10 |
| 47.0 |
|
Engine control module (ME-SFI) coding
Bridge |
73 
(2.73) |
N3/10

 |
 96
(2.96)
|
Ignition: OFF |
< 1  |
Wiring. |

 Printable version


 35
35 


 22
22 
 H
H 
