| Test Step |
Impulse readout |
Test scope |
Test connection |
Test condition |
Nominal value |
Possible cause/Remedy |
| 1.0 1) |
|
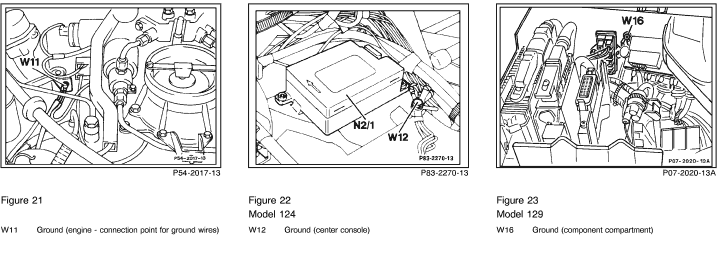
Ground, engine (W11)
(connection point for ground wires)
Model 124
Model 129 |
|
|

cir. 30
X4/10
cir. 30 |
-
- |
11 - 14 V
11 - 14 V |
Wiring,
Ground connection W11
(Figure 21) loose.
Wiring,
Ground connection W11
(Figure 21) loose.
|
| 1.1 |
|
Ground, battery (W10)
Model 124
Ground, component compartment (W16)
Model 129 |
|
|
cir. 30
X4/10
cir. 30
|
-
- |
11 - 14 V
11 - 14 V |
Wiring,
Ground connection W10
(Figure 20) loose.
Wiring,
Ground connection W16
(Figure 23) loose. |
| 2.0 1) |
|
CFI control module (N3)
Voltage supply,
Circuit 30a |
19  |
N3

 |
 1 |
- |
11 - 14 V |
Wiring,
Overvoltage protection relay module (K1/1) fuse,
K1/1.
|
| 2.1 |
|
Wiring from N3 to K1/1 |
N3
1 |
|
K1/1
4
|
CFI control module (N3) unplugged. |
< 1  |
Wiring. |
| 2.2 |
|
Wiring from circuit 30 to K1/1 |
N3
6 |
|
K1/1
1
|
- |
11 - 14 V |
Wiring. |
| 2.3 |
|
Wiring from circuit 30 to K1/1 |
X4/10
cir. 30 |
|
K1/1
1
|
- |
< 1 |
Wiring. |
| 3.0 1) |
|
CFI control module (N3)
Voltage supply,
Circuit 87E |
19 |
N3
|
41
|
Ignition: ON
Overvoltage protection relay module (K1/1) plugged in. |
11 - 14 V |
Wiring,
Connected components are shorted to circuit 31 (ground). |
| 1) On-off ratio 100% when measured with on-off ratio tester. |
| 4.0 |
|
Engine systems control module (N16)
Ground |
N16
4 |
|
X4/10
cir. 30 |
- |
11 - 14 V |
Wiring,
Loose ground connection:
Model 124: W10 (Figure 20)
Model 129: W16 (Figure 23).
|
| 5.0 |
|
Engine systems control module (N16)
Voltage supply
Circuit 30 |
4 |
N16
|
1 |
- |
11 - 14 V |
Wiring,
Loose wire at terminal block, terminal 30/61 (battery) (X4/10):
Model 124: (Figure 25)
Model 129: (Figure 26)
|
| 6.0 |
|
Engine systems control module (N16)
Voltage supply
Circuit 15 unfused |
4 |
N16
|
10 |
Ignition: ON |
11 - 14 V |
Wiring,
Loose wire at fuse and relay box (F1), plug connection:
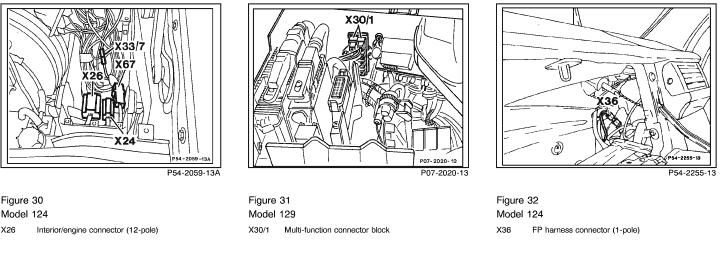
Model 124: Interior/engine connector (X26) (Figure 30)
Model 129: Multi-function connector block (X30/1) (Figure 31).
|
| 7.0 |
|
Engine systems control module (N16)
Voltage supply
Circuit 15 |
4 |
N16
|
21 |
Ignition: ON |
11 - 14 V |
Wiring,
Loose wire at fuse and relay box (F1), plug connection:
Model 124: Interior/engine connector (X26) (Figure 30)
Model 129: Multi-function connector block (X30/1) (Figure 31).
|
| 8.0 |
|
Fuel pumps (M3m1, M3m2)
Operation |
4 |
N16
|
21 |
Ignition: OFF
Engine systems control module (N16) unplugged.
Ignition: ON |
11 - 14 V |
Wiring,
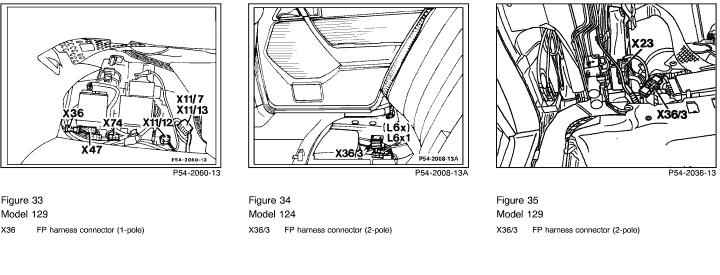
FP harness connector (X36):
Model 124: (Figure 32)
Model 129: (Figure 33)
M3m1 or M3m2.
|
| 9.0 |
|
Fuel pumps (M3m1, M3m2)
Control |
4 |
N16
|
2 |
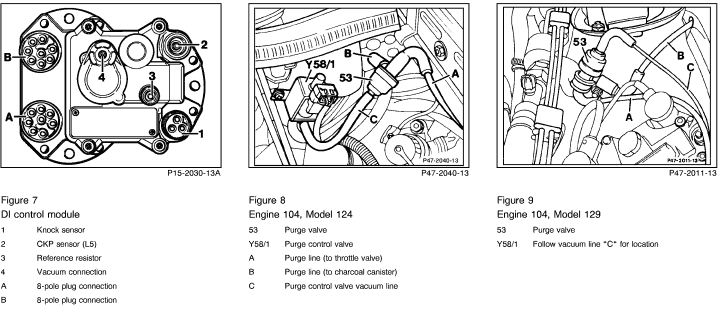
N16 plugged in.
Connector 2 of DI control module unplugged
(Figure 7).
Engine: Crank
|
10 ± 2V
while cranking |
 9.1 , 9.1 ,
N16. |
| 9.1 |
|
Control signal,
Circuit 50 |
4 |
N16
|
12 |
Connector 2 of DI control module unplugged
(Figure 7).
Engine: Crank
|
10 ± 2V
while cranking |
Wiring,
Model 124: Interior/engine connector (X26) (Figure 30) defective,
Model 129: AT/engine connector(X22/2) (Figure 29) defective.
|
| 10.0 |
 1) 1) |
Electrohydraulic
actuator (Y1)
Current check |
1 |
Y1
 |
2 |
Connect test cable
102 589 04 63 00 to Y1.
Ignition: ON |
Engine 104:
20 mA
Engine 119:
75 mA
|
Wiring to CFI control module (N3),
Y1. |
| 11.0 1) |
|
Electrohydraulic
actuator (Y1)
Malfunction circuit |
55 |
N3
 |
37
|
Ignition: OFF
Unplug N3 |
19.5 ± 1 |
Wiring,
Y1. |
| 11.1 |
|
Resistance |
1  |
Y1
|
 2 |
Ignition: OFF
Y1 unplugged
|
19.5 ± 1 |
Y1. |
| 11.2 |
|
Wiring |
|
|
Y1
1
2
|
Ignition: OFF
N3 and Y1 unplugged. |
< 1 |
Wiring,
Wires in connector (Y1) reversed. |
| 1) On-off ratio 90% when measured with on-off ratio tester. |
1) On-off ratio 20% when measured with on-off ratio tester.
2) On-off ratio 10% when measured with on-off ratio tester. |
| 12.2 |
|
Wiring |
N3
46 |
|
S29/2x1
3 |
Ignition: OFF
CFI control module (N3) unplugged.
|
< 1 |
Wiring.
|
| 12.3 |
|
Wiring |
W11
 |
|
S29/2x1
2 |
Ignition: OFF |
< 1 |
Wiring,
Ground connection (W11) loose (Figure 21).
|
| 13.0 |

 
1) |
ECT sensor (B11/2)
Malfunction circuit |
35 |
N3
|
16 |
Ignition: ON |
See Table I |
Wiring,
B11/2,
CFI control module (N3). |
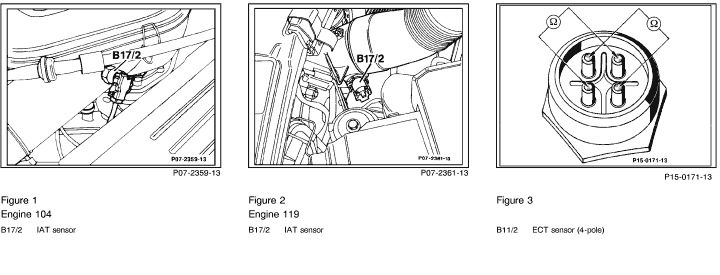
| 13.1 |
|
B11/2 |
1
2 |
B11/2
B11/2
|
3
4
|
B11/2 connector unplugged.
Measure connections diagonally and compare both values (Figure 12). |
See Table I
(both values must be the same). |
B11/2. |
| 13.2 |
|
Wiring |
|
|
B11/2
2
4 |
Ignition: OFF
N3 connector unplugged.
Terminal layout of connector (B11/2,
Figure 12).
|
< 1 |
Wiring. |
| 1) On-off ratio 30% when measured with on-off ratio tester. |
| 14.0 |
 1) 2) 1) 2) |
VAF sensor (B2)
Malfunction circuit |
34
34 |
|
31
52
|
Engine: at Idle
and at operating temperature. |
4.6 -5.1 V
0. 55 - 0.95 V |
B2,
CFI control module (N3),
Wiring,
N3
B2. |
| 14.1 |
|
B2 |
1 |
B2
|
3 |
Ignition: OFF
Connector on B2 unplugged. |
3.6 - 4.4 k |
B2. |
| 14.2 |
|
B2 |
1 |
B2
|
2 |
Slowly deflect air flow sensor plate by hand. |
-value increases continuously up to 2/3 of travel, then decreases again. |
B2. |
| 14.3 |
|
Wiring |
|
|
|
Ignition: OFF
N3 connector unplugged. |
< 1 |
Wiring. |
1) On-off ratio 40% when measured with on-off ratio tester.
2) On-off ratio 10% when measured with on-off ratio tester. |
| 15.0 |
 1) 1) |
TN-signal |
19 |
N3
|
27 |
Engine: at Idle |
5 - 7 V |
Wiring,
16.2 ,
TN-signal implausible,
other connected components defective.
|
| 15.1 |
|
Wiring |
N3
27 |
|
N16
11
|
Ignition: OFF |
< 1 |
Wiring. |
| 16.0 |
|
TN-signal |
4 |
N16
|
16
|
Engine: at Idle |
5 - 7 V |
Wiring,
DI control module (N1/3). |
| 16.1 |
|
TN-signal wire |
N1/3
4
(A)
|
|
N16
16 |
Ignition: OFF
Connector (A) of N1/3 unplugged (Figure 7). |
< 1 |
Wiring. |
| 16.2 |
|
Engine systems control module (N16) |
4 |
N16
|
11 |
Ignition: OFF
Connector (A) of N1/3 connected.
Engine: at Idle
|
5 - 7 V |
N16. |
| 1) On-off ratio 70% when measured with on-off ratio tester. |
| 1) On-off ratio 10% when measured with on-off ratio tester. |
| 17.3 |
|
Wiring |
W11 |
|
S29/2x1
2 |
Ignition: OFF
Connector (S29/2x1) unplugged. |
< 1 |
Wiring,
Ground connection (W11) loose (Figure 21).
|
| 18.0 |
 1) 1) |
Vehicle speed signal |
19 |
N3
|
29 |
Ignition: OFF
ASR control module (N30/1) connector unplugged.
Engine: Start
Drive vehicle onto chassis dynamometer, "drive" vehicle at > 20 km/h
(> 13 mph).
Model 124:
Ignition: ON
Roll vehicle approx. 1 meter. |
< 1 V
Needle oscil-lates: 0 - 12 V
(0 - 9 V with consumers)
|
Wiring,
Model 124: Hall-effect speed sensor (B6),
Model 129: Electronic speedometer (A1p8). |
| 18.1 |
|
Wiring
Model 124 |
N3
19
|
|
X53/5
|
Ignition: OFF
CFI control module (N3) and Hall-effect sensor multipoint connector (X53/5) unplugged.
|
< 1 |
Wiring,
Hall-effect speed sensor (B6). |
| 1) On-off ratio 60% when measured with on-off ratio tester. |
| [18.1] |
|
Model 129 |
N3
29 |
|
X30/1
3
(A2) |
Ignition: OFF
CFI control module (N3) and connector A2 of multi-function connector block (X30/1) (Figure 31) unplugged.
|
< 1 |
Wiring,
Check X30/1 (Figure 31). |
| 18.2 |
|
Wiring
Model 129 |
X30/1
3
(A2) |
|
A1p8
1
(1) |
Ignition: OFF
Connector (1) of A1p8 unplugged.
|
< 1 |
Wiring,
Check A1p8, see DM, body and accessories, Vol. 1 - 1.2. |
| 19.0 |
1) |
Data line
CFI control module (N3) 
DI control module (N1/3) |
N3
26 |
|
N1/3
7
(A)
|
Ignition: OFF
Connector (A) of N1/3 unplugged (Figure 7). |
< 1 |
Wiring,
Check for correct part no. matching of control modules N3 and N1/3. |
| 20.0 |
|
IAT sensor (B17/2)
Malfunction circuit |
5 |
N3
|
14 |
Ignition: ON |
See Table I |
Wiring,
Engine 104: (Figure 1),
Engine 119: (Figure 2),
B17/2,
N3.
|
| 1) On-off ratio 80% when measured with on-off ratio tester. |
| 1) On-off ratio 50% when measured with on-off ratio tester. |
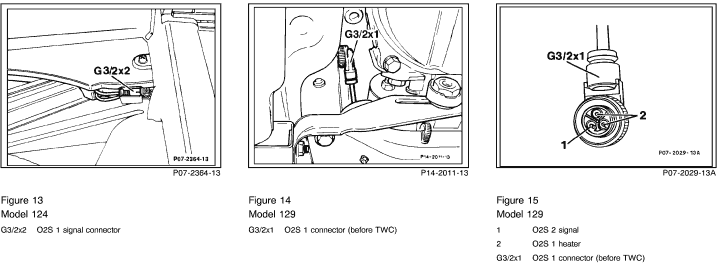
| 21.2 |
|
O2S 1 wire 1)
Model 124
Model 129 |
|
|
G3/2x2
G3/2x1
3 |
Ignition: OFF
CFI control module (N3) and O2S 1 signal connector (G3/2x2) unplugged.
Ignition: OFF
CFI control module (N3) and O2S 1 connector (G3/2x1) unplugged.
|
< 1
< 1 |
Wiring,
Wiring. |
| 21.3 |
|
O2S 1 (before TWC) (G3/2) |
N3
13 |
|

2 V |
On-off ratio tester connected.
Engine: at Idle
Connector G3/2x1 connected.
|
0 - 10% at on-off ratio tester after 30 seconds. |
G3/2. |
| 21.4 |
|
CFI control module (N3) |
13 |
N3
 |
6 |
On-off ratio tester connected.
Engine: at Idle
Connector G3/2x1 unplugged. |
90 - 100% at on-off ratio tester after 30 seconds. |
N3. |
| 22.0 |
|
O2S 1 heater
Voltage supply |
4 |
N16
|
20 |
Engine: at Idle |
11 - 14 V |
Wiring,
N3,
Engine systems control
module (N16).
|
| 1) Drive vehicle onto lift. |
| 22.1 |
|
Control signal
O2S 1 heater |
4 |
N16
|
18
|
Engine: at Idle |
11 - 14 V |
Wiring,
CFI control module (N3). |
| 22.2 |
|
Wiring |
N3
3 |
|
N16
18 |
Ignition: OFF
N3 and engine systems control module (N16) unplugged.
|
< 1 |
Wiring. |
| 22.3 |
|
Control signal
O2S 1 heater |
20 |
N16
|
1 |
Ignition: OFF
N16 unplugged.
O2S 1 connector (G3/2x1) connected.
Model 124: (Figure 13)
Model 129: (Figure 14).
|
0.5 - 1.7 A |
Wiring,
O2S 1 (before TWC) (G3/2). |
| 22.4 |
|
Model 124
Wiring |
G3/2x1
2 |
|
N16
20
|
Ignition: OFF
N16 and G3/2x1 unplugged.
|
< 1 |
Wiring. |
| [22.4] |
|
Model 129
Wiring 1) |
G3/2x1
2 |
|
N16
20
|
N16 and G3/2x1 unplugged. |
< 1 |
Wiring. |
| 22.5 |
|
Model 124
Wiring
Model 129
Wiring 1) |
G3/2x1
1
G3/2x1
1 |
|
W10
W16
|
Ignition: OFF
O2S 1 heater coil connector (G3/2x1) unplugged.
Ignition: OFF
Connector G3/2x1 unplugged.
|
< 1
< 1 |
Wiring,
Wiring. |
| 23.0 |
|
Adjustable camshaft timing solenoid (Y49) and mechanical camshaft adjustment
Engine 104 |
N3
1
N3
6 |
|
Y49
2
Y49
1 |
Ignition: OFF
Connector on Y49 unplugged.
Engine: at Idle
Bridge for a max. of 10 seconds.
|
Engine shakes |
Y49,
Check mechanical camshaft adjustment (see SMS, Repair Instructions, Engine 104, Group 05, Job No. 217). |
| 1) Drive vehicle onto lift. |
| 24.0 |
|
Engine 104
Camshaft adjustment (electrical) (Y49) |
1 |
Y49
|
2 |
Ignition: OFF
Connect test cable
102 589 04 63 00 to adjustable camshaft timing solenoid (Y49).
Engine: Start
Increase engine speed to approx. 2000 rpm.
|
Briefly 1.5 A,
then 1 A |
Wiring,
Y49,
CFI control module (N3). |
| 25.0 |
|
Engine 119
Left adjustable camshaft timing solenoid (Y49/1) and left mechanical camshaft timing adjustment |
N3
1
N3
6 |
|
Y49/1
2
Y49/1
1
|
Ignition: OFF
Connector on Y49/1 unplugged.
Engine: at Idle

Bridge for a max. of 10 seconds.
|
Engine shakes |
Y49/1,
Check mechanical camshaft adjustment (see SMS, Repair Instructions, Engine 119, Group 05, Job No. 217). |
| 26.0 |
|
Engine 119
Left camshaft adjustment (electrical) (Y49/1) |
1 |
Y49/1
|
2 |
Ignition: OFF
Connect test cable
102 589 04 63 00 to adjustable camshaft timing solenoid (Y49/1).
Engine: Start
Increase engine speed to approx. 3000 rpm.
|
Briefly 1.5 A,
then 1 A |
Wiring,
Y49/1,
Chech contacts at engine separation point connector (X26/2),
CFI control module (N3). |
| 26.1 |
|
Left camshaft adjustment
Control
|
40 |
N3
|
41 |
Increase engine speed to approx. 3000 rpm. |
Briefly 7.5 V
then approx. 5 V |
If nominal value is greater than
11 V, check CFI control module (N3) wiring for open circuit,
26.2.
|
| 26.2 |
|
Left adjustable camshaft timing solenoid (Y49/1) |
1 |
Y49/1
|
2 |
Ignition: OFF
Connector on Y49/1 unplugged.
|
5 ± 1 |
Y49/1. |
| 26.3 |
|
Wiring |
|
|
Y49/1
2
1
|
Ignition: OFF
CFI control module (N3) and connector on Y49/1 unplugged.
|
< 1 |
Wiring |
| 27.0 |
|
Engine 119
Right adjustable camshaft timing solenoid (Y49/2) and right mechanical camshaft adjustment |
N3
1
N3
6 |
|
Y49/2
2
Y49/2
1
|
Ignition: OFF
Connector on Y49/2 unplugged.
Engine: at Idle
Bridge for a max. of 10 seconds.
|
Engine shakes |
Y49/2,
Check mechanical camshaft adjustment (see SMS, Repair Instructions, Engine 119, Group 05, Job No. 217). |
| 28.0 |
|
Right camshaft adjustment (electrical) (Y49/2) |
1 |
Y49/2
|
2 |
Ignition: OFF
Connect test cable
102 589 04 63 00 to adjustable camshaft timing solenoid (Y49/2).
Engine: Start
Increase engine speed to approx. 3000 rpm.
|
Briefly 1.5 A,
then 1 A |
Wiring,
Y49/2,
CFI control module (N3). |
| 28.1 |
|
Right camshaft adjustment
Control |
22 |
N3
|
41
|
Increase engine speed to approx. 3000 rpm. |
Briefly 7.5 V
then approx. 5 V |
Wiring,
Y49/2,
N3. |
| 28.2 |
|
Right adjustable camshaft timing solenoid (Y49/2) |
1 |
Y49/2
|
2 |
Ignition: OFF
Connector on Y49/2 unplugged.
|
5 ± 1 |
Y49/2. |
| 28.3 |
|
Wiring |
|
|
Y49/2
2
1 |
Ignition: OFF
CFI control module (N3) and connector on Y49/2 unplugged.
|
< 1 |
Wiring.
|
| 29.0 |
|
A/C compressor engagement signal |
6 |
N3
|
45 |
Engine: at Idle
Switch ON automatic climate control (A/C compressor). |
5 - 10 V |
Wiring,
Engine systems control
module (N16),
Check A/C compressor cut-out (see DM, Climate Control, Vol. 1).
|
| 29.1 |
|
Wiring |
N16
9 |
|
N3
45 |
Ignition: OFF
N3 and A/C compressor control module (N6) unplugged.
|
< 1 |
Wiring. |
| 30.0 |
|
Electromagnetic AIR pump clutch (Y33)
Control |
4 |
N16
|
19 |
Ignition: OFF
ECT sensor (B11/2) unplugged. Using two resistance substitution units, simulate 2.5 k resistance (+ 20°C) at sockets 2 and 4 as well as at sockets 1 and 3
(Figure 12).
Engine: at Idle
Disconnect air hose to check valve.
|
11 - 14 V
(for approx. 2 minutes after start)
Noticeable air flow at air hose. |
30.1 ,
Engine systems control
module (N16). |
| 30.1 |
|
Secondary air injection control signal |
17 |
N16
|
21 |
Ignition: OFF
ECT sensor (B11/2) unplugged. Simulate 2.5 k resistance (+ 20°C) at sockets 2 and 4 as well as at sockets 1 and 3
(Figure 12).
Engine: at Idle
|
11 - 14 V
(for approx. 2 minutes after start) |
Wiring,
CFI control module (N3). |
| 30.2 |
|
Wiring |
N3
42 |
|
N16
17
|
Ignition: OFF
N3 and N16 unplugged. |
< 1 |
Wiring. |
| 30.3 |
|
AIR pump switchover
valve (Y32)
Control |
1 |
Y32
|
2 |
Ignition: OFF
ECT sensor (B11/2) unplugged. Simulate 2.5 k resistance (+ 20°C) at sockets 2 and 4 as well as at sockets 1 and 3
(Figure 12).
Connector on Y32 unplugged.
Engine: at Idle
|
11 - 14 V
(for approx. 2 minutes after start) |
Wiring to Y32 (located in engine compartment):
Model 124: (Figure 5),
Model 129: (Figure 6). |
| 30.4 |
|
AIR pump switchover
valve (Y32) |
1 |
Y32
|
2 |
Ignition: OFF
Connector on Y32 unplugged.
|
25 ± 5 |
Y32. |
| 30.5 |
|
Electromagnetic AIR pump clutch (Y33)
Control |
1 |
Y33
|
2 |
Ignition: OFF
ECT sensor (B11/2) unplugged. Simulate 2.5 k resistance (+ 20°C) at sockets 2 and 4 as well as at sockets 1 and 3
(Figure 12).
Connector on Y33 unplugged.
Engine: at Idle
|
11 - 14 V
(for approx. 2 minutes after start) |
Wiring to Y33 (located in harness channel in front of right spring tower). |
| 30.6 |
|
Electromagnetic AIR pump clutch (Y33) |
1 |
Y33
|
2 |
Connector on Y32 unplugged.
|
5 ± 1 |
Y33. |
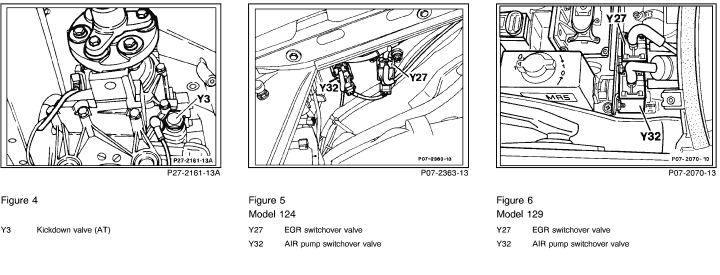
| 31.0 |
 |
Start valve (Y8)
Control |
20 |
N3
|
41 |
Ignition: OFF
ECT sensor (B11/2) unplugged. Using two resistance substitution units, simulate 2.5 k resistance (+ 20°C) at sockets 2 and 4 as well as at sockets 1 and 3
(Figure 12).
Engine: at Idle
|
Briefly
10 ± 2 V |
CFI control module (N3), see "Testing Starting System" (  33 ), 33 ),
32.0. |
| 32.0 |
|
Start valve (Y8)
Resistance |
1 |
Y8
|
2 |
Ignition: OFF
Connector on Y8 unplugged.
|
10 - 15 |
Y8. |
| 32.1 |
|
Wiring |
|
|
Y8
1
2
|
Ignition: OFF |
< 1 |
Wiring,
Intermittent contact (X26/2). |
| 33.0 |
|
ISC valve (Y6)
Current check |
1 |
Y6
|
2 |
Ignition: OFF
Connect test cable to Y6.
Engine: at Idle |
Engine 104
600 ± 50 mA
Engine 119
700 - 1000 mA
|
Wiring,
Intermittent contact (X26/2),
CFI control module (N3). |
| 33.1 |
|
Resistance |
1 |
Y6
|
2 |
Ignition: OFF |
Engine 104
7.5 - 10
Engine 119
3.5 - 5.5
|
Y6,
Intermittent contact (X26/2). |
| 33.2 |
|
Wiring |
|
|
Y6
1
2
|
Ignition: OFF
N3 unplugged. |
< 1 |
Wiring,
Intermittent contact (X26/2). |
| 34.0 |
|
Charcoal canister purging
Operation |
|
|
|
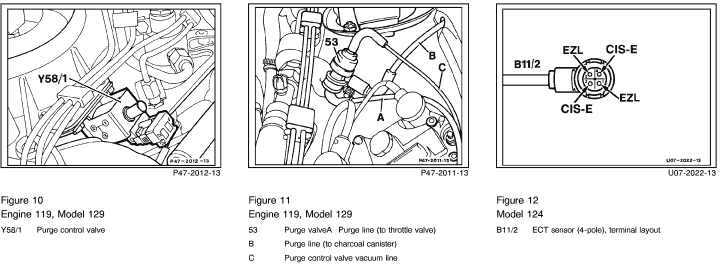
Note to Test connection:
Connect vacuum tester to side connection (B) of purge valve (53):
Model 124: (Figure 8),
Model 129: (Figure 9, 11).
Ignition: OFF
Purge line (B, Figures 8, 9 or 11) disconnected from charcoal canister at purge valve.
Engine: at Idle and at operating temperature. Slowly increase engine speed to a maximum of 3000 rpm.
|
Vacuum increases with increasing rpm. |
Wiring,
CFI control module (N3),
Purge control valve (Y58/1),
Check vacuum lines,
13.0 ,
Intermittent contact (X26/2). |
| 34.1 |
|
Purge control valve (Y58/1)
Control |
2 |
N3
|
41 |
Engine: at Idle
Increase engine speed to
> 800 rpm |
11 - 14 V |
Wiring,
N3,
Y58/1,
Intermittent contact (X26/2).
|
| 34.2 |
|
Purge control valve (Y58/1) |
1 |
Y58/1
|
2 |
Ignition: OFF
Connector on Y58/1 (Figures 8, 10) unplugged.
|
25 ± 5 |
Y58/1. |
| 34.3 |
|
Wiring |
|
|
Y58/1
1
2
|
Ignition: OFF
N3 unplugged. |
< 1 |
Wiring,
Intermittent contact (X26/2). |
| 35.0 |
|
Non-USA vehicles.
Continue to next test step.
|
|
|
|
|
|
|
| 36.0 1) |
|
Circuit 50
Activation |
6 |
N3
|
11 |
Plug 2 on DI control module (N1/3) disconnected
(Figure 7).
Engine: Start
|
10 ± 2 V while cranking |
Wiring (circuit 50). |
| 1) On-off ratio 70% when measured with on-off ratio tester. |
| 37.0 |
|
Deceleration shut-off
Engine 104 |
|
|
|
Note to Test connection:
Connect to
diagnostic socket (X11).
Engine: Start
Increase engine speed to 2000 - 2500 rpm, then close throttle valve.
|
On-off ratio momentarily jumps up to 95%. |
Wiring,
Check adjustment of linkage and throttle valve switch,
S27/2.
|
| 37.1 |
|
Deceleration shut-off microswitch (S27/2) |
10 |
N3
|
6 |
Ignition: OFF
CFI control module (N3) unplugged.
Accelerator pedal in CTP.
Depress accelerator pedal. |
< 1
 |
Open circuit, S27/2.
Short circuit, S27/2.
|
| 37.2 |
|
Vehicles with ASR
Idle speed switching signal |
6 |
N3
|
41 |
Ignition: ON
Accelerator pedal in CTP.
Depress accelerator pedal.
|
11 - 14 V
< 1 V
|
ACCelerator pedal position sensor,
Check EA/CC/ISC control module (N4/1), see DM, Engines,
Vol. 2 - 6.1. |
| 37.3 |
|
Electrohydraulic actuator (Y1)
Current check |
1 |
Y1
|
2 |
Ignition: OFF
Connect test cable
102 589 04 63 00 to electrohydraulic actuator.
Engine: Start
Increase engine speed to 2000 - 2500 rpm and close throttle valve.
|
Momentarily approx. - 60 mA until combustion resumes. |
1.0 - 3.0 and 10.0 ,
N3. |
| 38.0 |
|
Engine 104
Kickdown cut-out
Malfunction circuit
Engine 119
Kickdown cut-out
Malfunction circuit |
7 |
N16
|
1 |
Ignition: OFF
Engine systems control module (N16) unplugged.
Kickdown switch (S16/6) activated. |
Engine 104:
450 ± 50 mA 1)
850 ± 50 mA 1)
Engine 119 :
450 ± 50 mA 1)
250 ± 50 mA 1)
|
Wiring,
S16/6,
AT kickdown valve (Y3, Figure 4). |
| 38.1 |
|
Kickdown switch (S16/6)
Voltage supply |
7 |
N16
|
1 |
Ignition: OFF
N16 unplugged.
Ignition: ON
Accelerator pedal in CTP.
Accelerator pedal in kickdown position. |
< 1 V
11 - 14 V |
s16/6,
AT kickdown valve (Y3, Figure 4).
Wiring,
38.2. |
| 1) Nominal value may ary from one nanufacturer to annother. |
1) Nominal value may ary from one nanufacturer to annother.
2) Kickdown solenoid valve (Y3/1y1) in 5-speed AT 722.5 only. |
| 39.0 |
|
EGR valve (static test) |
|
|
|
Note to Test connection:
Connect vacuum tester to EGR valve.
Apply 500 mbar vacuum.
Disconnect vacuum line on EGR valve.
|
EGR valve closes audibly |
EGR valve. |
| 39.1 |
|
EGR valve (dynamic test) |
|
|
|
Note to Test connection:
Vacuum tester connected to EGR valve.
Engine: at Idle
Engine rpm > 1000 rpm |
> 400 mbar |
Vacuum lines,
Vacuum supply,
EGR switchover valve (Y27),
Model 124: (Figure 5),
Model 129: (Figure 6),
Throttle valve housing.
|
| 40.0 |
 |
EGR switchover
valve (Y27)
Control |
38 |
N3
|
41
|
Engine: at Idle
Engine rpm > 3000 rpm |
Approx. 12 V |
Wiring,
CFI control module (N3). |
| 40.1 |
|
EGR switchover valve (Y27) |
|
Y27
|
|
Ignition: OFF |
30 ± 5 |
Y27:
Model 124: (Figure 5),
Model 129: (Figure 6).
|
| 40.2 |
|
Wiring |
|
|
Y27
1
2
|
Ignition: OFF
N3 and Y27 unplugged. |
< 1 |
Wiring. |
| 41.0 |
|
Non-USA vehicles.
Continue to next test step.
|
|
|
|
|
|
|
| 42.0 |
|
Non-USA vehicles.
Continue to next test step.
|
|
|
|
|
|
|
| 43.0 |
|
Non-USA vehicles.
Continue to next test step.
|
|
|
|
|
|
|
| 44.0 |
|
Transmission upshift delay relay module (K29)
Solenoid valve (Y3/2)
Control |
W11
|
|
Y3/2
|
Ignition: OFF
ECT sensor (B11/2) unplugged. Using two resistance substitution units, simulate 2.5 k resistance (+ 20°C) at sockets 2 and 4 as well as at sockets 1 and 3
(Figure 12).
Engine: at Idle
|
11 - 14 V
Engine 104:
max. 80 sec.
Engine 119:
max. 120 sec. |
44.1 ,
44.2 ,
44.3 ,
44.4 ,
CFI control module (N3),
K29. |
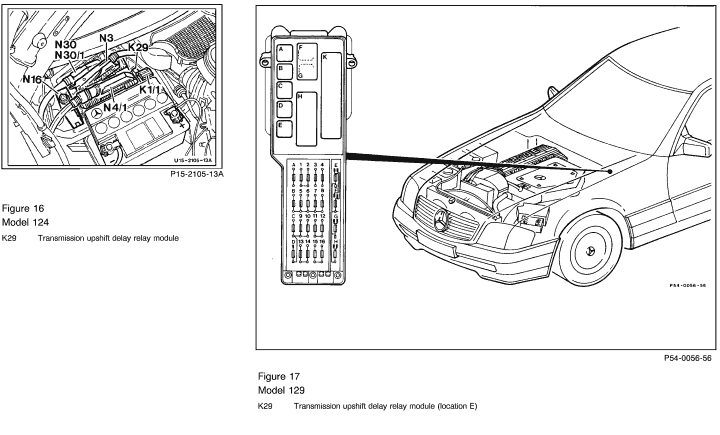
| 44.1 |
|
Transmission upshift delay relay module (K29)
Voltage supply |
W11
W11
|
|
K29
3
K29
4
|
Ignition: OFF
K29 unplugged:
Model 124: (Figure 16),
Model 129: (Figure 17).
Ignition: ON |
11 - 14 V
11 - 14 V
|
Overvoltage protection relay (K1/1),
Wiring. |
| 44.2 |
|
Wiring to solenoid valve (Y3/2) |
1
W11
|
K29
|
4
Y3/2x1
|
Ignition: OFF
Transmission upshift delay relay (K29) unplugged:
Model 124: Figure 16
Model 129: Figure 17
Solenoid valve connector (Y3/2x1) unplugged.
Ignition: ON |
11 - 14 V |
Open circuit. |
| 44.3 |
|
Solenoid valve (Y3/2) |
|
|
Y3/2
|
Ignition: OFF
Solenoid valve connector (Y3/2x1) unplugged.
|
10 - 18 |
Y3/2. |
| 44.4 |
|
Wiring from CFI control module (N3) to transmission upshift delay relay
module (K29) |
K29
5 |
|
N3
39 |
Ignition: OFF
Socket box connected
to N3.
K29 unplugged. |
< 1 |
Open circuit. |
| 45.0 |
|
Transmission upshift delay switchover valve (Y3/3)
Operation |
|
|
|
Note to Test connection:
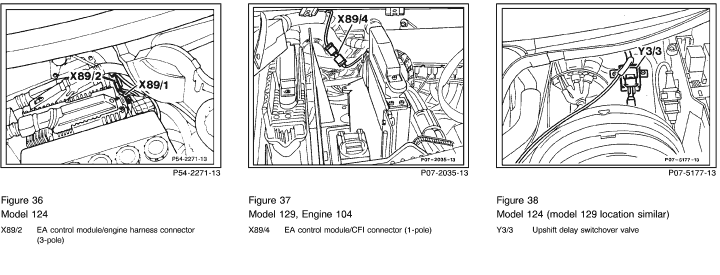
Disconnect vacuum line (Figure 38) on Y3/3.
Connect vacuum tester with Y-distributor to Y3/3.
Ignition: OFF
ECT sensor (B11/2) unplugged. Using two resistance substitution units, simulate 2.5 k resistance (+ 20°C) at sockets 2 and 4 as well as at sockets 1 and 3
(Figure 12).
Engine: at Idle
|
> 400 mbar (for a maximum of 80 seconds) |
Control of Y3/3,
Short/open circuit,
Y3/3 defective,
Vacuum element for transmission upshift delay,
Vacuum line. |
| 45.1 |
|
Control |
W11
Y3/3
1 |
|
Y3/3
2
+
|
Ignition: OFF
Connector of Y3/3 (Figure 38) unplugged. Using two resistance substitution units, simulate 2.5 k resistance (+ 20°C) at sockets 2 and 4 as well as at sockets 1 and 3
(Figure 12).
Engine: Start
|
11 - 14 V
11 - 14 V (for a maximum of 80 seconds)
|
Overvoltage protection relay module (K1/1),
Short/open circuit.
Short/open circuit,
CFI control module (N3). |
| 45.2 |
|
Coil resistance |
Y3/3
1 |
|
Y3/3
2 |
Ignition: OFF
Connector of Y3/3 (Figure 38) unplugged. |
25 - 40 |
Y3/3 defective. |
| Temperature (oC) |
Resistance ( ) |
Voltage (V) at IAT sensor (B17/2) |
Voltage (V) at ECT sensor (B11/2) |
| - 20 |
15700 |
2.85 - 3.49 |
5.12 - 5.60 |
| - 10 |
10000 |
2.50 - 3.06 |
4.49 - 5.11 |
| 0 |
5900 |
2.10 - 2.56 |
4.12 - 4.48 |
| 10 |
3700 |
1.69 - 2.07 |
3.77 - 4.11 |
| 20 |
2500 |
1.32 - 1.62 |
3.36 - 3.76 |
| 30 |
1700 |
1.03 - 1.25 |
2.92 - 3.35 |
| 40 |
1170 |
0.77 - 0.94 |
2.51 - 2.91 |
| 50 |
830 |
0.57 - 0.69 |
2.09 - 2.50 |
| 60 |
600 |
0.42 - 0.52 |
1.69 - 2.08 |
| 70 |
435 |
0.32 - 0.40 |
1.36 - 1.68 |
| 80 |
325 |
0.25 - 0.31 |
1.09 - 1.35 |
| 90 |
245 |
0.18 - 0.22 |
0.88 - 1.08 |
| 100 |
185 |
0.14 - 0.17 |
0.75 - 0.87 |
|


 Printable version
 1)
1)