 |
Mode |
Test scope |
Test connection |
Test condition |
Nominal value |
Possible cause/Remedy |
| 1.0 |
|
Instrument cluster (A1)
Voltage supply
circuit 30
|
11 
(2) |
A1
 |
 12
(2) |
Remove A1
Disconnect connector 2 |
11 - 14 V |
Wiring,
Fuse F17 in Fuse box F3
 1.1 1.1 |
| 1.1 |
|
Voltage supply
Circuit 15, unfused |
10 
(1) |
A1
 |
 1
(1) |
Remove A1
Disconnect connector 1
Ignition: ON
|
11 - 14 V |
Wiring,
Fuse F23 in Fuse box F3
 1.2 1.2 |
| 1.2 |
|
Voltage supply
Circuit 15, fused |
10 
(1) |
A1
 |
 5
(1) |
Remove A1
Disconnect connector 1
Ignition: ON
|
11 - 14 V |
Wiring,
Fuse F24 in Fuse box F3
Values OK:
A1 |
| 2.0 |
|
Instrument cluster (A1)
Illumination |
10 
(1) |
A1
 |
 8
(1) |
Remove A1
Disconnect connector 1
Ignition: ON
Turn on parking lights
|
11 - 14 V |
Wiring,
Exterior lamp switch (S1),
Short circuit in circuit 58d (output from A1). |
| 3.0 |
1 |
Fuel level gauge (A1p2) |
|
|
|
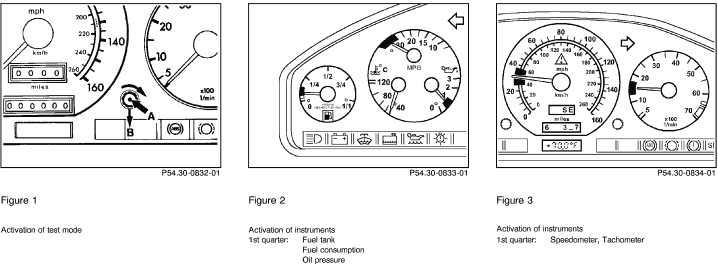
Activate test mode 1
(see  11 and 11 and  23 or 23 or  24 Figure 1). 24 Figure 1).
|
Analog fuel gauge reading  digital readout digital readout
|
A1,
 3.1 3.1 |
| 3.1 |
6 - 9 |
Fuel level gauge (A1p2) |
|
|
|
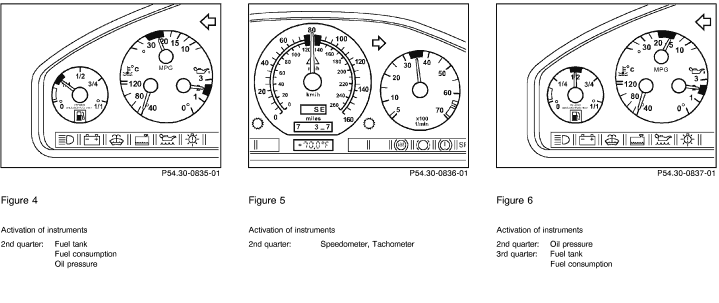
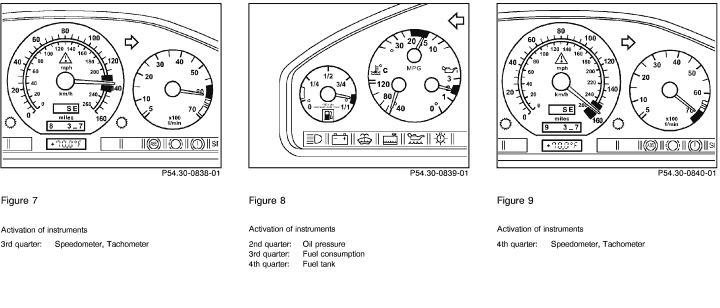
Activate test modes 6 - 9
|
see  24 Figures 24 Figures
2 - 9
|
A1,
 3.2 3.2 |
| 3.2 |
|
Wires and connections and fuel level sensor (B4) |
1  |
B4
 |
 2
|
Ignition: OFF
Disconnect connector at
B4
Connect resistance
substitution unit.
Ignition: ON
Resistance substitution
unit setting:
87 ± 2 
77 ± 1 
68 ± 3 
48 ± 3 
27 ± 3 
7 ± 2 
Note:
Before changing each resistance value, the ignition must be turned off and then turned on again. |
Display in
A1p2:
 0 1) 0 1)
 Res. 1) Res. 1)
 1/4 1/4
 1/2 1/2
 3/4 3/4
 1/1 1/1 |
Wiring,
Values OK:
B4,
 3.3 3.3 |
| 3.3 |
1 |
Programming fuel tank version in trip odometer |
|
|
|
Ignition: ON
Activate test mode 1 |
  = Standard fuel tank = Standard fuel tank
  =Fuel tank with pass-through (non-U.S.) =Fuel tank with pass-through (non-U.S.)
|
Set fuel tank version to   by depressing reset button for trip odometer. by depressing reset button for trip odometer. |
| 4.0 |
2 |
Fuel consumption
indicator (A1p10) |
|
|
|
Engine: at Idle
Activate test mode 2
Increase engine rpm |
With increasing rpm, the consumption in l/h increases.
Note:
The readout is only visible on the digital display.
The analog reading
shows 0.
|
 4.1 4.1 |
| 4.1 |
6 - 8 |
A1p10 |
|
|
|
Activate test modes 6 - 8
|
see Figures
2 - 9 |
A1,
 4.2 4.2 |
| 4.2 |
2 |
Fuel consumption signal from
HFM-SFI control module
(N3/4) or ME-SFI engine
control module (N3/10 or
N3/12)
with HFM-SFI:
with ME-SFI: |
18
(1)
W16
56
(1)
W16
|
|
 7
(1)
N3/4
7
(1)
58
(1)
N3/10
or
N3/12
 58
(1) |
Ignition: OFF
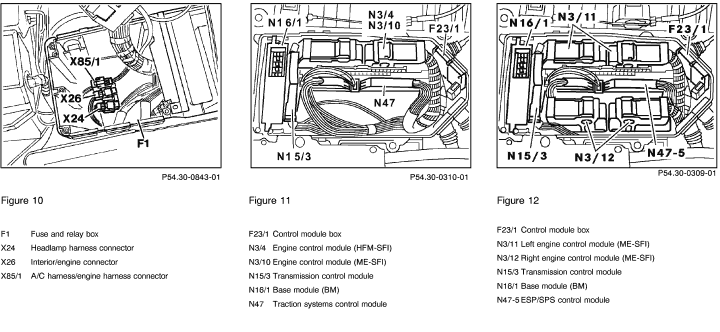
Disconnect N3/4 or N3/10 or N3/12 (Figures 11 to 14).
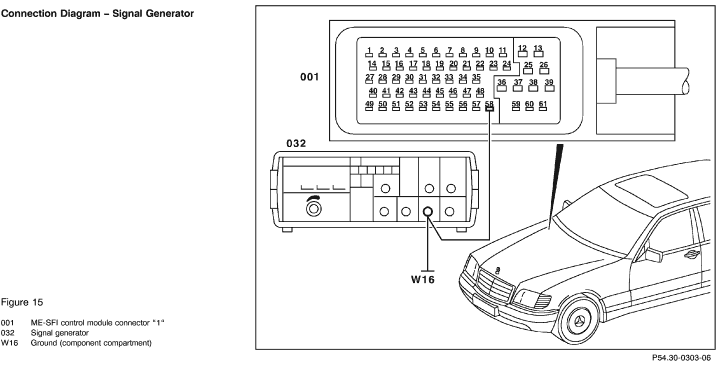
Connect signal generator (Figure 15) and make connection for rpm signal as follows:
HFM-SFI
First bridge N3/4 pin socket 18 to pin socket 7, then connect signal generator (pin 7 and ground)
ME-SFI
First bridge N3/10 or N3/12 pin socket 56 to pin socket 58, then connect signal generator
Set to a voltage amplitude of approx. 10 V.
Ignition: ON
Activate test mode 2.
|
HFM-SFI
25 HZ  5 l/h 5 l/h
50 HZ  10 l/h 10 l/h
75 HZ  15 l/h 15 l/h
100 HZ  20 l/h 20 l/h
Note:
The readout is only visible on the digital display.
The analog reading
shows 0.
|
Wiring,
A1,
Values OK:
N3/4
Engines, Volume 2 - 1.1 >23
N3/10 or N3/12
Engines, Volume 4 - 9.5 >23
- 9.6 >23
Note:
If no plausible values are indicated while driving and the speedometer is in order: check instrument cluster (A1) |
| 5.0 |
3 |
Engine oil pressure
gauge (A1p3) |
|
|
|
Engine: at Idle
Activate test mode 3.
Increase engine rpm |
Analog reading  digital readout. digital readout.
The oil pressure increases with increasing engine rpm.
|
A1,
 5.1 5.1 |
| 5.1 |
6 - 7 |
Oil pressure gauge (A1p3) |
|
|
|
Activate test modes 6 - 7
|
see Figures
2 - 9
|
A1,
 5.2 5.2 |
| 5.2 |
|
Wires and connections and oil pressure sensor (B5) |
1  |
B5
 |
 2
|
Ignition: OFF
Disconnect connector at
B5.
Connect resistance
substitution unit.
Engine: at Idle
Resistance substitution
unit setting:
13 
40 
90 
150 
|
Display in
A1p3:
 0 0
 1 1
 2 2
 3 3 |
Wiring,
A1,
Values OK: check oil pressure (see SMS Engine, Mechanical),
B5 |
| 6.0 |
4 |
Tachometer (A1p5) |
|
|
|
Engine: at Idle
Activate test mode 4, increase engine rpm |
Analog tachometer reading  digital readout digital readout
|
A1,
 6.1 6.1 |
| 6.1 |
|
Tachometer (A1p5)
with HFM-SFI:
with ME-SFI: |
W16
W16 |
|
N3/4
 18
(1)
N3/10
or
N3/12
 56
(1)
|
Disconnect plug on N3/4 (HFM-SFI) or N3/10 or N3/12 (ME-SFI) (Figures 11 to 14).
Connect signal generator and set to a voltage amplitude of approx. 10 V (Figure 15).
Ignition: ON
|
Engine 104, 120
Readout:
50 Hz 
1000 rpm
194 Hz 
4000 rpm
Engine 119
Readout:
70 Hz 
1000 rpm
270 Hz 
4000 rpm
|
Wiring,
A1,
Values OK on HFM-SFI engine:
N3/4
Values OK on ME-SFI engine:
N3/10 or N3/12 |
| 7.0 |
5 |
Low engine oil level
indicator lamp (A1e12) |
|
|
|
Oil level correct.
Engine: at Idle
Activate test mode 5.
|
Readout in odometer:
    Oil level OK, indicaor: OFF Oil level OK, indicaor: OFF
  Oil level not OK, indicaor: Oil level not OK, indicaor:
ON
|
Wiring,
Oil level switch (S43) |
| 8.0 |
|
Electronic speedo-
meter (A1p8)
Vehicles with ESP or vehicles with ASR or ETS
as of 9/95:
For left front axle VSS sensor (L6/1) output (feed signal to A1p8) from the Traction System control module (N47).
See D.M., Chassis and Drivetrain,
Vol. 3, 9.3  23 23
or
Vol. 3, 10.1  23 23 |
W16
|
|
N47
 1
(1) |
Disconnect connector from N47 (Figure 11, or 12).
Connect signal generator and set to a voltage amplitude of approx. 10 V
Ignition: ON |
With increasing frequency the speed on the speedometer increases. |
Wiring,
A1.
Values OK: N47-1 or N47-2,
D.M., Chassis and Drivetrain,
Volume 3 - 9.3 >23
N47-5
D.M., Chassis and Drivetrain,
Volume 3 - 10.1 > 23 |
| 9.0 |
|
Outside temperature
display (A1p4) |
9  |
X24
 |
 10
|
Disconnect 2-pole
connector X24 ( Figure
10).
Connect resistance
substitution unit.
Ignition: ON
Resistance substitution
unit setting:
53 k 
9.8 k 
1 k 
|
Display in
A1p4:
 - 30 °C - 30 °C
 0 °C 0 °C
 + 50 °C + 50 °C |
Wiring,
A1,
 9.1 9.1 |
| 9.1 |
6 |
Outside temperature indicator temperature sensor (B14) |
|
|
|
Ignition: ON
Activate test mode 6.
53 k 
9.8 k 
3.7 k 
1.6 k  |
Readout in odometer:
 - 30 °C - 30 °C
 0 °C 0 °C
 20 °C 20 °C
 40 °C 40 °C |
B14 |
| 10.0 |
|
ECT gauge (A1p1) |
W11
 |
|
B13

|
Disconnect plug on ECT
gauge sensor (B13).
Connect resistance
substitution unit.
Ignition: ON
Resistance substitution
unit setting:
110 
67 
38 
20  |
Display in
A1p1:
 60 °C 60 °C
 80 °C 80 °C
 100 °C 100 °C
 120 °C 120 °C |
Wiring,
A1
Values OK:
B13
|
| 11.0 |
|
Instrument cluster (A1)
Data line from traction system control module (N47)
ETS or ASR:
ESP: |
N47
7  (1) (1)
9  (1) (1) |
|
A1
 14
(2)
 14
(2) |
Remove A1
Disconnect connector 2 |
 5 5 
|
Wiring,
Values OK:
N47,
D.M., Chassis and Drivetrain,
Vol. 3, 9.3 >23 or
D.M., Chassis and Drivetrain,
Vol. 3, 10.1 >23 |

 Printable version


 12
12  11
11 digital readout


 = Standard fuel tank
  =Fuel tank with pass-through (non-U.S.)


 5
5 